
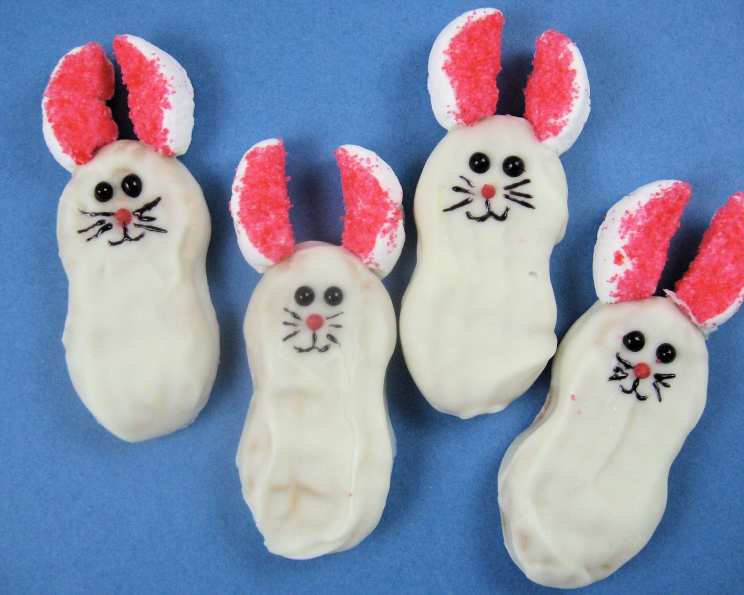
Hoppy Easter Treats: Nutter Butter Bunnies
The scent of peanut butter and melted chocolate instantly transports me back to childhood Easters. My grandmother, with her flour-dusted apron and twinkling eyes, always had a secret weapon in her Easter basket arsenal: peanut butter eggs. They were messy, imperfect, and utterly delicious. These Nutter Butter Bunnies capture that same whimsical spirit – a little bit playful, a little bit homemade, and completely irresistible. Imagine the delight on your loved ones’ faces when they see these adorable, edible bunnies hopping into their Easter baskets. They’re a guaranteed hit, and surprisingly easy to make!
Recipe Overview
- Prep Time: 30 minutes
- Cook Time: None
- Total Time: 55 minutes
- Servings: 16
- Yield: 16 Bunnies
- Dietary Type: Vegetarian
Ingredients
- 16 Nutter Butter sandwich cookies
- 12 ounces white chocolate candy melts or 12 ounces white chocolate chips
- 8 marshmallows (for ears)
- 1 tablespoon granulated sugar or 1 tablespoon pink sugar
- Pink food coloring (omit if using colored sugar)
- Black decorating gel, tube with decorating tip (I prefer to use a fine-tipped paintbrush to draw the mouth and whiskers)
- Pink decorating icing, tube with decorating tip (I used a tube of Wilton red decorating candy)
- Wax paper
Equipment Needed
- Microwave-safe bowl
- Wax paper
- Knife or kitchen shears
- Small bowl (for sugar)
- Spoon
- Fine-tipped paintbrush (optional)
Instructions
-
Start by preparing your workspace. Lay a sheet of wax paper on the counter top. This will prevent the chocolate from sticking.
-
Prepare the bunny ears. In a small bowl, mix together the pink food coloring and the granulated sugar (or use pre-colored sugar). If using food coloring, add just a drop or two until you achieve your desired shade of pink.
-
Shape the ears. Cut each marshmallow in half to form two circles. Then, cut each circle in half again. You should now have four marshmallow “ears” from each marshmallow.
-
Sugar the ears. Press the sticky part of each marshmallow ear into the pink sugar, ensuring it’s well coated. Shake off any excess sugar. Set the sugared ears aside.
-
Melt the chocolate. Melt the white chocolate candy melts (or white chocolate chips) as instructed on the package. I find the microwave to be the easiest method. Use 30-second intervals, stirring in between, to prevent burning. Ensure the chocolate is smooth and completely melted.
-
Dip the cookies. Dip each Nutter Butter cookie into the melted chocolate, ensuring it’s fully coated.
-
Remove excess chocolate. Gently shake off any excess melted chocolate to avoid a thick or uneven coating.
-
Place on wax paper. Lay the chocolate-covered Nutter Butter cookies on the wax paper.
-
Attach the ears. Before the chocolate sets, position two marshmallow ears at the top of each bunny head and gently press them into the candy coating. Make sure they are securely attached.
-
Allow the coating to harden. Let the chocolate coating harden completely for 20-30 minutes. You can speed this process up by placing the bunnies in the refrigerator for a shorter amount of time (about 10-15 minutes).
-
Re-attach ears if needed. If the ears don’t adhere properly to the bunny head, you can use a small dab of white frosting or a bit of the melted chocolate to re-attach them later.
-
Add the eyes. Using a tube of black decorating gel, pipe two small eyes onto each cookie.
-
Add the nose. Next, pipe on the nose using the pink/red decorating icing.
-
Let the nose harden. At this point, allow the nose icing to harden for 10-15 minutes so you don’t smear it when applying the whiskers. This step is crucial for a clean, professional look.
-
Draw the mouth and whiskers. For the mouth and whiskers, you can pipe them directly onto the bunny. However, I find it easier to squirt a small amount of black decorating gel onto the wax paper, then use a fine-tipped paintbrush to draw on the mouth and whiskers. This allows for greater control and finer lines.
Expert Tips & Tricks
- Melting Chocolate Mastery: When melting white chocolate, patience is key. Heat it in short intervals, stirring frequently, to avoid scorching or seizing. If the chocolate becomes too thick, add a tiny amount of vegetable oil (a teaspoon at a time) to thin it out.
- Ear Security: To ensure the marshmallow ears stay put, slightly dampen the back of the marshmallow with a tiny bit of water before pressing it into the melted chocolate.
- Neat Decorating: For precise decorating, use a toothpick to clean up any stray icing or chocolate.
- Tinting White Chocolate: If you want pastel-colored bunnies, you can tint the melted white chocolate with gel food coloring. Add the coloring a drop at a time until you reach your desired shade. Avoid liquid food coloring, as it can make the chocolate seize.
- Make-Ahead Prep: The sugared marshmallow ears can be prepared a day in advance and stored in an airtight container.
- Chocolate Substitute: If you don’t have candy melts or white chocolate chips, you can use almond bark as a substitute.
Serving & Storage Suggestions
Serve these adorable Nutter Butter Bunnies as a delightful treat in Easter baskets, at Easter brunch, or as a festive dessert. To make them even more appealing, arrange them on a pretty platter lined with pastel-colored tissue paper or artificial grass.
Store the finished bunnies in an airtight container at room temperature. They will last for up to a week. Avoid storing them in the refrigerator, as the chocolate may bloom (develop a white, powdery coating) due to condensation. If you live in a warm climate, you can store them in the refrigerator, but be sure to wrap them well to prevent moisture absorption.
Nutritional Information
| Nutrient | Amount per Serving | % Daily Value |
|---|---|---|
| Calories | 195.7 kcal | N/A |
| Calories from Fat | N/A | 45% |
| Total Fat | 9.8 g | 15% |
| Saturated Fat | 4.8 g | 24% |
| Cholesterol | 4.5 mg | 1% |
| Sodium | 73.5 mg | 3% |
| Total Carbohydrate | 25.4 g | 8% |
| Dietary Fiber | 0.3 g | 1% |
| Sugars | 20.3 g | N/A |
| Protein | 2.5 g | 5% |
Note: Nutritional information is an estimate and may vary based on specific ingredients and portion sizes.
Variations & Substitutions
- Dark Chocolate Bunnies: Use dark chocolate candy melts or chips instead of white chocolate for a richer flavor.
- Peanut-Free Bunnies: Substitute the Nutter Butter cookies with another type of sandwich cookie, such as vanilla wafers or chocolate cookies.
- Coconut Bunnies: Sprinkle shredded coconut on the melted white chocolate before it sets for a tropical twist.
- Sprinkle Bunnies: Add festive sprinkles to the melted chocolate for extra color and fun.
- Flavor Extracts: Add a drop of your favorite flavor extract (such as vanilla, almond, or peppermint) to the melted white chocolate for a unique flavor.
FAQs (Frequently Asked Questions)
Q: Can I use regular chocolate chips instead of candy melts?
A: Yes, you can. However, candy melts tend to melt more smoothly and set more firmly than chocolate chips. If using chocolate chips, you may need to add a small amount of shortening or vegetable oil to help them melt properly.
Q: How do I prevent the chocolate from seizing when melting it?
A: The key is to heat the chocolate gently and avoid adding any water or moisture to it. Use short intervals in the microwave (30 seconds at a time), stirring in between, or melt it over a double boiler.
Q: Can I make these bunnies ahead of time?
A: Absolutely! They can be made a day or two in advance and stored in an airtight container at room temperature.
Q: What if I don’t have decorating gel for the eyes and whiskers?
A: You can use melted chocolate or even a mixture of powdered sugar and a small amount of water to create a glaze for the eyes and whiskers.
Q: My marshmallow ears are sliding off. What can I do?
A: Make sure the melted chocolate is still wet when you attach the ears. You can also use a toothpick to create small indentations in the chocolate where the ears will go to help them adhere better.
Final Thoughts
These Nutter Butter Bunnies are more than just a sweet treat; they’re a delightful project that brings joy to both the maker and the recipient. So, gather your ingredients, unleash your inner artist, and create a batch of these adorable bunnies to brighten up your Easter celebrations. Don’t be afraid to experiment with different colors, sprinkles, and decorations to make them your own. And, most importantly, have fun! Let me know in the comments how yours turn out!