
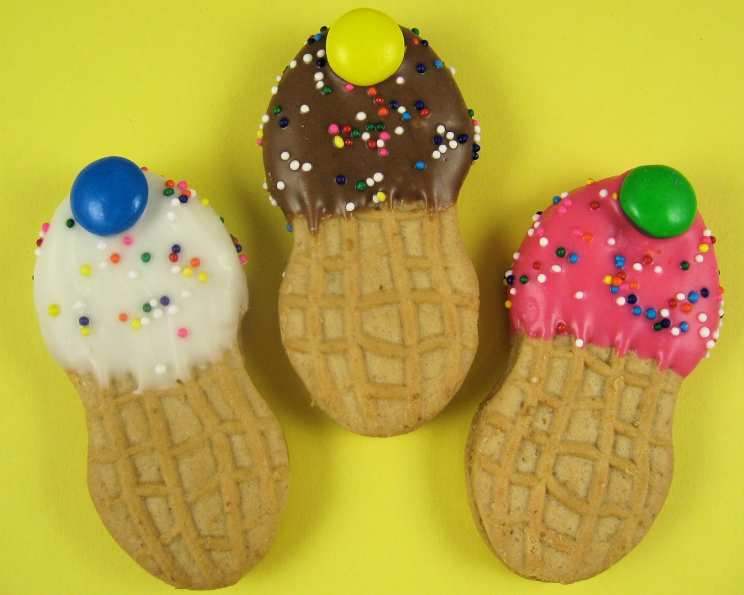
Nutter Butter Ice Cream Cones: A Sweet Bite of Nostalgia
The aroma of peanut butter always takes me back to childhood summers. I can almost feel the sticky sweetness on my fingers as I carefully constructed miniature ice cream sandwiches with Nutter Butters and a scoop of vanilla. Those were simple joys, and these Nutter Butter Ice Cream Cones are a playful, elevated take on that beloved memory. They’re a delightful blend of sweet, salty, and fun – perfect for bringing smiles to faces of all ages. Each bite is a tiny burst of happiness, reminding me of carefree days and the pure pleasure of a sweet treat.
Recipe Overview
- Prep Time: 30 minutes
- Cook Time: 5 minutes
- Total Time: 35 minutes
- Yields: 15 Ice Cream Cones
- Serves: 15
- Dietary Type: Vegetarian
Ingredients
- 15 Nutter Butter sandwich cookies
- 2 ounces white chocolate candy melts
- 2 ounces white chocolate candy melts, plus pink food coloring or red food coloring
- 2 ounces peanut butter chips, plus ½ – 1 ounce semi-sweet chocolate chips
- M&M’s
- Multi-color non-pareils
- Wax paper
Equipment Needed
- Small microwave-safe dishes
- Microwave
- Spoon or fork for dipping
- Wax paper lined baking sheet
Instructions
-
Prepare a clean surface by laying a sheet of wax paper on your countertop. This will prevent your decorated cookies from sticking.
-
Vanilla Ice Cream Cones: In a small, microwave-safe dish, place 2 ounces of white chocolate candy melts.
-
Microwave the candy melts at 50% power for about a minute. This lower power setting helps prevent the chocolate from scorching.
-
Stir the candy melts thoroughly. If not fully melted, continue microwaving in short, 15-20 second intervals, stirring after each interval. Be cautious not to overcook the chocolate, as this can cause it to seize up. If this happens, add a tiny amount of vegetable shortening and stir until smooth again.
-
Take one Nutter Butter cookie and dip the top half into the melted white chocolate. Ensure the cookie is evenly coated.
-
Place the chocolate-dipped cookie on the wax paper.
-
Immediately sprinkle the wet white chocolate with multi-color non-pareils for a festive touch.
-
Top the sprinkles with a single M&M to resemble the “cherry” on top of your ice cream cone.
-
Strawberry Ice Cream Cones: In a separate microwave-safe dish, place the remaining 2 ounces of white chocolate candy melts.
-
Add a small amount of pink or red food coloring to the white chocolate. Mix until the chocolate is a uniform shade of pink/red.
-
Repeat the dipping and decorating process as described above, using the pink-tinted white chocolate. Dip the top half of a Nutter Butter cookie into the melted pink chocolate, then place it on the wax paper. Sprinkle with multi-color non-pareils and top with an M&M.
-
Chocolate Ice Cream Cones: In another small, microwave-safe dish, combine 2 ounces of peanut butter chips with ½ to 1 ounce of semi-sweet chocolate chips. The amount of semi-sweet chocolate will depend on how dark you want your chocolate “ice cream” to be.
-
Microwave the peanut butter and chocolate chips at 50% power for 45 seconds.
-
Stir the mixture. Continue microwaving in 15-20 second intervals, stirring after each interval, until completely melted and smooth. It’s helpful to add a tiny amount of vegetable shortening here as well, to ensure a smooth, glossy finish.
-
Repeat the dipping and decorating process. Dip the top half of a Nutter Butter cookie into the melted peanut butter-chocolate mixture, then place it on the wax paper. Sprinkle with multi-color non-pareils and top with an M&M.
-
Allow the decorated Nutter Butter Ice Cream Cones to harden completely before serving. This will take approximately 15-20 minutes at room temperature, or you can speed up the process by placing them in the refrigerator for about 10 minutes.
-
Once hardened, enjoy your adorable and delicious treats!
Expert Tips & Tricks
- Melting Chocolate: Patience is key when melting chocolate! Using a lower power setting and short intervals prevents burning and seizing. If the chocolate does seize, a tiny bit of vegetable shortening can often bring it back to a smooth consistency.
- Coloring White Chocolate: When adding food coloring to white chocolate, use gel food coloring rather than liquid. Gel food coloring is more concentrated and less likely to affect the consistency of the chocolate.
- Achieving the Perfect Dip: For a clean, even dip, gently tap the cookie against the side of the bowl after dipping to remove any excess chocolate.
- Securing the Sprinkles: Sprinkle the non-pareils immediately after dipping the cookies in the melted chocolate. The warm chocolate acts as an adhesive, ensuring the sprinkles stick properly.
- Make-Ahead Prep: You can melt the chocolates and prepare the decorations ahead of time. Just store the melted chocolate in a warm place (or re-melt as needed) and have your sprinkles and M&Ms ready to go.
- Consider using different types of sprinkles! Jimmies, edible glitter, and mini chocolate chips can all be used to make your ice cream cone cookies even more creative.
Serving & Storage Suggestions
These Nutter Butter Ice Cream Cones are best served chilled or at room temperature. Arrange them artfully on a platter for a party or enjoy them as a fun afternoon snack.
To store, keep the cookies in an airtight container at room temperature. They will stay fresh for up to 3-4 days. Avoid refrigerating them, as the chocolate can develop a bloom (a white coating) due to condensation. If you live in a warm climate, storing them in the refrigerator is acceptable, but be aware of the potential for bloom.
Nutritional Information
Please note that this is an estimate and may vary based on specific ingredients used.
| Nutrient | Amount per Serving | % Daily Value |
|---|---|---|
| Calories | 140 kcal | 7% |
| Total Fat | 7g | 9% |
| Saturated Fat | 3g | 15% |
| Cholesterol | 2mg | 1% |
| Sodium | 70mg | 3% |
| Total Carbohydrate | 17g | 6% |
| Dietary Fiber | 1g | 4% |
| Sugars | 12g | – |
| Protein | 2g | 4% |
Variations & Substitutions
- Vegan Version: Use vegan Nutter Butter cookies (some brands offer vegan options) and dairy-free chocolate.
- Gluten-Free: While standard Nutter Butters are not gluten-free, you can adapt this recipe using gluten-free peanut butter cookies and decorate them in the same style.
- Different Chocolate: Experiment with dark chocolate, milk chocolate, or even flavored candy melts like mint or salted caramel.
- Nut-Free: If allergies are a concern, substitute the Nutter Butters with a different type of cookie and use sunflower seed butter chips instead of peanut butter chips for the chocolate coating. Always double-check ingredient labels to ensure they are safe for those with allergies.
FAQs (Frequently Asked Questions)
Q: Can I use regular chocolate chips instead of candy melts?
A: Yes, you can use regular chocolate chips, but candy melts tend to melt smoother and set harder, making them ideal for dipping.
Q: How do I prevent the chocolate from getting lumpy when melting?
A: Use a low power setting (50%) on your microwave and melt the chocolate in short intervals, stirring frequently. Overheating is the most common cause of lumpy chocolate.
Q: Can I make these ahead of time?
A: Absolutely! These cookies can be made a day or two in advance and stored in an airtight container at room temperature.
Q: My M&Ms keep sliding off. What am I doing wrong?
A: Make sure the chocolate is still wet when you place the M&M on top. If the chocolate has already started to set, it won’t adhere properly.
Q: What can I use instead of non-pareils?
A: Get creative! Try using chopped nuts, crushed pretzels, mini chocolate chips, or sprinkles in different shapes and colors.
Final Thoughts
These Nutter Butter Ice Cream Cones are more than just a recipe; they’re a delightful experience. The simple act of dipping and decorating transforms humble cookies into whimsical treats that are sure to bring joy to everyone who tries them. So gather your ingredients, unleash your creativity, and prepare to indulge in a sweet bite of nostalgia. Don’t be afraid to experiment with different flavors and decorations to make them your own. And most importantly, have fun! I’d love to hear about your variations and see your creations, so please share your feedback and photos. Pair these adorable cones with a glass of cold milk or a scoop of your favorite ice cream for the ultimate sweet treat experience.