
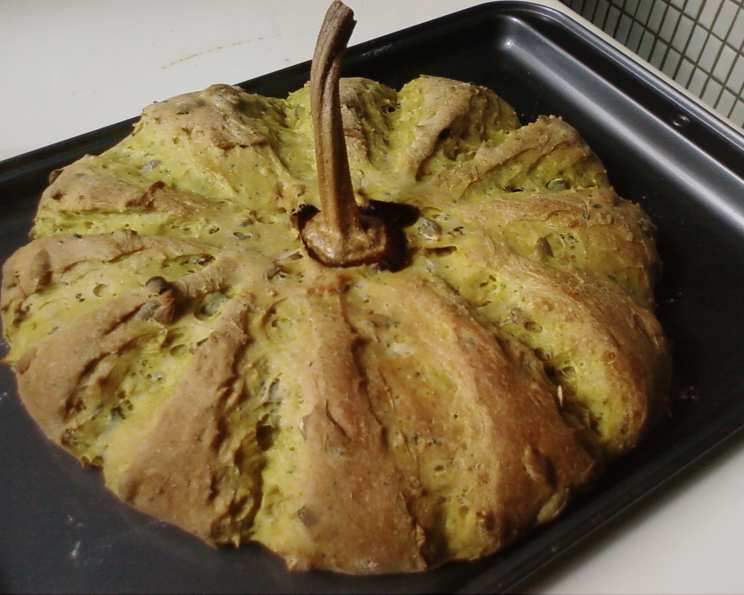
Nutty Pumpkin Yeast Bread: A Culinary Ode to Autumn
The scent of yeast blooming and pumpkin baking—it’s a memory etched in my mind, always taking me back to crisp autumn days spent in my grandmother’s kitchen. She had a knack for turning the simplest ingredients into something extraordinary, and this Nutty Pumpkin Yeast Bread is my attempt to capture that magic. I remember the golden-brown loaf, shaped like a plump pumpkin, sitting proudly on her counter. The aroma alone was enough to make your mouth water, and the taste? A perfect balance of savory and sweet, with a delightful crunch from the seeds. It’s more than just bread; it’s a warm, comforting hug in every slice.
Recipe Overview
- Prep Time: 3 hours
- Cook Time: 20-30 minutes
- Total Time: 3 hours 30 minutes
- Yields: 16 slices
- Serves: 8
- Dietary Type: Vegetarian
Ingredients
- 1 cup pumpkin juice (240g) (blend equal parts of water and pumpkin puree and measure out exactly 1 cup)
- 1 tablespoon water, to adjust dough wetness
- 4 teaspoons oil (56g) (half vegetable oil and half butter)
- 3 cups bread flour (360g) (up to half can be whole wheat flour)
- 1 1/4 teaspoons salt
- 2 teaspoons sugar
- 2 1/2 teaspoons yeast
- 1/2 cup sesame seeds
- 1/2 cup pumpkin seeds
Equipment Needed
- Bread machine (optional)
- Mixing bowl
- Measuring cups and spoons
- Kitchen scale (optional but recommended for accuracy)
- Baking sheet
- Parchment paper (optional)
- Scissors
- Oven
- Instant-read thermometer
Instructions
-
Prepare the Pumpkin Juice: If you don’t have pre-made pumpkin juice, you can easily make your own. Simply blend water with pumpkin puree. Alternatively, you can use steamed pumpkin flesh, skin on, for a more intense flavor. I even add the seeds because my blender is sharp enough to pulverize them. The key is to measure out exactly 1 cup (240g) of this mixture.
-
Combine Ingredients (Bread Machine Method): If using a bread machine, add the following ingredients in the order specified by your machine’s manufacturer: pumpkin juice, oil, bread flour, salt, sugar, yeast, and sesame seeds. Select the dough cycle and let the machine do its work.
-
Combine Ingredients (Hand Mixing Method): In a large mixing bowl, combine the pumpkin juice, oil, bread flour, salt, sugar, yeast, and sesame seeds. Mix until a shaggy dough forms. Turn the dough out onto a lightly floured surface and knead for 8-10 minutes, until smooth and elastic. Add the water, one tablespoon at a time, until the dough is just right.
-
Incorporate the Pumpkin Seeds: Once the dough cycle is complete (or after kneading by hand), knead in the pumpkin seeds by hand. This prevents the green skins of the pumpkin seeds from falling off during the machine’s spinning. Gently fold them into the dough until evenly distributed.
-
First Proofing: Form the dough into a ball and place it in a lightly oiled bowl, turning to coat. Cover the bowl with plastic wrap or a clean kitchen towel. Let the dough rise in a warm place for about an hour, or until doubled in size.
-
Shape the Pumpkin: After the first proof, gently punch down the dough to release the air. Place the dough on a baking sheet lined with parchment paper (optional). Re-form it into a ball. Now for the fun part: insert the saved stem from your pumpkin into the top of the dough ball. If you don’t have a stem, you can use a small piece of cinnamon stick as a substitute.
-
Create the Pumpkin Slits: Using scissors, cut slits into the dough, mimicking the segments of a pumpkin. Make three cuts, spaced evenly around the dough. Repeat the cuts every 20 minutes over the next hour, in the same places, to enhance the pumpkin-like appearance. This will ensure that the dough rises in a way that accentuates the pumpkin shape.
-
Second Proofing: During the hour of shaping and cutting slits, spray the dough with water from time to time to keep it moist and prevent a skin from forming. Let the dough continue to proof until it has doubled in size, about another hour. Be aware that the dough might grow sideways, depending on its consistency.
-
Baking: After the second proof, spray the dough with some water one last time to encourage a shiny crust. Bake in a preheated oven at 180 degrees Celsius (350 degrees Fahrenheit) for 20-30 minutes. The bread is done when it has a beautiful golden-brown color and an instant-read thermometer inserted into the center registers 80 degrees Celsius (176 degrees Fahrenheit).
-
Cooling: Once baked, remove the bread from the oven and let it cool completely on a wire rack before slicing and serving.
Expert Tips & Tricks
- Pumpkin Juice Consistency: The consistency of your pumpkin juice is crucial. If it’s too thick, the dough will be dry. If it’s too thin, the dough will be sticky. Adjust with small amounts of water or flour as needed.
- Dough Temperature: The ideal dough temperature for yeast activity is around 24-27 degrees Celsius (75-80 degrees Fahrenheit). If your kitchen is cold, you can warm the pumpkin juice slightly before adding it to the other ingredients.
- Scoring Depth: Be careful not to cut the slits too deeply during shaping. You want to create definition without completely separating the segments.
- Oven Calibration: Ovens can vary in temperature. Use an oven thermometer to ensure your oven is accurately calibrated.
- Steam: For a crispier crust, place a pan of hot water on the bottom rack of the oven during baking. This will create steam and help the bread rise properly.
Serving & Storage Suggestions
Serve the Nutty Pumpkin Yeast Bread warm or at room temperature. It’s delicious on its own, or you can spread it with butter, cream cheese, or a drizzle of honey. It also pairs well with soups, stews, and salads.
To store, wrap the bread tightly in plastic wrap or place it in an airtight container. It will keep at room temperature for 2-3 days, in the refrigerator for up to a week, or in the freezer for up to 2 months. To reheat, wrap the bread in foil and warm it in a 180 degrees Celsius (350 degrees Fahrenheit) oven for 10-15 minutes.
Nutritional Information
| Nutrient | Amount per Serving | % Daily Value |
|---|---|---|
| Calories | 299.1 kcal | N/A |
| Calories from Fat | N/A | 34% |
| Total Fat | 11.2 g | 17% |
| Saturated Fat | 1.7 g | 8% |
| Cholesterol | 0 mg | 0% |
| Sodium | 366.7 mg | 15% |
| Total Carbohydrate | 41.2 g | 13% |
| Dietary Fiber | 3.2 g | 12% |
| Sugars | 1.5 g | 6% |
| Protein | 9.5 g | 19% |
Variations & Substitutions
- Whole Wheat Version: Substitute up to half of the bread flour with whole wheat flour for a nuttier flavor and added fiber.
- Sweet Pumpkin Bread: Increase the sugar to 1/4 cup and add 1/2 teaspoon of pumpkin pie spice for a sweeter bread.
- Gluten-Free: Substitute the bread flour with a gluten-free bread flour blend. You may need to adjust the liquid accordingly.
- Vegan: Ensure that the butter in the oil mixture is replaced with a vegan alternative.
- Seed Variations: Experiment with different types of seeds, such as sunflower seeds, flax seeds, or chia seeds.
FAQs (Frequently Asked Questions)
Q: Can I use canned pumpkin puree instead of making my own pumpkin juice?
A: Yes, you can. Just blend equal parts of canned pumpkin puree and water to create the pumpkin juice. Make sure to measure out exactly 1 cup (240g).
Q: What if I don’t have a bread machine?
A: No problem! You can easily make this bread by hand. Just follow the hand mixing instructions in step 3.
Q: My dough isn’t rising. What should I do?
A: Make sure your yeast is fresh and that your kitchen is warm enough. You can also try placing the dough in a slightly warm oven (turned off) to encourage rising.
Q: Can I make this bread ahead of time?
A: Yes, you can make the dough ahead of time and store it in the refrigerator for up to 24 hours. Just punch it down before shaping and baking.
Q: The crust is getting too brown during baking. What should I do?
A: Tent the bread with foil to prevent it from browning too quickly.
Final Thoughts
I hope this Nutty Pumpkin Yeast Bread brings as much joy to your kitchen as it does to mine. It’s a simple recipe, but with a little care and attention, you can create a truly stunning and delicious loaf. Don’t be afraid to experiment with different variations and make it your own. And most importantly, share it with loved ones and enjoy the warmth and comfort it brings. Happy baking!