
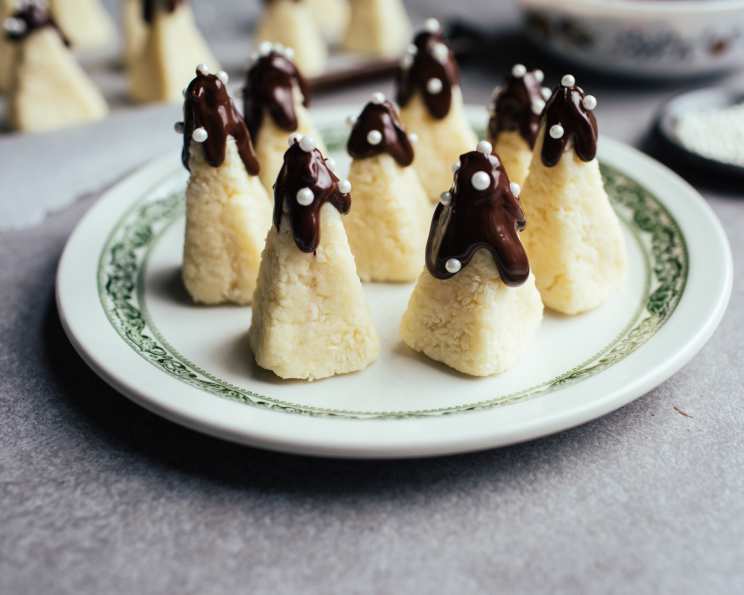
O Sweet Christmas Tree
The scent of coconut always transports me back to childhood Christmases. My grandmother, a woman of endless holiday spirit, would always have a platter of colorful coconut treats nestled amongst the gingerbread men and sugar cookies. While I couldn’t resist a gingerbread man, it was always her coconut creations that stole my heart. These little coconut trees are an homage to her, a way to carry on that tradition and share the same joy with my own family.
Recipe Overview
- Prep Time: 20 minutes
- Cook Time: 0 minutes
- Total Time: 40 minutes
- Yields: 25 trees
- Dietary Type: Vegetarian
Ingredients
- ¼ cup butter or ¼ cup margarine, melted
- 2 cups powdered sugar
- 2 tablespoons half-and-half cream
- 3 cups coconut
- Green food coloring (optional)
- 3 ounces chocolate, for dipping
- Decorative candies (silver balls)
Equipment Needed
- Mixing Bowl
- Microwave or Double Boiler (for melting chocolate)
- Wax Paper or Parchment Paper
Instructions
-
In a mixing bowl, combine the melted butter (or margarine), powdered sugar, and half-and-half cream. Mix well until a smooth, pliable dough forms.
-
If desired, add green food coloring to the dough. Start with a few drops and gradually add more until you achieve your desired shade of green. Mix thoroughly to ensure the color is evenly distributed throughout the dough.
-
While the dough is still warm and pliable, take about a tablespoon amount (adjust to your desired tree size).
-
Using your fingertips, gently shape the dough into an upside-down cone, resembling a standing fir tree. Avoid rolling the dough; instead, firmly squeeze it together so that it adheres well. This helps the trees maintain their shape.
-
Stand one end of the shaped dough on your work surface. Gently shape it into a fir tree by pressing fairly firmly. This will help give it the characteristic Christmas tree shape.
-
Avoid making the tip too sharp, as it needs to accommodate the decorative ball later. A slightly rounded tip will work best.
-
Repeat steps 3-6 until all the dough is shaped into trees.
-
Melt the chocolate using your preferred method (microwave or double boiler). If microwaving, heat in 30-second intervals, stirring in between, to prevent burning.
-
Dip the tops of the coconut trees into the melted chocolate. Ensure the chocolate coats the top portion of the tree evenly.
-
While the chocolate is still soft, carefully place a silver ball (or your chosen decorative candy) on the tip of each tree.
-
Place the finished trees on wax paper or parchment paper to allow the chocolate to set completely. This usually takes about 20-30 minutes at room temperature, or you can speed up the process by placing them in the refrigerator for a shorter time.
Expert Tips & Tricks
- For a richer flavor, use melted butter instead of margarine.
- If the dough is too sticky, add a little more powdered sugar, a tablespoon at a time, until it reaches a manageable consistency. If it’s too dry, add a tiny bit more half-and-half.
- To prevent the chocolate from seizing when melting, avoid getting any water or steam into it.
- Use high-quality chocolate for a smoother, more flavorful coating.
- Get creative with your decorations! Instead of silver balls, try using sprinkles, edible glitter, or chopped nuts.
- If you want to add a little something extra to the flavor of your coconut mixture, consider adding a dash of vanilla or almond extract.
Serving & Storage Suggestions
These sweet little Christmas trees are perfect for serving on dessert platters, as part of a holiday buffet, or as edible gifts. They make a delightful addition to any festive gathering.
Store the coconut trees in an airtight container at room temperature for up to 3 days, or in the refrigerator for up to a week. If storing in the refrigerator, allow them to come to room temperature before serving for the best texture. Freezing is not recommended as it can affect the texture of the coconut.
Nutritional Information
| Nutrient | Amount per Serving | % Daily Value |
|---|---|---|
| Calories | 139.7 kcal | N/A |
| Calories from Fat | 93 g | 67% |
| Total Fat | 10.4 g | 15% |
| Saturated Fat | 8.2 g | 41% |
| Cholesterol | 5.3 mg | 1% |
| Sodium | 21.5 mg | 0% |
| Total Carbohydrate | 13.1 g | 4% |
| Dietary Fiber | 2.2 g | 8% |
| Sugars | 10.2 g | 40% |
| Protein | 1.2 g | 2% |
Variations & Substitutions
- Vegan Option: Substitute the butter with a vegan butter alternative and the half-and-half cream with coconut cream or another non-dairy creamer. Use vegan chocolate for dipping.
- Peppermint Trees: Add a few drops of peppermint extract to the coconut mixture for a refreshing twist. Crush peppermint candies and sprinkle them over the melted chocolate before it sets.
- Chocolate Coconut Trees: Add a tablespoon or two of cocoa powder to the coconut mixture for a chocolatey flavor.
- Nutty Trees: Incorporate finely chopped nuts, such as almonds, walnuts, or pecans, into the coconut mixture for added texture and flavor.
- Different Chocolate: Use white chocolate for a snowy effect! A drizzle of dark chocolate over the white makes a nice contrast.
FAQs (Frequently Asked Questions)
Q: Can I make these ahead of time?
A: Yes! These trees can be made a day or two in advance. Store them in an airtight container at room temperature or in the refrigerator.
Q: What if my chocolate seizes up when melting?
A: The most common cause of chocolate seizing is moisture. Try adding a teaspoon of vegetable oil or shortening to the chocolate and gently stir until it becomes smooth again. Avoid overheating.
Q: Can I use sweetened coconut instead of unsweetened?
A: Yes, but you may need to reduce the amount of powdered sugar to prevent the trees from being overly sweet. Taste and adjust as needed.
Q: My dough is too crumbly. What can I do?
A: Add a tiny bit more half-and-half cream, a teaspoon at a time, until the dough comes together.
Q: Can I use different colors of food coloring?
A: Absolutely! Get creative and use different colors for a vibrant and festive look. You could even make rainbow trees!
Final Thoughts
These “O Sweet Christmas Tree” treats are more than just a recipe; they’re a journey back to simpler times and a chance to create lasting memories. Whether you’re a seasoned baker or just starting out, this recipe is easy enough to tackle and impressive enough to delight. So, gather your ingredients, put on some holiday music, and let the spirit of Christmas fill your kitchen as you create these adorable and delicious little trees. Share them with friends and family, and watch their faces light up with joy. I hope you find as much pleasure in making and sharing these treats as I do!