
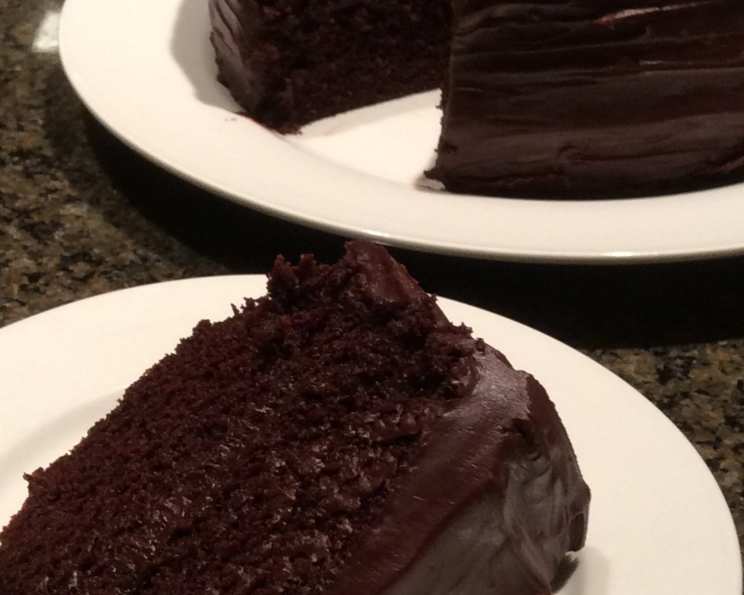
Old Fashioned Chocolate Cake With Glossy Chocolate Icing
The scent of chocolate still vividly recalls my childhood. Every year, my grandmother would bake a towering chocolate cake for my birthday, its dark, rich aroma filling her cozy kitchen. The cake itself was incredibly moist, never dry, and the glossy chocolate icing would gleam like dark jewels. It wasn’t just a cake; it was a symbol of love, family, and countless happy memories. This recipe attempts to recapture some of that magic, bringing a touch of old-fashioned goodness to your own kitchen.
Recipe Overview
- Prep Time: 30 minutes
- Cook Time: 35-40 minutes
- Total Time: 1 hour 10 minutes (plus cooling time)
- Servings: 12
- Yield: 1 layer cake
- Dietary Type: Egg-Free
Ingredients
Cake:
- 3 cups all-purpose flour
- 2 cups sugar
- ½ cup unsweetened cocoa powder
- 2 teaspoons baking soda
- 1 teaspoon table salt
- 2 cups hot water
- ¾ cup vegetable oil
- 2 tablespoons white vinegar
- 1 tablespoon instant coffee granules
- 1 tablespoon vanilla extract
Glossy Chocolate Icing:
- 8 tablespoons (1 stick) unsalted butter
- 1 ½ cups sugar
- 1 ¼ cups unsweetened cocoa powder
- 1 pinch salt
- 1 ¼ cups heavy cream
- ¼ cup sour cream
- 1 teaspoon instant coffee granules
- 2 teaspoons vanilla extract
Equipment Needed
- Two 8-inch round cake pans
- Nonstick cooking spray
- Large mixing bowl
- Large measuring cup
- Whisk
- Cooling rack
- Large saucepan
Instructions
- Preheat your oven to 350°F (175°C) with a rack positioned in the center. This ensures even baking and prevents burning.
- Prepare the cake pans by spraying two 8-inch round cake pans with nonstick cooking spray. This will prevent the cake from sticking and make removal much easier. You can also line the bottom of the pans with parchment paper for extra insurance.
- In a large mixing bowl, whisk together the dry cake ingredients: 3 cups of all-purpose flour, 2 cups of sugar, ½ cup of unsweetened cocoa powder, 2 teaspoons of baking soda, and 1 teaspoon of table salt. Whisking ensures that all the ingredients are evenly distributed, which is essential for a consistent texture.
- In a separate large measuring cup, combine the wet ingredients: 2 cups of hot water, ¾ cup of vegetable oil, 2 tablespoons of white vinegar, 1 tablespoon of instant coffee granules, and 1 tablespoon of vanilla extract. The hot water helps dissolve the coffee granules, enhancing the chocolate flavor.
- Pour the wet ingredients into the dry ingredients and whisk until just combined. Don’t overmix; a few lumps are perfectly fine. Overmixing can develop the gluten in the flour, resulting in a tough cake.
- Divide the batter evenly between the two prepared cake pans (about 3 cups each). Using a kitchen scale can help ensure even layers.
- Bake for 35-40 minutes, or until a toothpick inserted into the center comes out clean. Start checking for doneness around 35 minutes. If the toothpick has wet batter on it, bake for a few more minutes and check again.
- Once baked, cool the cakes in the pans for 15 minutes on a wire rack. This allows the cakes to firm up slightly, making them easier to handle.
- After 15 minutes, invert the cakes onto the wire rack and leave them upside down until completely cooled before frosting. Cooling the cakes completely prevents the icing from melting and ensures a stable, professional finish.
- To make the glossy chocolate icing, melt 8 tablespoons (1 stick) of unsalted butter in a large saucepan over medium heat.
- Stir in 1 ½ cups of sugar, 1 ¼ cups of unsweetened cocoa powder, and a pinch of salt. The mixture will be thick and grainy at this stage, but don’t worry.
- In a separate large measuring cup, combine 1 ¼ cups of heavy cream, ¼ cup of sour cream, and 1 teaspoon of instant coffee granules, mixing until smooth. The sour cream adds a subtle tang and richness to the icing.
- Gradually add the cream mixture to the chocolate mixture in the saucepan, stirring continuously until blended and smooth. Adding the cream gradually helps prevent the cocoa powder from clumping.
- Cook the icing over medium heat until the sugar has dissolved and the mixture is smooth and hot to the touch. Be careful not to boil the icing, as this can cause it to become grainy.
- Remove the saucepan from the heat and stir in 2 teaspoons of vanilla extract. The vanilla enhances the overall flavor of the icing.
- Cool the icing at room temperature until it reaches a spreadable consistency (this can take up to three hours). The cooling process allows the icing to thicken properly.
- If the icing isn’t getting thick enough to be spreadable, place it in the refrigerator until it reaches the desired consistency. Check it frequently to prevent it from becoming too thick.
- If the icing becomes too thick to spread easily, gently warm it in the microwave in 20-second intervals, stirring well after each interval, until it reaches the desired consistency.
- Once the icing is the right consistency, stir it well and ice the cake. Frost the first layer, then place the second layer on top, and ice the top and then the sides.
Expert Tips & Tricks
- For a more intense chocolate flavor, use Dutch-processed cocoa powder.
- To prevent the cake layers from sticking, lightly dust the cooled pans with cocoa powder after spraying them with nonstick spray.
- If you’re short on time, you can prepare the cake layers a day in advance. Wrap them tightly in plastic wrap and store them at room temperature.
- To ensure even baking, use oven thermometers to verify the accuracy of your oven’s temperature.
- For a smoother icing, sift the cocoa powder and sugar before adding them to the saucepan.
Serving & Storage Suggestions
Serve the old-fashioned chocolate cake slightly chilled or at room temperature. A scoop of vanilla ice cream or a dollop of whipped cream complements the rich chocolate flavor beautifully.
Store leftover cake in an airtight container at room temperature for up to 3 days, in the refrigerator for up to a week, or in the freezer for up to 2 months. Thaw frozen cake in the refrigerator overnight before serving. To refresh the cake, you can lightly brush it with simple syrup before serving.
Nutritional Information
| Nutrient | Amount per Serving | % Daily Value |
|---|---|---|
| Calories | 657 kcal | 33% |
| Total Fat | 33.5g | 52% |
| Saturated Fat | 14g | 70% |
| Cholesterol | 57mg | 19% |
| Sodium | 436mg | 18% |
| Total Carbohydrate | 91g | 30% |
| Dietary Fiber | 5g | 20% |
| Sugars | 59g | 118% |
| Protein | 6.4g | 13% |
Note: Nutritional information is an estimate and may vary based on specific ingredients and preparation methods.
Variations & Substitutions
- Gluten-Free: Substitute the all-purpose flour with a gluten-free all-purpose blend. Be sure to add a binder like xanthan gum if the blend doesn’t already contain it.
- Dairy-Free: Replace the heavy cream and sour cream with coconut cream or a dairy-free alternative. Use a dairy-free butter substitute for the icing.
- Spice it Up: Add a pinch of cinnamon or chili powder to the cake batter for a warm, subtle kick.
- Coffee Boost: Increase the amount of instant coffee granules in both the cake and the icing for a more pronounced coffee flavor.
- Nuts: Add chopped walnuts or pecans to the cake batter or sprinkle them on top of the finished cake for added texture and flavor.
FAQs (Frequently Asked Questions)
Q: Why is there vinegar in the cake?
A: The vinegar reacts with the baking soda to create carbon dioxide, which helps the cake rise and gives it a light, airy texture.
Q: Can I use different types of oil?
A: Yes, you can substitute the vegetable oil with other neutral oils like canola oil or sunflower oil. Avoid using strongly flavored oils like olive oil, as they can affect the taste of the cake.
Q: How do I prevent the cake from sinking in the middle?
A: Make sure your oven temperature is accurate and avoid opening the oven door frequently during baking. Overbaking can also cause the cake to dry out and sink.
Q: Can I make this cake as a single layer cake?
A: Yes, you can bake the batter in a single 9×13 inch pan. Adjust the baking time accordingly, checking for doneness after about 45 minutes.
Q: What’s the best way to get a smooth frosting finish?
A: Use an offset spatula and warm it slightly under hot water. Wipe the spatula clean between each stroke for a smooth, even finish.
Final Thoughts
This old-fashioned chocolate cake is a timeless classic that’s sure to bring joy to any occasion. Don’t be intimidated by the number of steps; each one is simple and straightforward. Gather your ingredients, preheat your oven, and let the comforting aroma of chocolate fill your home. I encourage you to try this recipe and share your feedback. Perhaps pair it with a glass of cold milk or a rich cup of coffee for the ultimate indulgence!