
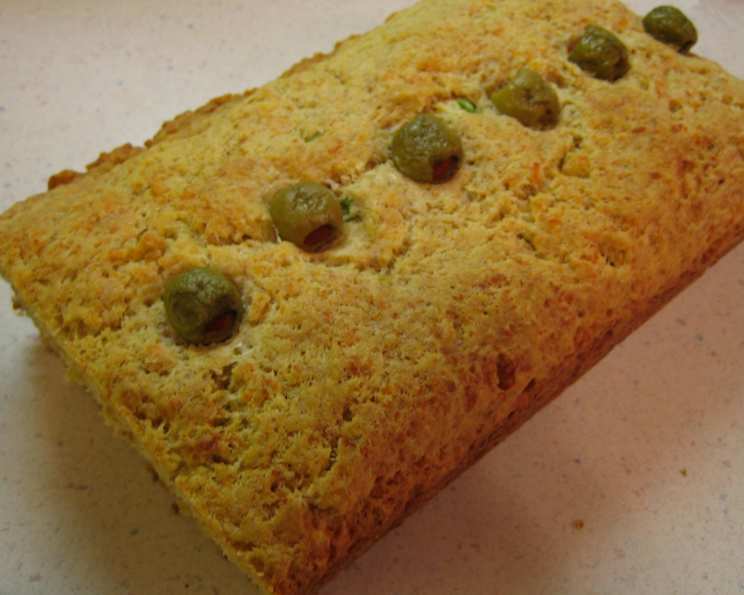
Olive-Cheese Quick Bread: A Savory Delight
The first time I tasted olive bread was at a tiny bakery in Florence, Italy. The aroma of freshly baked bread mingled with the salty tang of olives, creating an irresistible invitation. One bite of that rustic loaf, studded with plump olives and hints of herbs, transported me. I knew I had to recreate that experience at home. This Olive-Cheese Quick Bread, while not exactly that Florentine loaf, captures the essence of those flavors in a simple, satisfying bake – perfect for a cozy evening.
Recipe Overview
- Prep Time: 15 minutes
- Cook Time: 35-45 minutes
- Total Time: 50-60 minutes
- Servings: 8-10
- Yield: 1 loaf
- Dietary Type: Vegetarian
Ingredients
- 2 cups flour
- 3 teaspoons sugar
- 2 teaspoons baking powder
- ½ teaspoon baking soda
- ¼ teaspoon salt
- 1 cup shredded cheddar cheese
- 1 egg, room temperature
- ¾ cup milk (or buttermilk or water)
- ¼ cup oil
- 1 tablespoon finely chopped onion (optional)
- 35 stuffed green olives
- 1 ½ teaspoons olive oil
Equipment Needed
- Loaf pan
- Large bowl
- Medium bowl
- Measuring cups and spoons
- Whisk or fork
- Spoon or spatula
- Oven
Instructions
- Grease a loaf pan thoroughly. This step is crucial to prevent the bread from sticking. Set aside.
- Preheat your oven to 350°F (175°C). Ensure your oven is properly preheated for even baking.
- In a large bowl, combine the dry ingredients: flour, sugar, baking powder, baking soda, and salt.
- Add the shredded cheddar cheese to the dry ingredients and mix well. This ensures the cheese is evenly distributed throughout the bread.
- In a medium bowl, lightly beat the egg until just combined.
- Stir in the milk and oil into the beaten egg, mixing well until a smooth emulsion forms.
- If using, add the finely chopped onion to the egg-milk mixture and mix.
- Pour the wet ingredients into the dry ingredients. Gently stir until just moistened. Be careful not to over-mix the batter. Over-mixing develops the gluten in the flour, resulting in a tough bread. It is okay to have some lumps.
- Spoon half of the batter into the prepared loaf pan, spreading it evenly.
- Arrange 28 of the stuffed green olives on their sides on top of the batter, forming 4 rows of 7 olives each. This creates an attractive pattern and ensures each slice has plenty of olives.
- Spoon the remaining batter over the olives, smoothing the top with the back of a spoon.
- Place the remaining 7 olives evenly spaced down the center of the top of the loaf. This provides a visual indication of the deliciousness inside.
- Brush the top of the loaf with olive oil (or spray). This helps the bread brown beautifully and adds a subtle olive flavor.
- Bake for 35-45 minutes, or until a wooden pick inserted into the center comes out clean. Start checking for doneness at 35 minutes; baking times can vary depending on your oven.
- Let the bread stand in the loaf pan for 10 minutes before inverting it onto a wire rack to cool completely. This is crucial, as allowing the bread to rest helps it set and prevents it from falling apart when sliced.
- Slice and serve warm or at room temperature.
Expert Tips & Tricks
- Don’t over-mix the batter: A few lumps are perfectly fine. Over-mixing leads to a dense, tough loaf.
- Room temperature egg is key: A room-temperature egg emulsifies better, creating a smoother batter. If you forgot to take your egg out of the fridge ahead of time, place it in a bowl of warm water for a few minutes.
- Vary the cheese: Use a blend of cheeses for a more complex flavor profile.
- Customize the olives: Experiment with different types of olives, such as Kalamata or black olives, for a unique twist.
- Add herbs: Incorporate fresh or dried herbs like rosemary, thyme, or oregano into the batter for added flavor.
- Check for doneness accurately: Insert a wooden skewer into the center of the loaf. If it comes out clean, the bread is done. If it comes out with wet batter, bake for a few more minutes and check again.
Serving & Storage Suggestions
This Olive-Cheese Quick Bread is delicious served warm or at room temperature. It pairs perfectly with soups, salads, or as an appetizer with a cheese board.
- Serving: Serve sliced as part of a brunch spread, alongside a hearty soup, or as a flavorful addition to a cheese and charcuterie board. A drizzle of balsamic glaze can also elevate the presentation and taste.
- Storage: Store leftovers in an airtight container at room temperature for up to 2 days or in the refrigerator for up to 5 days. For longer storage, freeze the bread (wrapped tightly in plastic wrap and then foil) for up to 2 months.
- Reheating: To reheat, wrap the bread in foil and warm it in a 350°F (175°C) oven for 10-15 minutes, or until heated through. You can also toast slices individually.
Nutritional Information
Note: Nutritional information is an estimate and may vary based on specific ingredients used.
| Nutrient | Amount per Serving | % Daily Value |
|---|---|---|
| Calories | 269 kcal | 13% |
| Total Fat | 14.1 g | 22% |
| Saturated Fat | 4.7 g | 24% |
| Cholesterol | 44.5 mg | 15% |
| Sodium | 350.4 mg | 15% |
| Total Carbohydrate | 27 g | 9% |
| Dietary Fiber | 0.8 g | 3% |
| Sugars | 1.8 g | 4% |
| Protein | 8.3 g | 17% |
Variations & Substitutions
- Gluten-Free: Substitute the all-purpose flour with a gluten-free blend. Ensure the blend contains xanthan gum or add some to the recipe for structure.
- Dairy-Free: Use a dairy-free milk alternative (such as almond, soy, or oat milk) and a dairy-free shredded cheese.
- Herbed Version: Add 1-2 teaspoons of dried herbs like rosemary, thyme, or oregano to the dry ingredients for an herbaceous flavor.
- Spicy Kick: Incorporate a pinch of red pepper flakes into the batter for a touch of heat.
- Different Cheeses: Experiment with different types of cheese, such as Gruyere, provolone, or pepper jack, for a unique flavor profile.
- Olive Variations: Try using different types of olives, such as Kalamata, black, or a mix.
FAQs (Frequently Asked Questions)
Q: Can I use self-rising flour instead of all-purpose flour?
A: No, self-rising flour contains baking powder and salt. Using it in this recipe would throw off the balance of ingredients and likely result in a dense, salty bread.
Q: Can I make this bread ahead of time?
A: Yes, you can bake the bread a day in advance. Store it in an airtight container at room temperature. It’s often best served the day it’s made, but it’s still delicious the next day!
Q: My bread is browning too quickly. What should I do?
A: If the top of the bread is browning too quickly, tent it with aluminum foil during the last 15-20 minutes of baking. This will prevent it from burning.
Q: Can I freeze this bread?
A: Yes, you can freeze this bread for up to 2 months. Wrap it tightly in plastic wrap and then in foil. Thaw it overnight in the refrigerator before reheating.
Q: What can I serve with this olive-cheese quick bread?
A: This bread pairs perfectly with soups, salads, cheese boards, or as an appetizer with a glass of wine. It’s especially good with a creamy tomato soup or a Mediterranean salad.
Final Thoughts
This Olive-Cheese Quick Bread is a delightful addition to any meal or gathering. Its savory flavors and easy preparation make it a go-to recipe for both novice and experienced bakers. Don’t be afraid to experiment with different cheeses, olives, and herbs to create your own signature version. I encourage you to give this recipe a try and share your creations with friends and family. Perhaps serve it alongside a warm bowl of potato and ham soup for a comforting and satisfying meal! Bon appétit!