
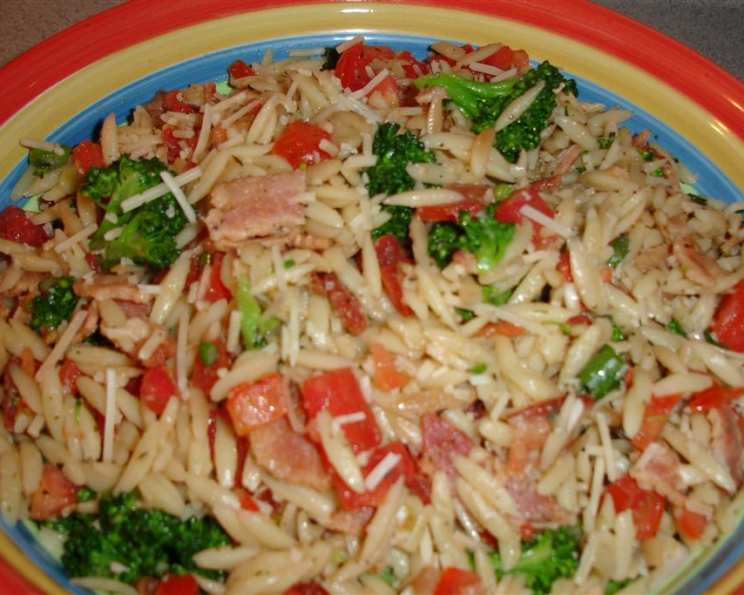
Orzo Pasta Salad: A Colorful Mediterranean Delight
I remember the first time I made orzo pasta salad. It was a sweltering summer day, and I was craving something light, refreshing, and bursting with flavor. I rummaged through my refrigerator, grabbed whatever fresh produce I could find, and tossed it all together with some cooked orzo. The result was a vibrant, satisfying salad that became an instant family favorite. That simple, impromptu creation sparked a lifelong love for orzo salads, and I’ve been experimenting with different variations ever since.
Recipe Overview
- Prep Time: 20 minutes
- Cook Time: 20 minutes
- Total Time: 40 minutes
- Servings: 4
- Yield: About 6 cups
- Dietary Type: Adaptable (see variations)
Ingredients
- 1 cup orzo pasta
- 2 cups chicken broth (vegetable broth for vegetarian option)
- 2 tablespoons olive oil
- 3 cloves garlic, pressed
- 3 green onions, sliced
- 1 teaspoon Italian seasoning
- 6 slices bacon, cooked & crumbled (omit for vegetarian/vegan)
- 1 cup broccoli florets, cooked until slightly tender
- 2 Roma tomatoes, chopped
- Salt and pepper to taste
- 1/4 cup Parmesan cheese, freshly grated (optional, omit for vegan)
Equipment Needed
- Large skillet or pot
- Cutting board
- Knife
- Garlic press
- Microwave (optional, for bacon and broccoli)
- Serving bowl
Instructions
- Begin by preparing the orzo. In a large skillet or pot, heat the olive oil over medium heat. Add the orzo pasta and pressed garlic, and sauté for about 5 minutes, or until the orzo is lightly browned, stirring frequently to prevent burning. This step adds a lovely nutty flavor to the pasta.
- Slowly pour in the chicken broth (or vegetable broth) and stir in the Italian seasoning. Be careful as the broth will sputter when it hits the hot pan.
- Bring the mixture to a boil, then reduce the heat to low, cover the pot, and simmer for approximately 20 minutes, stirring occasionally, or until most of the liquid is absorbed. The orzo should be tender but not mushy. If the orzo is still too firm after 20 minutes, add a little more broth and continue cooking.
- Once the orzo is cooked, remove it from the heat and let it cool completely. This is crucial for preventing the salad from becoming soggy. You can speed up the cooling process by spreading the orzo out on a baking sheet.
- While the orzo is cooling, prepare the other ingredients. Cook the bacon until crispy using your preferred method (see tip below for microwave method). Once cooked, crumble the bacon into small pieces.
- Cook the broccoli florets until they are slightly tender but still have a bit of bite. Steaming is a great way to preserve their vibrant green color and nutrients.
- Chop the Roma tomatoes into bite-sized pieces and slice the green onions.
- Once the orzo has cooled, transfer it to a large serving bowl. Add the crumbled bacon, cooked broccoli florets, chopped tomatoes, and sliced green onions.
- Season the salad with salt and pepper to taste. Be mindful of the saltiness of the bacon when seasoning.
- Gently toss all the ingredients together until well combined.
- If using, chill the salad in the refrigerator for at least an hour before serving. This allows the flavors to meld together beautifully.
- Just before serving, toss the orzo salad with the freshly grated Parmesan cheese (if using).
Microwave Bacon and Broccoli Tip: For a quick and easy way to cook the bacon, place the bacon slices on a paper plate lined with paper towels. Microwave on high for about 2 minutes for 4 slices, or until crispy. To steam the broccoli, place the florets in a microwave-safe bowl with a tablespoon or two of water. Cover the bowl with plastic wrap, leaving a small vent for steam to escape. Microwave on high for about 3 minutes, or until the broccoli is slightly tender.
Expert Tips & Tricks
- Toast the orzo: Before adding the broth, toasting the orzo in the olive oil enhances its nutty flavor and adds depth to the salad.
- Cook the orzo al dente: Just like with any pasta salad, cooking the orzo al dente (slightly firm to the bite) will prevent it from becoming mushy as it sits.
- Don’t overcook the broccoli: Overcooked broccoli can become soggy and lose its vibrant green color. Aim for slightly tender, with a bit of bite.
- Add a vinaigrette: For a more pronounced flavor, toss the salad with a simple vinaigrette made with olive oil, lemon juice or balsamic vinegar, Dijon mustard, and herbs.
- Make it ahead: This orzo pasta salad can be made a day in advance. Just add the Parmesan cheese (if using) right before serving.
- Balance the flavors: Taste as you go and adjust the seasoning (salt, pepper, Italian seasoning) to balance the flavors to your liking.
Serving & Storage Suggestions
This orzo pasta salad is delicious served chilled. It’s a fantastic side dish for grilled chicken, fish, or vegetables. It also makes a wonderful light lunch on its own. For a more substantial meal, add grilled shrimp, chickpeas, or cannellini beans.
Store leftover orzo pasta salad in an airtight container in the refrigerator for up to 3-4 days. It’s best not to leave it at room temperature for more than 2 hours. The flavors will continue to develop as it sits, making it even more delicious the next day! It is not recommended to freeze this salad, as the texture of the pasta and vegetables may change upon thawing.
Nutritional Information
(Estimated per serving, based on recipe as written with Parmesan and Bacon)
| Nutrient | Amount per Serving | % Daily Value |
|---|---|---|
| Calories | 435 kcal | N/A |
| Total Fat | 25 g | 38% |
| Saturated Fat | 8 g | 40% |
| Cholesterol | 29 mg | 9% |
| Sodium | 771 mg | 32% |
| Total Carbohydrate | 36 g | 12% |
| Dietary Fiber | 2 g | 8% |
| Sugars | 2 g | N/A |
| Protein | 15 g | 30% |
Variations & Substitutions
- Vegetarian/Vegan: Omit the bacon and Parmesan cheese. Use vegetable broth instead of chicken broth. You can add toasted pine nuts or walnuts for extra crunch and flavor.
- Gluten-Free: Use gluten-free orzo pasta.
- Mediterranean: Add Kalamata olives, feta cheese, and sun-dried tomatoes for a classic Mediterranean twist.
- Italian: Add fresh mozzarella balls, basil, and a balsamic glaze.
- Seasonal: Use seasonal vegetables like asparagus, peas, and radishes in the spring, or roasted butternut squash, Brussels sprouts, and cranberries in the fall.
- Protein Boost: Add grilled chicken, shrimp, chickpeas, or white beans for a more substantial meal.
- Herbs: Experiment with different herbs like parsley, dill, mint, or oregano to customize the flavor profile.
- Cheese: Instead of Parmesan, try feta, goat cheese, or shaved Pecorino Romano.
FAQs (Frequently Asked Questions)
Q: Can I make this orzo salad ahead of time?
A: Absolutely! In fact, it’s even better if you make it a few hours ahead of time to allow the flavors to meld together. Just add the Parmesan cheese (if using) right before serving.
Q: Can I use a different type of pasta?
A: While orzo is the traditional choice for this salad, you can substitute it with other small pasta shapes like ditalini or small shells. Keep in mind that different pasta shapes may require different cooking times.
Q: How do I prevent the orzo from becoming mushy?
A: The key is to cook the orzo al dente (slightly firm to the bite) and let it cool completely before adding the other ingredients. Overcooked orzo will become mushy and the salad will be less appealing.
Q: Can I freeze this orzo salad?
A: Freezing is not recommended, as the texture of the pasta and vegetables may change upon thawing. It’s best to store leftovers in the refrigerator and enjoy them within 3-4 days.
Q: What can I add to make this salad more flavorful?
A: A simple vinaigrette can add a lot of flavor. You can also experiment with different herbs, cheeses, and vegetables to customize the flavor profile to your liking.
Final Thoughts
This orzo pasta salad is a versatile and delicious dish that’s perfect for any occasion. Whether you’re looking for a light lunch, a flavorful side dish, or a potluck contribution, this recipe is sure to impress. Feel free to get creative and adapt it to your own tastes and preferences. Don’t be afraid to experiment with different ingredients and flavor combinations. I encourage you to give this recipe a try and share your feedback. Pair it with a crisp glass of white wine for a truly delightful experience. Happy cooking!