
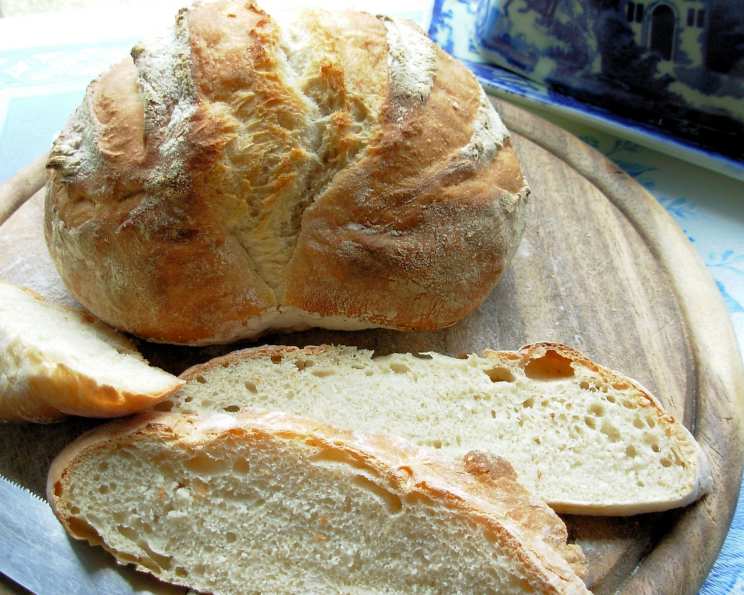
Our Daily Bread in a Crock – Weekly Make and Bake Rustic Bread
The memory still warms me, even after all these years. I can almost smell the yeasty aroma that perpetually hung in my grandmother’s pantry, a comforting cloud that promised warmth and sustenance. Tucked away in that cool, dimly lit space, nestled amongst jars of pickled onions and homemade jams, sat her earthenware crock, perpetually filled with a bubbling, living dough. Each morning, she’d pull a piece from that seemingly endless supply, shaping it with practiced hands into a loaf that would fill the cottage with the irresistible scent of freshly baked bread. It was a simple ritual, yet it spoke volumes about her resourcefulness and the enduring power of homemade goodness. Now, I carry on that tradition, adapted for modern kitchens but still holding the essence of my grandmother’s wisdom.
Recipe Overview
- Prep Time: 30 minutes
- Cook Time: 30 minutes
- Total Time: 336 hours 30 minutes (includes proving and storage)
- Servings: Varies depending on loaf size
- Yield: 4-5 loaves of bread
- Dietary Type: Vegetarian
Ingredients
- 24 fluid ounces hand-warm water
- 1 1/2 teaspoons dried fast-rising yeast (Or, 1 oz fresh yeast, added to a little warm water with 1 teaspoon sugar)
- 2 1/2 teaspoons sea salt
- 1 3/4 lbs (6 1/2 US Cups) unbleached white bread flour
Equipment Needed
- Large mixing bowl
- Wooden spoon or dough hook (optional)
- Shower cap or plastic wrap (for covering the dough)
- Baking sheet or pizza tray
- Sharp serrated knife
- Cooling rack
- Earthenware crock or large container with a lid for storage
Instructions
-
Begin by pouring the hand-warm water into a large mixing bowl. The water temperature is crucial; it should be tepid, comfortably warm to the touch, but not hot, as excessive heat will kill the yeast.
-
Add the dried fast-rising yeast to the water, followed by the sea salt. Mix thoroughly until the salt and yeast are dissolved. If using fresh yeast, dissolve it in a little warm water with a teaspoon of sugar before adding it to the bowl.
-
Now, add all the unbleached white bread flour to the bowl. Using a wooden spoon or a dough hook attachment on a stand mixer, mix the ingredients together until they are thoroughly amalgamated. There’s no need to over-knead the dough at this stage; just ensure everything is well combined. The dough will be shaggy and slightly sticky, and that’s perfectly fine.
-
Leave the bread dough in the mixing bowl. Cover the bowl loosely with a shower cap (one that is dedicated solely for this purpose!) or plastic wrap. This will prevent the dough from drying out while it proves.
-
Allow the dough to prove for 2 hours, or until it has doubled in size. The exact proving time will depend on the temperature of your kitchen. A warmer environment will encourage faster rising.
-
After the initial proving, the dough can be stored in the fridge or used immediately to bake a loaf of bread.
-
If baking a loaf now, preheat your oven to 225°C/450°F (Gas Mark 8). Place a baking sheet or pizza tray in the oven to heat up; this will help create a crispy crust.
-
Tear off a large ball of dough, about the size of a small melon (or adjust according to the size of loaf you desire). On a lightly floured surface, knead the dough for about 1 minute. This brief kneading helps develop the gluten structure, resulting in a better texture.
-
Shape the dough as desired. You can form it into free-form loaves such as a boule, baguette, or banneton, or place it in a greased and floured loaf tin.
-
Allow the shaped dough to prove and rise for a further 20 to 30 minutes. This second proving allows the loaf to expand and lighten before baking.
-
Just before baking, slash the surface of the loaf with a sharp serrated knife. These slashes not only look attractive but also control the expansion of the loaf in the oven, preventing it from cracking haphazardly.
-
At this point, you can add a glaze or special finish, such as an egg wash for a glossy crust, or sprinkle with seeds for added flavor and texture.
-
Bake at 225°C/450°F for 30 minutes, or until the loaf is well-risen, golden brown, and sounds hollow when tapped on the underside. For an extra chewy texture and moist interior, add a bowl of boiling water to the bottom of the oven as soon as you put the bread in. The steam created will help the loaf rise fully and create a lovely crust.
-
Remove the baked bread from the oven and cool it on a cooling rack. This allows air to circulate around the loaf, preventing the bottom from becoming soggy.
-
Serve the bread warm with butter, cheese, jam, hams, and cold cuts. Sliced when cool, it is perfect for sandwiches. It’s also wonderful when toasted the next day.
-
To store the excess dough, place it back in the mixing bowl, loosely covered, and store it in the fridge or somewhere cool. This dough will keep for up to two weeks, though I find it’s usually gone within 7 to 10 days! This amount of dough will make between 4 and 5 loaves of bread, depending on the size and shape of each loaf.
Expert Tips & Tricks
- For a richer flavor, try using a blend of flours. Substitute up to half of the white bread flour with whole wheat or rye flour.
- Adding herbs, seeds, or dried fruit to the dough can create interesting flavor combinations. Try rosemary and sea salt, sunflower seeds and pumpkin seeds, or cranberries and walnuts.
- If you find the dough is too sticky to handle, lightly flour your hands and the work surface.
- To achieve a crispier crust, brush the loaf with water or an egg wash before baking.
- If the top of the loaf is browning too quickly, tent it with foil for the last 10-15 minutes of baking.
- For a sourdough-like tang, allow the dough to ferment in the fridge for a longer period, up to 48 hours.
Serving & Storage Suggestions
Serve the freshly baked bread warm, sliced, and accompanied by your favorite spreads, cheeses, or cold cuts. For a more formal presentation, arrange slices on a wooden board with a selection of cheeses and olives.
Store leftover bread in an airtight container at room temperature for up to 2 days, or in the refrigerator for up to 5 days. To freeze, wrap the loaf tightly in plastic wrap and then in foil, and freeze for up to 3 months. Thaw completely before slicing and serving. Reheat in a moderate oven to restore its crusty texture.
Nutritional Information
| Nutrient | Amount per Serving (estimated) | % Daily Value (estimated) |
|---|---|---|
| Calories | 727.9 kcal | N/A |
| Total Fat | 2.1 g | 3% |
| Saturated Fat | 0.3 g | 1% |
| Cholesterol | 0 mg | 0% |
| Sodium | 1463.5 mg | 60% |
| Total Carbohydrate | 152.2 g | 50% |
| Dietary Fiber | 5.8 g | 23% |
| Sugars | 0.5 g | N/A |
| Protein | 21.1 g | 42% |
Note: Nutritional information is an estimate and can vary based on specific ingredients and serving sizes.
Variations & Substitutions
- Garlic & Herb Bread: Add minced garlic and chopped fresh herbs (such as rosemary, thyme, or oregano) to the dough during the initial mixing stage.
- Olive & Sun-Dried Tomato Bread: Incorporate chopped olives and sun-dried tomatoes (oil-packed, drained) into the dough.
- Cheese Bread: Add shredded cheese (such as cheddar, Parmesan, or Gruyere) to the dough.
- Sweet Bread: Add a touch of sugar or honey to the dough, along with dried fruit and spices like cinnamon or nutmeg.
- Whole Wheat Bread: Substitute a portion of the white bread flour with whole wheat flour for a nuttier flavor and increased fiber content.
FAQs (Frequently Asked Questions)
Q: Can I use all-purpose flour instead of bread flour?
A: While you can, bread flour has a higher protein content, which contributes to a chewier texture and better rise. All-purpose flour will result in a slightly softer loaf.
Q: How do I know if my dough has proved enough?
A: The dough should have doubled in size and feel light and airy. If you gently poke it with your finger, the indentation should remain.
Q: Can I freeze the unbaked dough?
A: Yes, you can freeze the dough after the initial proving. Divide it into portions, wrap tightly in plastic wrap, and freeze for up to 3 months. Thaw completely before shaping and baking.
Q: My bread is browning too quickly. What should I do?
A: Tent the loaf with aluminum foil for the last 10-15 minutes of baking to prevent it from burning.
Q: Why is my bread dense and heavy?
A: This could be due to several factors, including using old yeast, not proving the dough for long enough, or over-kneading. Ensure your yeast is fresh, give the dough enough time to rise, and avoid overworking it.
Final Thoughts
This method of making bread is a wonderful way to always have fresh, delicious bread on hand without the daily effort of making dough from scratch. It’s a process that connects us to a simpler time, when resourcefulness and homemade goodness were valued above all else. So, embrace the rustic charm of this weekly make and bake bread, experiment with different flavors and shapes, and enjoy the satisfaction of creating something truly special. I hope you try this recipe and share the warmth and aroma of freshly baked bread with your loved ones. Don’t hesitate to let me know how it turns out; I love hearing your baking adventures!