
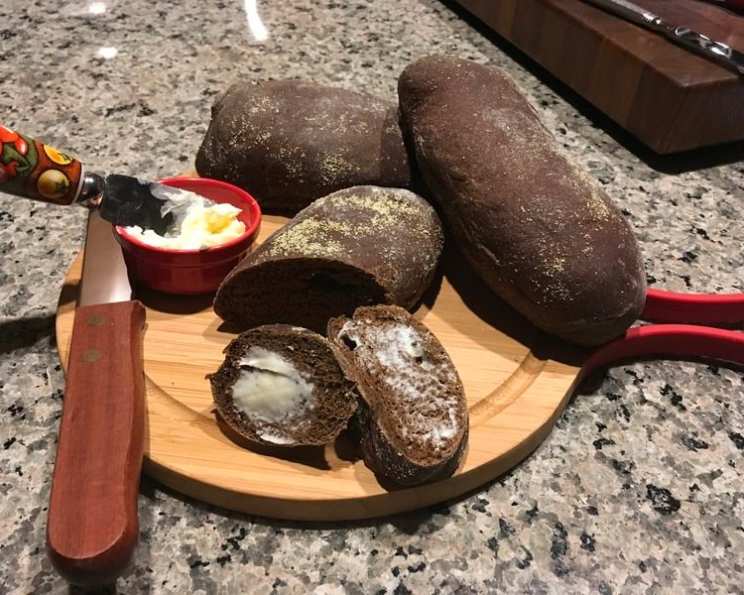
Outback Steakhouse Bushman Bread: A Culinary Journey Home
The scent of molasses, coffee, and warm wheat always takes me back. Not to a bakery, but to Friday nights with my family. My dad, usually stoic, would become visibly excited as we pulled into the Outback Steakhouse parking lot. He wasn’t there for the steaks (though he enjoyed them), but for the Bushman Bread. That dark, slightly sweet loaf, served warm with whipped butter, was the highlight of the meal, the reason we always left room for “just one more slice.” Recreating it at home has become a personal mission, a way to share that comforting memory with a new generation.
Recipe Overview
- Prep Time: 30 minutes
- Cook Time: 20-24 minutes
- Total Time: 3 hours 25 minutes (includes rise time)
- Yields: 8 small loaves
- Serves: 8
- Dietary Type: Vegetarian
Ingredients
Dough:
- 1 ½ cups warm water
- 2 tablespoons butter, softened
- ½ cup honey
- 2 cups bread flour
- 1 ⅔ cups wheat flour
- 1 tablespoon cocoa
- 1 tablespoon granulated sugar
- 2 teaspoons instant coffee
- 1 teaspoon salt
- 2 ¼ teaspoons yeast
Coloring:
-
¼ cup water
-
75 drops red food coloring
-
45 drops blue food coloring
-
30 drops yellow food coloring
-
Cornmeal, for dusting
Equipment Needed
- Large mixing bowl
- Measuring cups and spoons
- Covered bowl for rising dough
- Cookie sheet(s)
- Plastic wrap
- Oven
Instructions
- In a large bowl, combine the bread flour, wheat flour, cocoa, sugar, coffee, and salt. It is important to properly combine these dry ingredients before adding wet ingredients. This ensures even flavor distribution and helps develop the gluten properly.
- Create a well in the center of the dry mixture. This will help to evenly distribute the wet ingredients into the dry ingredients.
- Pour the warm water into the well, then add the softened butter, honey, and yeast. Ensure your water isn’t too hot, as this can kill the yeast. Ideally, it should be lukewarm.
- In a separate small bowl, combine the food coloring drops with ¼ cup of water and add that to the well. Mixing the food coloring separately ensures even distribution of color throughout the dough.
- Slowly mix the ingredients with a spoon, drawing the dry ingredients into the wet. This initial mixing helps to hydrate the flour and form a shaggy dough.
- When you can handle the dough, begin to combine it by hand, kneading the dough thoroughly for at least ten minutes, until it is very smooth and has a consistent color. Kneading develops the gluten in the flour, which gives the bread its structure and chewiness.
- Set the dough into a covered bowl in a warm place for an hour, to allow it to rise. A warm environment encourages the yeast to activate and produce carbon dioxide, causing the dough to expand.
- When the dough has risen to about double in size, punch it down and divide it into 8 even portions. Punching down releases the excess gas and allows for a more even rise during the second proofing.
- Form the portions into tubular-shaped loaves about 8″ long and 2″ wide. Aim for consistent shapes for even baking.
- Sprinkle the entire surface of the loaves with cornmeal and place them on a cookie sheet, or two. Cornmeal adds a subtle texture and prevents the loaves from sticking to the baking sheet.
- Cover the cookie sheet(s) with plastic wrap and let the dough rise once more for another hour in a warm location. This second rise, or proofing, helps to create a light and airy bread.
- Preheat the oven to 350° degrees F (175 degrees C).
- Uncover the dough and bake it for 20-24 minutes in the hot oven.
- Loaves should begin to darken slightly on top when done. The internal temperature should reach approximately 200°F (93°C).
- Serve warm with a sharp bread knife and butter on the side. For whipped butter, use an electric mixer on high speed to whip some butter until it’s fluffy.
Expert Tips & Tricks
- Don’t over-knead: While kneading is essential, over-kneading can result in tough bread. Aim for a smooth and elastic dough.
- Temperature is key: Ensure your water is warm, but not hot, to activate the yeast properly. Too hot, and you’ll kill the yeast.
- Proofing location: A warm, draft-free environment is crucial for proper rising. A slightly warmed oven (turned off) or a sunny spot can work well.
- Achieving the color: The blend of food coloring is essential for mimicking the signature Bushman Bread color. Adjust the ratios slightly to your preference. Start with less and add more gradually.
- Butter Flavor: A touch of molasses in your whipped butter can elevate the experience even more.
Serving & Storage Suggestions
Serve the Bushman Bread warm, ideally within an hour or two of baking, to maximize its softness and flavor. A serrated bread knife will help slice it neatly. Leftovers can be stored at room temperature in an airtight container for up to 2 days, or in the refrigerator for up to a week. To freeze, wrap the loaves tightly in plastic wrap and then in foil; they can be frozen for up to 2 months. Reheat in a preheated 350°F (175°C) oven for about 10-15 minutes, or until warmed through. The bread is wonderful with a slather of butter, but consider offering other spreads like honey butter, garlic butter, or even a creamy cheese spread.
Nutritional Information
| Nutrient | Amount per Serving | % Daily Value |
|---|---|---|
| Calories | 301.6 kcal | N/A |
| Calories from Fat | 35g | 12% |
| Total Fat | 4g | 6% |
| Saturated Fat | 2g | 9% |
| Cholesterol | 7.6 mg | 2% |
| Sodium | 320.2 mg | 13% |
| Total Carbohydrate | 61.9 g | 20% |
| Dietary Fiber | 4 g | 15% |
| Sugars | 19.2 g | 76% |
| Protein | 7.2 g | 14% |
Note: Nutritional information is an estimate and may vary based on specific ingredients and portion sizes.
Variations & Substitutions
- Gluten-Free: Substitute the bread and wheat flour with a gluten-free all-purpose flour blend. You may need to adjust the liquid slightly.
- Vegan: Replace the butter with a vegan butter alternative and ensure the honey is substituted with agave or maple syrup.
- Sweetener: Experiment with different sweeteners like brown sugar or molasses for a deeper flavor.
- Spice it up: Add a pinch of cinnamon or nutmeg to the dough for a warm, spiced flavor.
- Seeds: Incorporate sunflower seeds or flax seeds into the dough for added texture and nutrition.
FAQs (Frequently Asked Questions)
Q: Why is my dough not rising?
A: The most common reason for dough not rising is inactive yeast. Ensure your yeast is fresh and that the water is warm, but not too hot, when activating it. Also, make sure the environment where you are proofing the dough is warm enough.
Q: Can I use a stand mixer to knead the dough?
A: Absolutely! Use the dough hook attachment and knead on medium speed for about 8-10 minutes, or until the dough is smooth and elastic.
Q: How can I make the bread softer?
A: Adding a tablespoon of oil to the dough can help create a softer texture. Also, avoid over-baking the bread.
Q: What if I don’t have wheat flour?
A: You can substitute the wheat flour with more bread flour, but the texture and flavor will be slightly different. The bread will be less dense and have a milder flavor.
Q: How can I make the whipped butter like Outback?
A: Besides using an electric mixer to whip air into softened butter, try adding a touch of honey or maple syrup and a pinch of salt for a hint of sweetness and balance.
Final Thoughts
Bringing the familiar comfort of Outback Steakhouse Bushman Bread into your own kitchen is more than just baking a loaf of bread; it’s about recreating memories, sharing warmth, and savoring the simple pleasures of life. Don’t be afraid to experiment with variations and make it your own. I wholeheartedly encourage you to try this recipe, and I’d love to hear about your experience! What small touches did you add? How did you serve it? Let the aroma of freshly baked bread fill your home and create new traditions that will be cherished for years to come.