
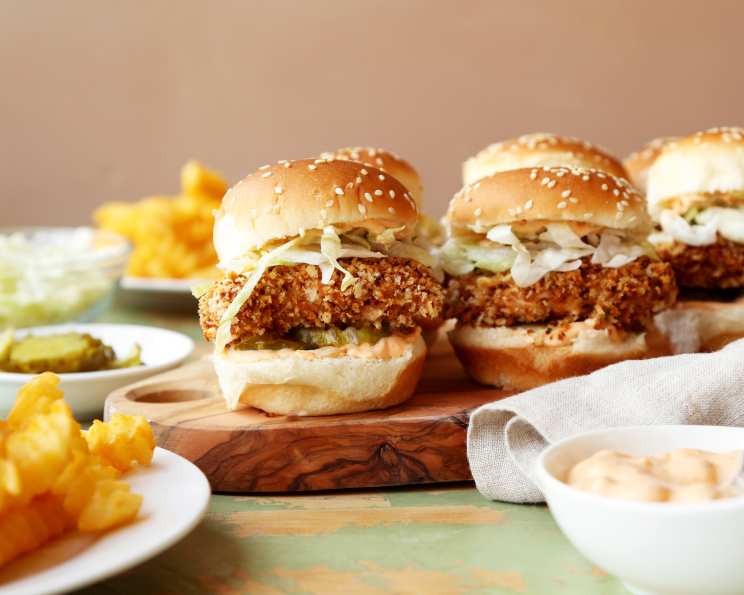
Oven-Fried Chicken Sliders: Crispy, Spicy, and Irresistibly Delicious
The scent of fried chicken always takes me back to summer picnics as a kid. My grandmother, a true Southern matriarch, would spend hours tending to a massive cast iron skillet filled with bubbling oil and golden-brown chicken. While those memories are cherished, I’ve learned that you can capture that same incredible flavor and satisfying crunch without the fuss (and the lingering smell of frying oil!). These Oven-Fried Chicken Sliders are my modern take on a classic, packing all the spicy, crispy goodness into a perfectly portable bite.
Recipe Overview
- Prep Time: 20 minutes
- Cook Time: 25 minutes
- Total Time: 45 minutes
- Servings: 12
- Yield: 12 sliders
- Dietary Type: Adaptable; see variations below
Ingredients
- 1 1⁄4 cups mayonnaise
- 3 tablespoons hot sauce (Frank’s recommended)
- 1 tablespoon onion powder
- 1 tablespoon garlic powder
- 1 tablespoon sweet paprika
- 1⁄3 cup pickled jalapeño pepper, finely chopped
- 6 boneless skinless chicken thighs
- 1 large egg, beaten to blend
- 1 tablespoon honey
- Kosher salt
- 1⁄2 cup extra virgin olive oil
- 2 1⁄2 cups panko breadcrumbs (Japanese bread crumbs)
- 12 potato rolls (preferably Martin’s, buttered and toasted)
- 1⁄4 head iceberg lettuce, thinly sliced
- Sliced bread and butter pickles, and french fries (for serving)
Equipment Needed
- Medium bowl
- Large bowl
- Large skillet
- Rimmed baking sheet
- Wire rack
Instructions
-
In a medium bowl, whisk together the mayonnaise, hot sauce, onion powder, garlic powder, paprika, and jalapeños. This is your spicy mayonnaise, the flavor bomb that makes these sliders truly sing. Set aside until ready to use.
-
Place a rack in the middle of your oven and preheat it to 450°F (232°C). High heat is key to getting that crispy, oven-fried texture.
-
Cut each chicken thigh in half crosswise, creating 12 equal-sized pieces. This ensures even cooking and perfect slider portions.
-
In a large bowl, whisk together the egg, honey, and 1/4 cup of the spicy mayonnaise along with 1 1/2 teaspoons of kosher salt. Ensure everything is completely combined to create a flavorful and binding marinade. Reserve the remaining spicy mayonnaise for topping the rolls later.
-
Toss the chicken in the egg mixture, ensuring all pieces are thoroughly coated. Let the chicken sit uncovered at room temperature while you toast the bread crumbs. This allows the egg mixture to adhere properly.
-
While the chicken marinates, heat the olive oil in a large skillet over medium-high heat. You’ll know the oil is ready when you see small wisps of smoke rising from it.
-
Add the panko breadcrumbs and 1/4 teaspoon of kosher salt to the skillet, tossing to coat them evenly in the oil.
-
Cook the panko, tossing frequently, until it’s beautifully golden brown. This should take about 6–8 minutes. Keep a close eye on them, as they can burn quickly. A consistently browned panko gives the chicken an evenly crispy texture.
-
Remove the toasted panko from the heat and let it cool in the pan for about 10 minutes. This will allow it to crisp up even further.
-
Place a wire rack inside a rimmed baking sheet. This is crucial for allowing air to circulate around the chicken, promoting even cooking and maximum crispiness. The rimmed baking sheet will catch any drips.
-
Lift each piece of chicken from the bowl, allowing any excess egg mixture to drip back into the bowl. This prevents the breading from becoming soggy.
-
Coat the chicken in the toasted panko breadcrumbs, pressing gently to help them adhere. Ensure the chicken is completely covered for maximum crunch.
-
Transfer the breaded chicken to the prepared wire rack, spacing the pieces evenly apart. Repeat with the remaining chicken and panko.
-
Bake the chicken in the preheated oven until it is cooked through and the juices run clear when the thighs are pierced with a knife. The panko mixture should be slightly darkened in color. This usually takes about 15–20 minutes. Internal temperature should reach 165°F (74°C). Use a meat thermometer to check for doneness.
-
Remove the baked chicken from the oven and let it cool for about 10 minutes before assembling the sliders. This allows the chicken to retain its juices and prevents the buns from getting soggy.
-
Liberally spread the remaining seasoned mayonnaise over the cut and toasted sides of the potato rolls. This adds moisture and flavor to every bite.
-
Build your sliders with a generous serving of sliced bread and butter pickles, crispy fried chicken, and thinly shredded iceberg lettuce. Add more hot sauce to taste for an extra kick. Serve immediately with a side of french fries for the ultimate comfort food experience.
Expert Tips & Tricks
- For extra crispy chicken, consider double-dredging. After the initial panko coating, dip the chicken back into the egg mixture and then into the panko again.
- Don’t overcrowd the pan when toasting the panko breadcrumbs. Cook them in batches if necessary to ensure even browning.
- Toasting the potato rolls enhances their flavor and prevents them from becoming soggy.
- Make sure your oven is properly preheated to ensure the chicken cooks evenly and the panko crisps up nicely.
- If you don’t have a wire rack, you can bake the chicken directly on the baking sheet, but the bottom may not be as crispy.
Serving & Storage Suggestions
Serve these Oven-Fried Chicken Sliders immediately while they are hot and crispy. They are perfect for parties, game days, or a fun family dinner. Leftover chicken can be stored in an airtight container in the refrigerator for up to 3 days. Reheat in the oven or air fryer to maintain crispiness. To reheat, preheat the oven to 350°F (175°C) and bake for about 10-15 minutes, or until heated through. You can also reheat them in an air fryer at 375°F (190°C) for about 5-7 minutes. It’s best to store the components (chicken, buns, lettuce, pickles, and mayonnaise) separately and assemble the sliders just before serving to prevent sogginess.
Nutritional Information
| Nutrient | Amount per Serving | % Daily Value |
|---|---|---|
| Calories | 397 kcal | N/A |
| Total Fat | 14.5 g | 22% |
| Saturated Fat | 2.4 g | 11% |
| Cholesterol | 44.1 mg | 14% |
| Sodium | 669.3 mg | 27% |
| Total Carbohydrate | 49.6 g | 16% |
| Dietary Fiber | 2.9 g | 11% |
| Sugars | 4.3 g | N/A |
| Protein | 16.4 g | 32% |
Note: Nutritional information is an estimate and may vary based on specific ingredients and portion sizes.
Variations & Substitutions
- Gluten-Free: Use gluten-free panko breadcrumbs and gluten-free potato rolls.
- Dairy-Free: Use a dairy-free mayonnaise alternative.
- Spice Level: Adjust the amount of hot sauce and jalapeños to suit your preference. For a milder flavor, remove the seeds and membranes from the jalapeños. For extra heat, add a pinch of cayenne pepper to the panko breadcrumb mixture.
- Chicken Options: Chicken tenders can be used in place of the chicken thighs, just reduce cooking time accordingly.
- Vegetarian Option: Substitute the chicken with thick slices of breaded and baked tofu or portobello mushrooms.
FAQs (Frequently Asked Questions)
Q: Can I make the spicy mayonnaise ahead of time?
A: Absolutely! The spicy mayonnaise can be made up to 3 days in advance. Just cover and chill it in the refrigerator. The flavors will even meld together and intensify over time.
Q: How do I keep the chicken crispy after baking?
A: Placing the baked chicken on a wire rack allows air to circulate and helps maintain its crispiness. Avoid stacking the chicken, as this can cause it to become soggy.
Q: Can I use regular breadcrumbs instead of panko?
A: Panko breadcrumbs are recommended for their extra crispy texture. However, if you don’t have panko, you can use regular breadcrumbs. Just be aware that the chicken may not be as crispy.
Q: What’s the best way to toast the potato rolls?
A: You can toast the potato rolls in a toaster, under a broiler, or in a dry skillet. Just keep a close eye on them to prevent burning. Lightly buttering the rolls before toasting adds extra flavor.
Q: Can I freeze the cooked chicken?
A: Yes, you can freeze the cooked chicken. Allow it to cool completely, then wrap it tightly in plastic wrap and place it in a freezer bag. It can be stored in the freezer for up to 2 months. Thaw in the refrigerator overnight before reheating.
Final Thoughts
These Oven-Fried Chicken Sliders are a guaranteed crowd-pleaser. They’re packed with flavor, satisfyingly crispy, and surprisingly easy to make. Don’t be intimidated by the number of steps – the result is well worth the effort. I encourage you to give this recipe a try and let me know what you think! Serve them with your favorite sides, like coleslaw or potato salad, and a refreshing beverage for a complete and unforgettable meal. Enjoy!