
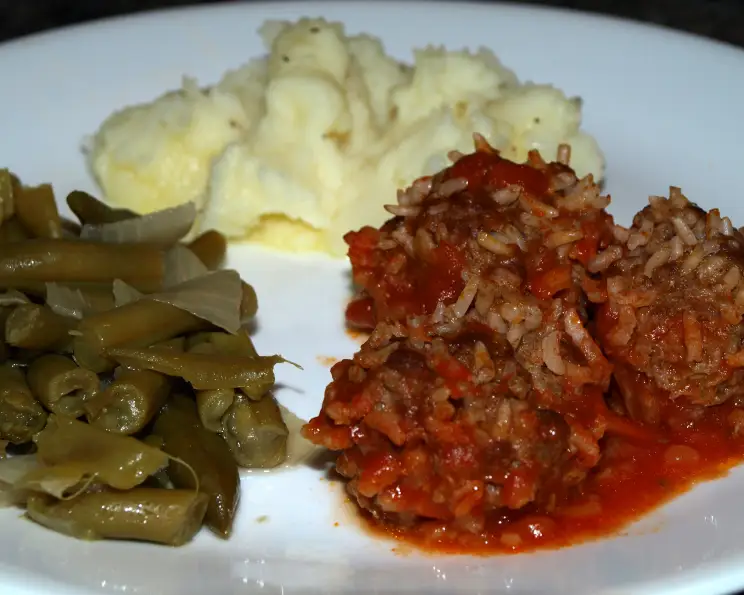
Oven Porcupines: A Nostalgic Comfort Food Classic
My grandmother, a woman who believed a good meal could solve almost any problem, had a repertoire of simple, hearty dishes. Amongst them, Oven Porcupines stood out not for its elegance, but for its uncanny ability to soothe a grumpy child (me!) after a long day at school. I can still picture her small kitchen, the scent of tomato sauce simmering on the stove, and the anticipation of biting into those tender meatballs, each grain of rice a tiny burst of playful texture. It wasn’t just a meal; it was a hug on a plate, a reminder that even the simplest things can be incredibly satisfying.
Recipe Overview
- Prep Time: 20 minutes
- Cook Time: 1 hour
- Total Time: 1 hour 20 minutes
- Servings: 4-6
- Yield: Variable, depending on meatball size
- Dietary Type: Not Vegetarian, Not Vegan, Can be Gluten-Free (see notes)
Ingredients
- 1 lb ground beef
- ½ cup uncooked rice (long grain, medium grain, or short grain all work well)
- ½ cup water (for mixing into the meatball mixture)
- ⅓ cup chopped onion
- 1 teaspoon salt
- ½ teaspoon celery salt
- ⅛ teaspoon garlic powder
- ⅛ teaspoon pepper
- 1 (15 ounce) can tomato sauce
- 1 cup water (for the sauce)
- 2 teaspoons Worcestershire sauce (use gluten-free if needed)
Equipment Needed
- Large mixing bowl
- Measuring cups and spoons
- 9×13 inch baking dish
- Aluminum foil
Instructions
- Preheat your oven to 350 degrees Fahrenheit (175 degrees Celsius). Ensure the oven rack is positioned in the center.
- In a large mixing bowl, combine the ground beef, uncooked rice, ½ cup water, chopped onion, salt, celery salt, garlic powder, and pepper.
- Using your hands (or a sturdy spoon), thoroughly mix all the ingredients together until they are evenly distributed. Be careful not to overmix, as this can result in tough meatballs.
- Shape the mixture into meatballs. A rounded tablespoonful of the mixture is a good starting point for each meatball, but feel free to adjust the size to your preference. Aim for consistent sizing to ensure even cooking.
- Place the meatballs in an ungreased 9×13 inch baking dish. Arrange them in a single layer, leaving a little space between each meatball.
- In a separate bowl or directly in the measuring cup, stir together the tomato sauce, 1 cup water, and Worcestershire sauce. Whisk until well combined and the sauce is smooth.
- Pour the tomato sauce mixture evenly over the meatballs in the baking dish, ensuring that all the meatballs are partially submerged in the sauce.
- Cover the baking dish tightly with aluminum foil. This helps to trap the moisture and ensures that the rice cooks properly.
- Bake in the preheated oven for 1 hour.
- After 1 hour, carefully remove the aluminum foil and continue baking for an additional 10-15 minutes, or until the meatballs are cooked through and the rice is tender. The internal temperature of the meatballs should reach 160 degrees Fahrenheit (71 degrees Celsius). The sauce should also be bubbling and slightly thickened.
- Remove from the oven and let stand for a few minutes before serving. This allows the sauce to thicken further and the meatballs to rest.
Expert Tips & Tricks
- Browning Boost: For a richer flavor and more appealing color, quickly brown the meatballs in a skillet with a little oil before transferring them to the baking dish.
- Rice Ratio: The type of rice you use can affect the final texture. Long-grain rice will result in distinct grains, while short-grain rice will create a slightly stickier texture. Experiment to find your preference!
- Flavor Infusion: Add a bay leaf or a sprig of fresh thyme to the sauce for extra depth of flavor. Remember to remove it before serving.
- Make-Ahead Magic: Prepare the meatballs and sauce ahead of time and store them separately in the refrigerator for up to 24 hours. Assemble and bake just before serving.
- Sauce Consistency: If the sauce is too thin after baking, you can thicken it by simmering it on the stovetop for a few minutes after removing the meatballs. Alternatively, mix a tablespoon of cornstarch with two tablespoons of cold water and whisk it into the sauce during the last 10 minutes of baking.
Serving & Storage Suggestions
Serve Oven Porcupines hot, right out of the oven. They pair beautifully with mashed potatoes, egg noodles, rice, or polenta. Steamed green beans, a simple salad, or a side of crusty bread are also excellent accompaniments.
Leftovers can be stored in an airtight container in the refrigerator for up to 3-4 days. To reheat, gently warm them in a saucepan over medium heat, or microwave in short intervals until heated through. You can also freeze Oven Porcupines for up to 2-3 months. Thaw overnight in the refrigerator before reheating. Adding a splash of water or broth when reheating will help prevent them from drying out.
Nutritional Information
| Nutrient | Amount per Serving | % Daily Value |
|---|---|---|
| Calories | 350 kcal | 18% |
| Total Fat | 20g | 31% |
| Saturated Fat | 8g | 40% |
| Cholesterol | 80mg | 27% |
| Sodium | 800mg | 35% |
| Total Carbohydrate | 25g | 8% |
| Dietary Fiber | 2g | 8% |
| Sugars | 6g | |
| Protein | 20g | 40% |
Note: Nutritional information is an estimate and may vary based on specific ingredients and portion sizes.
Variations & Substitutions
- Turkey Porcupines: Substitute ground turkey for ground beef for a leaner version.
- Vegetarian Option: Use a plant-based ground meat substitute and vegetable broth for a vegetarian-friendly dish.
- Spicy Kick: Add a pinch of red pepper flakes or a dash of hot sauce to the sauce for a touch of heat.
- Italian Twist: Use Italian-seasoned ground beef and add a can of diced tomatoes with Italian herbs to the sauce. Sprinkle with grated Parmesan cheese before serving.
- Gluten-Free: Ensure the Worcestershire sauce is gluten-free or omit it.
- Healthier Sauce: Reduce the amount of sugar in the sauce, or use a no-sugar-added tomato sauce.
FAQs (Frequently Asked Questions)
Q: Why are they called “Porcupines”?
A: The name comes from the appearance of the rice grains poking out from the meatballs after they are cooked, resembling the quills of a porcupine.
Q: Can I use brown rice instead of white rice?
A: Yes, you can use brown rice, but it will require a longer cooking time. Add an extra 30-45 minutes to the baking time and ensure there is enough liquid to keep the rice from drying out.
Q: What if my rice isn’t cooked through after an hour?
A: If the rice is still hard after the initial baking time, add a little more water (about ¼ cup) to the baking dish, cover it with foil, and continue baking until the rice is tender.
Q: Can I add vegetables to the meatball mixture?
A: Absolutely! Finely chopped carrots, celery, or bell peppers can be added to the meatball mixture for extra flavor and nutrients.
Q: Can I freeze the meatballs after they’re cooked?
A: Yes, Oven Porcupines freeze very well. Allow them to cool completely, then transfer them to a freezer-safe container or bag. They can be stored in the freezer for up to 2-3 months.
Final Thoughts
Oven Porcupines are more than just meatballs; they’re a testament to the power of simple, home-cooked meals to create lasting memories. I encourage you to try this recipe, personalize it to your liking, and share it with your loved ones. Whether it’s a busy weeknight dinner or a cozy weekend meal, Oven Porcupines are sure to bring comfort and joy to your table. And, as my grandmother would say, a full belly makes for a happy heart. Bon appétit!