
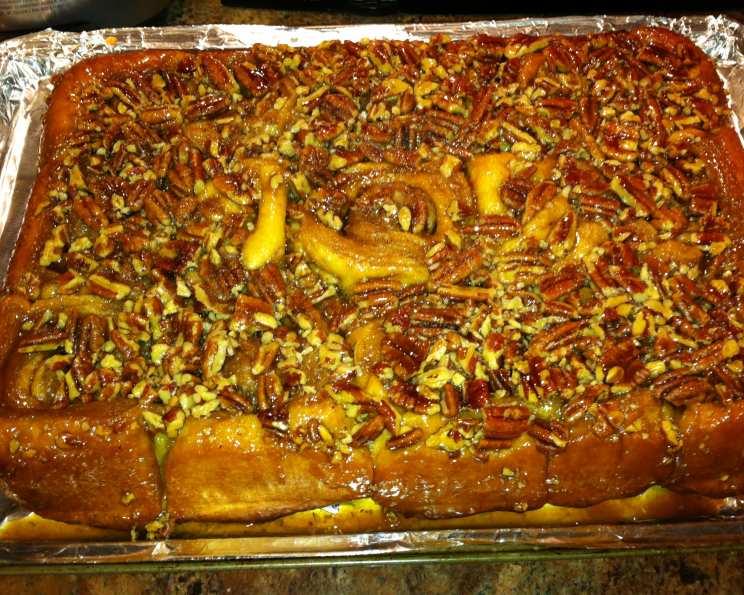
Overnight Sticky Buns: A Baker’s Dream Come True
The scent of warm caramel and cinnamon has always been my weakness. I remember sneaking into my grandmother’s kitchen as a child, drawn in by the intoxicating aroma of her baking. Her sticky buns, always made the night before and baked fresh in the morning, were legendary. Each bite was an explosion of sweet, gooey goodness, a memory I cherish and strive to recreate in my own kitchen.
Recipe Overview
- Prep Time: 45 minutes
- Cook Time: 25-30 minutes
- Total Time: 3 hours 30 minutes (includes rising time)
- Servings: 12 buns
- Yields: 12 buns
- Dietary Type: Not specified
Ingredients
Dough
- 3 large eggs, at room temperature
- ¾ cup buttermilk, at room temperature
- ¼ cup granulated sugar
- 1 ¼ teaspoons table salt
- 2 ¼ teaspoons instant yeast
- 4 ¼ cups unbleached all-purpose flour, plus additional for dusting work surface (21 ¼ ounces)
- 6 tablespoons unsalted butter, melted and cooled until warm
Caramel Glaze
- 6 tablespoons unsalted butter
- ¾ cup packed light brown sugar (5 ¼ ounces)
- 3 tablespoons corn syrup (light or dark)
- 2 tablespoons heavy cream
- 1 pinch table salt
Cinnamon-Sugar Filling
- ¾ cup packed light brown sugar (5 ¼ ounces)
- 2 teaspoons ground cinnamon
- ¼ teaspoon ground cloves
- 1 pinch table salt
- 1 tablespoon unsalted butter, melted
Pecan Topping
- 3 tablespoons unsalted butter
- ¼ cup packed light brown sugar (1 ¾ ounces)
- 3 tablespoons corn syrup (light or dark)
- 1 pinch table salt
- 1 teaspoon vanilla extract
- ¾ cup pecans, toasted in a skillet over medium heat until fragrant and browned, about 5 minutes, then cooled and coarsely chopped (3 ounces)
Equipment Needed
- Standing mixer
- Small saucepan
- Rubber spatula
- Rolling pin
- Serrated knife
- Nonstick metal 13- by 9-inch baking dish
- Wire rack
- Rimmed baking sheet
- Small bowl
- Pizza stone (optional, but recommended)
Instructions
- Prepare the Dough: In the bowl of a standing mixer, whisk the eggs to combine. Add the buttermilk and whisk again until combined.
- Combine Dry Ingredients: Whisk in the granulated sugar, salt, and instant yeast.
- Incorporate Flour: Add about 2 cups of the flour and the melted butter. Stir with a wooden spoon or rubber spatula until evenly moistened and combined.
- Knead the Dough: Add all but about ¼ cup of the remaining flour. Knead with the dough hook at low speed for 5 minutes.
- Check Dough Consistency: The dough should feel soft and moist but not wet and sticky. If necessary, add more flour, 1 tablespoon at a time. Knead at low speed for another 5 minutes. The dough should clear the sides of the bowl but still stick to the bottom.
- Hand Kneading: Turn the dough out onto a lightly floured work surface. Knead by hand for about 1 minute to ensure it’s uniform. It shouldn’t stick to the surface during hand kneading; if it does, knead in additional flour 1 tablespoon at a time.
- First Rise: Lightly spray a large bowl or plastic container with nonstick cooking spray. Transfer the dough to the bowl, spray the dough lightly with cooking spray, and cover the bowl tightly with plastic wrap. Set in a warm, draft-free spot until doubled in volume, approximately 2 to 2 ½ hours.
- Prepare the Caramel Glaze: While the dough is rising, combine all the caramel glaze ingredients – butter, brown sugar, corn syrup, heavy cream, and salt – in a small saucepan. Cook over medium heat, whisking occasionally, until the butter is melted and the mixture is thoroughly combined.
- Prepare the Baking Dish: Pour the caramel glaze mixture into a nonstick metal 13- by 9-inch baking dish. Using a rubber spatula, spread the mixture to cover the entire surface of the dish. Set the baking dish aside.
- Make the Cinnamon-Sugar Filling: In a small bowl, combine the brown sugar, cinnamon, cloves, and salt. Mix thoroughly, using your fingers to break up any sugar lumps. Set aside.
- Shape the Dough: Turn the risen dough out onto a lightly floured work surface. Gently shape it into a rough rectangle with the long side nearest you.
- Roll and Butter the Dough: Lightly flour the dough and roll it out to a 16- by 12-inch rectangle. Brush the dough with the melted butter, leaving a ½-inch border along the top edge. With the butter remaining on the brush, brush the sides of the baking dish.
- Add the Filling: Sprinkle the cinnamon-sugar filling mixture over the dough, leaving a ¾-inch border along the top edge. Smooth the filling in an even layer with your hand, then gently press the mixture into the dough to adhere.
- Roll into a Cylinder: Beginning with the long edge nearest you, roll the dough into a taut cylinder. Firmly pinch the seam to seal and roll the cylinder seam-side down.
- Shape and Cut the Buns: Very gently stretch the cylinder to an even diameter and an 18-inch length. Push the ends in to create even thickness. Using a serrated knife and a gentle sawing motion, slice the cylinder in half, then slice each half in half again to create evenly sized quarters. Slice each quarter evenly into thirds, yielding 12 buns. The end pieces may be slightly smaller.
- Arrange and Refrigerate: Arrange the buns cut-side down in the prepared baking dish. Cover tightly with plastic wrap and refrigerate for 10 to 14 hours.
- Second Rise: The next morning, place the baking pan in a warm-water bath (about 120 degrees) in the kitchen sink or a large roasting pan for 20 minutes. Remove from the water bath and let stand at room temperature until the buns look slightly puffy and are pressed against one another, about 1 ½ hours.
- Preheat Oven: About an hour before baking, adjust an oven rack to the lowest position and place a pizza stone on the rack (if using). Preheat the oven to 350 degrees Fahrenheit.
- Bake the Buns: Place the baking pan on the pizza stone (if using) and bake until golden brown. The center of the dough should register about 180 degrees on an instant-read thermometer, approximately 25 to 30 minutes.
- Cool and Invert: Cool the buns on a wire rack for 10 minutes. Invert onto a rimmed baking sheet, large rectangular platter, or cutting board. Use a rubber spatula to scrape any glaze remaining in the baking pan onto the buns. Let cool while making the pecan topping.
- Make the Pecan Topping: Combine the butter, brown sugar, corn syrup, and salt in a small saucepan. Bring to a simmer over medium heat, whisking occasionally to thoroughly combine. Off the heat, stir in the vanilla extract and pecans until the pecans are evenly coated.
- Top the Buns: Using a soup spoon, spoon a heaping tablespoon of the pecan topping over the center of each sticky bun.
- Final Cool and Serve: Continue to cool until the sticky buns are warm, about 15 to 20 minutes. Pull apart or use a serrated knife to cut apart the sticky buns and serve.
Expert Tips & Tricks
- Room Temperature Ingredients: Using room temperature eggs and buttermilk is crucial for a light and airy dough. They emulsify better, creating a smoother batter and better gluten development.
- The Warm Water Bath: The warm water bath is optional, but it speeds up the rising process after refrigeration. Make sure the water isn’t too hot, or it could kill the yeast.
- Pizza Stone Advantage: A pizza stone helps to distribute heat evenly, preventing the bottom of the buns from burning while ensuring the center is fully cooked. If you don’t have a pizza stone, you can use a baking sheet.
- Doneness Test: The internal temperature of 180 degrees Fahrenheit is a reliable indicator of doneness. If the buns are browning too quickly, you can tent them with foil during the last 10 minutes of baking.
- Pecan Toasting: Toasting the pecans before adding them to the topping enhances their flavor and adds a delightful crunch. Watch them carefully while toasting, as they can burn quickly.
Serving & Storage Suggestions
These overnight sticky buns are best served warm, allowing the caramel and pecan topping to be gloriously gooey. They can be enjoyed on their own or with a scoop of vanilla ice cream for an extra indulgent treat. Leftover sticky buns can be wrapped tightly in foil or plastic wrap and refrigerated for up to 3 days. Reheat them in a microwave oven (for 2 buns, about 2 minutes at 50 percent power works well) or in a 325-degree oven for about 8 minutes. For longer storage, freeze the buns individually wrapped for up to 2 months. Thaw them overnight in the refrigerator before reheating.
Nutritional Information
| Nutrient | Amount per Serving | % Daily Value |
|---|---|---|
| Calories | 546 kcal | N/A |
| Calories from Fat | 207 g | 38% |
| Total Fat | 23 g | 35% |
| Saturated Fat | 11.3 g | 56% |
| Cholesterol | 91.2 mg | 30% |
| Sodium | 319.3 mg | 13% |
| Total Carbohydrate | 79.2 g | 26% |
| Dietary Fiber | 2.3 g | 9% |
| Sugars | 39 g | 156% |
| Protein | 7.8 g | 15% |
Variations & Substitutions
- Dairy-Free: Substitute the buttermilk with a plant-based alternative like almond or soy milk. Use vegan butter for the dough, glaze, and topping.
- Nut-Free: Replace the pecans with toasted sunflower seeds or pumpkin seeds for a nut-free option.
- Spiced Variations: Experiment with different spices in the filling, such as cardamom, ginger, or nutmeg.
- Fruity Twist: Add a layer of chopped apples or pears to the filling for a seasonal variation.
FAQs (Frequently Asked Questions)
Q: Can I use active dry yeast instead of instant yeast?
A: Yes, you can. Use the same amount (2 ¼ teaspoons), but proof the yeast in warm milk or water with a teaspoon of sugar for about 5-10 minutes before adding it to the other ingredients.
Q: My dough didn’t double in size. What did I do wrong?
A: Several factors can affect rising: the yeast may be old or inactive, the temperature might be too cold, or the salt level might be too high. Make sure your yeast is fresh and the rising environment is warm and draft-free.
Q: Can I make the dough ahead of time and freeze it?
A: Yes, you can freeze the dough after the first rise. Punch down the dough, wrap it tightly in plastic wrap, and freeze for up to 2 months. Thaw overnight in the refrigerator before proceeding with the recipe.
Q: My caramel glaze is too thick. How can I fix it?
A: Add a tablespoon or two of heavy cream or milk to thin the glaze while it’s still warm in the saucepan. Stir until it reaches the desired consistency.
Q: Can I skip the overnight refrigeration?
A: While the overnight refrigeration isn’t strictly necessary, it allows the flavors to meld and the dough to develop a richer taste. It also makes the buns easier to handle and slice. If you’re short on time, you can shorten the refrigeration to a minimum of 2 hours.
Final Thoughts
These Overnight Sticky Buns are more than just a recipe; they’re an invitation to create warm, comforting memories in your own kitchen. Don’t be intimidated by the multiple steps; the process is incredibly rewarding, and the aroma alone is worth the effort. Gather your ingredients, put on your favorite music, and prepare to embark on a baking adventure that will fill your home with love and the irresistible scent of homemade goodness. I encourage you to try this recipe, experiment with variations, and share your creations with friends and family. Perhaps a cup of freshly brewed coffee or a glass of cold milk would complete the experience. Happy baking!