
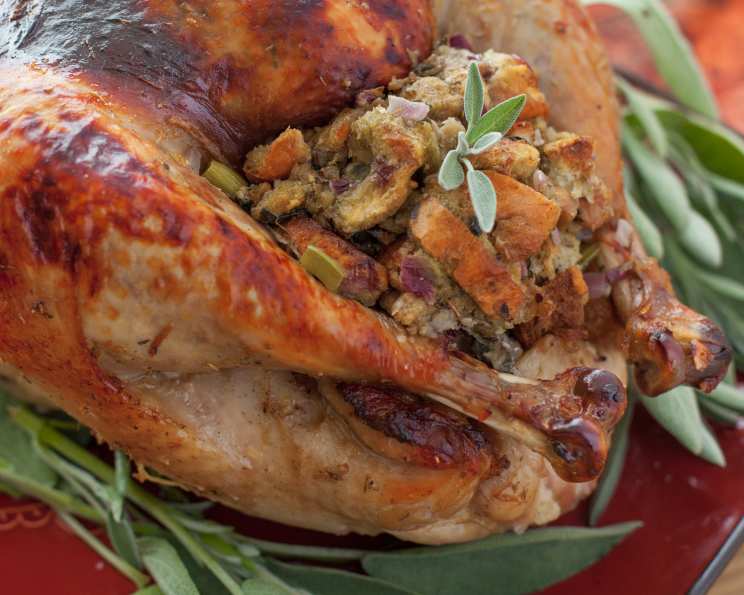
Oyster Stuffing: A Taste of Thanksgiving Tradition
I remember Thanksgiving at my grandmother’s house, a symphony of aromas swirling from the kitchen. Turkey, of course, was the star, but nestled beside it, glistening and fragrant, was her oyster stuffing. It wasn’t just a side dish; it was a family heirloom, a briny, savory testament to generations of Thanksgivings past, each bite a comforting echo of loved ones gathered around the table. To this day, the smell of oysters sautéing with celery and onions instantly transports me back to those cozy, laughter-filled holidays.
Recipe Overview
- Prep Time: 20 minutes
- Cook Time: 25-40 minutes
- Total Time: 45-60 minutes
- Servings: Approximately 10-12
- Yield: Enough for a 14-15 pound turkey, or a large casserole dish.
- Dietary Type: Not Gluten-Free, Contains Dairy
Ingredients
- 1 lb bread, including crusts (approximately 10 cups packed and cubed)
- 1 pint raw oysters, shucked and drained, liquor reserved.
- 4-8 tablespoons butter
- 1 cup celery, finely chopped
- 2 cups onions, chopped
- 1/4 – 1/2 cup fresh parsley, minced
- 1 tablespoon sage, minced
- 1 tablespoon thyme, minced
- 3/4 teaspoon salt
- 1/2 teaspoon black pepper, ground
- 1/4 teaspoon nutmeg, freshly grated
- 1/8 teaspoon clove, ground
- 1 cup chicken stock, or oyster liquor if preferred (see notes)
- 2 large eggs, well beaten (optional)
Equipment Needed
- Large Bowl
- Large Skillet or Sauté Pan
- Baking Sheet
- Measuring Cups and Spoons
- Sharp Knife
- Cutting Board
- Casserole Dish (optional)
Instructions
- Preheat your oven to 400°F (200°C). Spread the cubed bread evenly on a baking sheet.
- Toast the bread in the preheated oven until golden brown and slightly dried out. This usually takes about 5-10 minutes, but keep a close eye on it to prevent burning. Once toasted, transfer the bread cubes to a large bowl.
- While the bread is toasting, prepare the aromatics. In a large skillet or sauté pan, melt the butter over medium heat. Allow the butter to melt completely and continue heating until the foam subsides, indicating the water content has evaporated and the butter is starting to brown slightly. This adds a nutty depth to the stuffing.
- Add the chopped onions and celery to the melted butter. Cook over medium heat for about 5 minutes, or until the vegetables are tender and translucent, stirring occasionally. Don’t rush this step; allowing the onions and celery to soften properly is crucial for developing the flavor base of the stuffing.
- Remove the skillet from the heat. Stir in the minced parsley, sage, thyme, salt, black pepper, nutmeg, and clove. Make sure the spices are evenly distributed throughout the mixture.
- Add the spiced vegetable mixture to the bowl of toasted bread cubes. Gently toss to combine, ensuring the bread is evenly coated with the buttery, aromatic mixture.
- Drain the raw oysters, reserving the oyster liquor. Add the drained oysters to the bowl with the bread and vegetables. Gently toss to distribute the oysters throughout the mixture. The goal is to moisten the bread without packing it down.
- Moisten the stuffing. Begin by adding about 3/4 cup of chicken stock (or oyster liquor if using) to the bowl. Gently toss to combine. If the stuffing seems dry, add the remaining stock, a little at a time, until the stuffing is moist but not soggy.
- (Optional): If using, gently fold in the well-beaten eggs. The eggs will help bind the stuffing together and add richness.
- At this point, the stuffing is ready to be used to stuff your turkey. It’s important to stuff the turkey just before roasting and to ensure the stuffing reaches a safe internal temperature of 165°F (74°C).
- (Alternative baking method): If you prefer to bake the stuffing separately, transfer the mixture to a greased casserole dish. Bake in a preheated oven at 350°F (175°C) for 25 to 40 minutes, or until heated through and the top is golden brown and slightly crusty.
Expert Tips & Tricks
- Toast the bread thoroughly: This prevents the stuffing from becoming mushy. Stale bread works best.
- Don’t over-moisten: Add the stock gradually, as the bread will continue to absorb moisture as it sits. The stuffing should be moist but not soggy.
- Use fresh herbs: They provide a brighter, more vibrant flavor than dried herbs. If using dried herbs, reduce the amount by half.
- For a richer flavor: Consider browning the butter slightly before adding the onions and celery. This adds a nutty, caramelized flavor.
- Adjust the seasoning: Taste the stuffing before baking and adjust the salt, pepper, and spices to your liking.
- Make ahead: The stuffing can be assembled a day ahead of time. Cover and refrigerate until ready to bake. If refrigerating, you may need to add a little extra stock before baking, as the bread will absorb more moisture as it sits.
Serving & Storage Suggestions
Serve the oyster stuffing hot as a side dish alongside your Thanksgiving turkey or other holiday meals. It pairs well with gravy, cranberry sauce, and roasted vegetables.
Storage: Leftover oyster stuffing should be stored in an airtight container in the refrigerator. It will keep for up to 3-4 days.
Reheating: Reheat leftover stuffing in the oven at 350°F (175°C) until heated through. You may need to add a little extra stock to prevent it from drying out. Alternatively, you can reheat it in the microwave in short intervals, stirring occasionally.
Freezing: Oyster stuffing can be frozen for up to 2-3 months. Thaw overnight in the refrigerator before reheating. The texture may be slightly softer after freezing and thawing.
Nutritional Information
Nutritional information is an estimate and can vary based on specific ingredients and portion sizes.
| Nutrient | Amount per Serving | % Daily Value |
|---|---|---|
| Calories | 280 kcal | 14% |
| Total Fat | 10g | 15% |
| Saturated Fat | 5g | 25% |
| Cholesterol | 45mg | 15% |
| Sodium | 680mg | 29% |
| Total Carbohydrate | 38g | 13% |
| Dietary Fiber | 3g | 10% |
| Sugars | 5g | N/A |
| Protein | 12g | 24% |
Variations & Substitutions
- Gluten-Free: Use gluten-free bread cubes.
- Spicy: Add a pinch of red pepper flakes or a dash of hot sauce to the vegetable mixture.
- Vegetarian (Oyster-Free): Substitute the oysters with chopped mushrooms or artichoke hearts.
- Different Herbs: Experiment with other herbs such as rosemary, marjoram, or savory.
- Seafood Medley: Add other types of seafood, such as shrimp or crabmeat, along with the oysters.
- Cornbread Stuffing: Use cornbread cubes instead of regular bread for a Southern twist.
FAQs (Frequently Asked Questions)
Q: Can I use canned oysters instead of fresh?
A: While fresh oysters are ideal for the best flavor and texture, canned oysters can be used in a pinch. Drain them well and adjust the seasoning accordingly, as they tend to be saltier.
Q: How do I prevent the stuffing from becoming too dry?
A: The key is to add the chicken stock (or oyster liquor) gradually and avoid over-baking. You can also tent the casserole dish with foil during the last part of baking to prevent the top from drying out.
Q: Can I make this stuffing ahead of time?
A: Absolutely! Assembling the stuffing a day or two in advance is a great time-saver. Just be sure to store it in the refrigerator and add a little extra stock before baking if it seems dry.
Q: How do I know when the stuffing is done?
A: The stuffing is done when it is heated through, the top is golden brown and slightly crusty, and an instant-read thermometer inserted into the center registers 165°F (74°C).
Q: Can I add other vegetables to the stuffing?
A: Yes, feel free to add other vegetables such as diced carrots, bell peppers, or mushrooms to the onion and celery mixture. Just be sure to cook them until tender before adding them to the bread cubes.
Final Thoughts
Oyster stuffing is more than just a recipe; it’s a tradition, a connection to the past, and a celebration of the present. Whether you’re a seasoned chef or a novice cook, I encourage you to give this recipe a try. Embrace the aroma of sautéed vegetables, the briny tang of the oysters, and the warmth of the spices. Gather your loved ones, share a delicious meal, and create memories that will last a lifetime. Don’t hesitate to experiment with variations and make it your own family heirloom. And please, let me know how it turns out – I’d love to hear about your culinary adventures! Perhaps you could pair it with a crisp Sauvignon Blanc to cut through the richness of the dish. Happy cooking!