
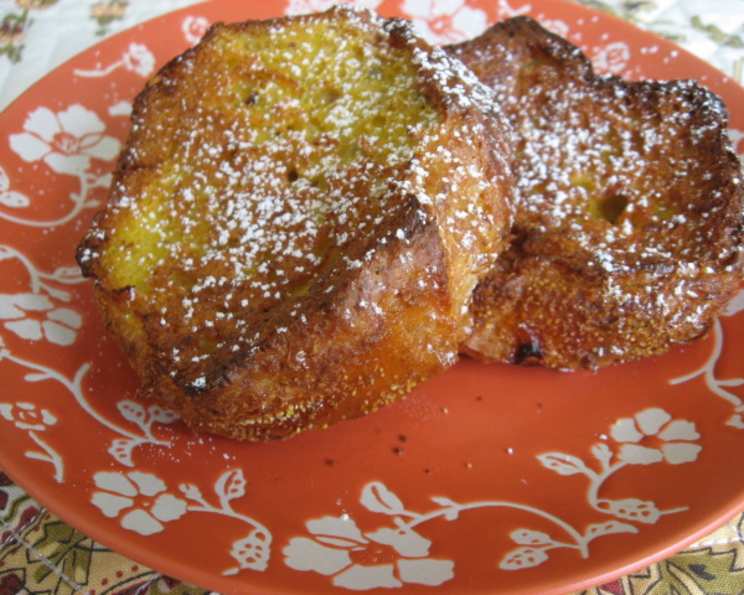
Pain Perdu: Rediscovering a Childhood Delight
The scent of cinnamon and warm bread always transports me back to my grandmother’s kitchen. She called it “eggy bread,” a simple breakfast she’d whip up on lazy Sunday mornings. I didn’t know then that this humble dish had a more elegant name: Pain Perdu, French for “lost bread.” It was her way of using up day-old bread, transforming it into something truly special. Each bite was a comforting blend of sweet custard and caramelized crust, a taste of pure nostalgia.
Recipe Overview
- Prep Time: 35 minutes
- Cook Time: 20-25 minutes
- Total Time: 55-60 minutes
- Servings: 5-6
- Dietary Type: Omnivore
Ingredients
- 6 large eggs
- 1 1/2 cups milk
- 1 1/2 teaspoons pure vanilla extract
- 2 tablespoons sugar
- 1/2 teaspoon ground cinnamon
- 1 French bread (sliced thick, day-old bread) or 1 Italian bread (sliced thick, day-old bread)
- 4 tablespoons unsalted butter
- Powdered sugar, for dusting
- Maple syrup (optional), for serving
Equipment Needed
- Large bowl
- Whisk
- Large shallow baking dish
- Wide spatula
- Two baking sheets with sides
Instructions
-
Prepare the Custard: In a large bowl, whisk together the 6 large eggs, 1 1/2 cups of milk, 1 1/2 teaspoons of pure vanilla extract, 2 tablespoons of sugar, and 1/2 teaspoon of ground cinnamon. Whisk until everything is thoroughly blended and the sugar is dissolved. This custard base is what gives the Pain Perdu its rich flavor.
-
Soak the Bread: Arrange the sliced French or Italian bread in a large shallow baking dish. Overlap the slices slightly if necessary to fit them all. Pour the milk mixture evenly over the bread.
-
Let the Bread Soak: Allow the bread to stand and soak up the custard for at least 30 minutes. About halfway through, carefully turn the bread slices with a wide spatula and rearrange them so they are evenly moistened. This ensures that every piece of bread is infused with the custard, resulting in a uniformly delicious final product. Proper soaking is key to avoiding dry spots in the baked Pain Perdu.
-
Preheat the Oven: Position one oven rack in the upper third of the oven and another in the lower third. Preheat the oven to 400°F (200°C).
-
Prepare the Baking Sheets: Put 2 tablespoons of unsalted butter on each of two baking sheets with sides. Place the baking sheets in the preheated oven until the butter is completely melted and the pans are hot, about 5 minutes. This step is crucial for creating a crispy, golden-brown crust.
-
Coat the Pans with Butter: Tilt the pans so the melted butter coats them evenly. Be careful as the pans will be very hot. Remove the pans from the oven.
-
Arrange the Bread on Baking Sheets: Carefully place 5 to 6 slices of the soaked bread on each of the hot pans, spacing them evenly. Avoid overcrowding the pans, as this can prevent the bread from browning properly.
-
Bake the Pain Perdu: Bake for 15 minutes. After 15 minutes, take the pans out of the oven and carefully turn each piece of bread over with a wide spatula.
-
Continue Baking: Return the pans to the oven, placing the one from the top rack on the bottom rack and vice versa. Continue baking until the bread is puffed and evenly browned, about 15 to 20 minutes more. Keep a close eye on the bread during this final baking stage to prevent burning.
-
Serve: Transfer the Pain Perdu to a platter, dust generously with powdered sugar, and serve immediately. For an extra touch of sweetness, serve with warm maple syrup, if desired.
Expert Tips & Tricks
- Bread Choice Matters: Using day-old bread is essential because it absorbs the custard better without becoming soggy. If your bread is too fresh, you can dry it out slightly by leaving it uncovered overnight.
- Don’t Skip the Soaking: The soaking time is critical for achieving the right texture. Too short, and the bread will be dry; too long, and it will be mushy. Aim for the 30-minute mark, adjusting slightly based on the bread’s density.
- Hot Pan is Key: Melting the butter in the baking sheet before adding the soaked bread is what creates that irresistible crispy bottom. Make sure the pan is hot before adding the bread.
- Even Browning: Rotating the pans halfway through baking ensures that the Pain Perdu browns evenly on both sides.
- Flavor Infusion: For a richer flavor, consider adding a splash of orange liqueur or a pinch of nutmeg to the custard mixture.
- Prevent Sticking: If you’re concerned about the bread sticking to the baking sheets, you can line them with parchment paper before melting the butter.
Serving & Storage Suggestions
Pain Perdu is best served immediately while it’s warm and the crust is crispy. Dust generously with powdered sugar for an elegant presentation, and offer a side of maple syrup, fresh berries, whipped cream, or a fruit compote.
Leftover Pain Perdu can be stored in an airtight container in the refrigerator for up to 2 days. To reheat, bake in a preheated oven at 350°F (175°C) for about 10-15 minutes, or until heated through. You can also reheat individual slices in a toaster oven or microwave, though the texture may be slightly softer. Freezing is not recommended, as the texture of the bread will change significantly.
Nutritional Information
| Nutrient | Amount per Serving | % Daily Value |
|---|---|---|
| Calories | 350 kcal | 18% |
| Total Fat | 18g | 28% |
| Saturated Fat | 8g | 40% |
| Cholesterol | 225mg | 75% |
| Sodium | 250mg | 11% |
| Total Carbohydrate | 35g | 12% |
| Dietary Fiber | 1g | 4% |
| Sugars | 15g | – |
| Protein | 12g | 24% |
Note: Nutritional information is an estimate and may vary based on specific ingredients and portion sizes.
Variations & Substitutions
- Dairy-Free Pain Perdu: Substitute the milk with almond milk, soy milk, or oat milk. Use a dairy-free butter alternative for cooking.
- Gluten-Free Pain Perdu: Use gluten-free bread slices instead of traditional bread.
- Spiced Pain Perdu: Add a pinch of ground nutmeg, cardamom, or ginger to the custard mixture for a warmer, more aromatic flavor.
- Citrus Zest: Add the zest of an orange or lemon to the custard for a bright, refreshing twist.
- Berry Infusion: Puree fresh or frozen berries and swirl them into the custard for a fruity Pain Perdu.
- Savory Pain Perdu: Omit the sugar and vanilla. Add herbs like thyme or rosemary. Use cheese like Gruyere or Parmesan to coat the outside after soaking. Serve with a fried egg on top.
FAQs (Frequently Asked Questions)
Q: Can I use a different type of bread?
A: Yes, while French or Italian bread is traditionally used, you can experiment with other types of bread such as brioche, challah, or even croissants. Just be mindful that the soaking time may need to be adjusted depending on the bread’s density.
Q: What if I don’t have time to soak the bread for 30 minutes?
A: While the 30-minute soaking time is recommended for optimal texture, you can get away with a shorter soaking time (around 15-20 minutes) if you’re in a hurry. Just make sure to flip the bread slices frequently to ensure they’re evenly moistened.
Q: Can I make Pain Perdu ahead of time?
A: You can prepare the custard mixture ahead of time and store it in the refrigerator for up to 24 hours. However, it’s best to soak and bake the bread fresh for the best texture.
Q: My Pain Perdu is burning on the bottom. What should I do?
A: If the bottom of the Pain Perdu is browning too quickly, lower the oven temperature slightly (to 375°F or 190°C) and move the baking sheet to a higher rack in the oven. You can also tent the baking sheet with foil to prevent further browning.
Q: Can I add chocolate chips to the Pain Perdu?
A: Absolutely! Adding chocolate chips to the custard mixture or sprinkling them on top of the soaked bread before baking is a delicious way to add a touch of indulgence.
Final Thoughts
Pain Perdu is more than just a way to use up stale bread; it’s a celebration of simple ingredients transformed into something truly delightful. With its crispy edges, custardy interior, and comforting aroma, this classic dish is sure to become a favorite in your kitchen. So, gather your ingredients, preheat your oven, and prepare to rediscover the joy of Pain Perdu. Don’t hesitate to experiment with variations and substitutions to create your own signature version. And most importantly, share your culinary creations with loved ones and savor the sweet moments together. Bon appétit!