
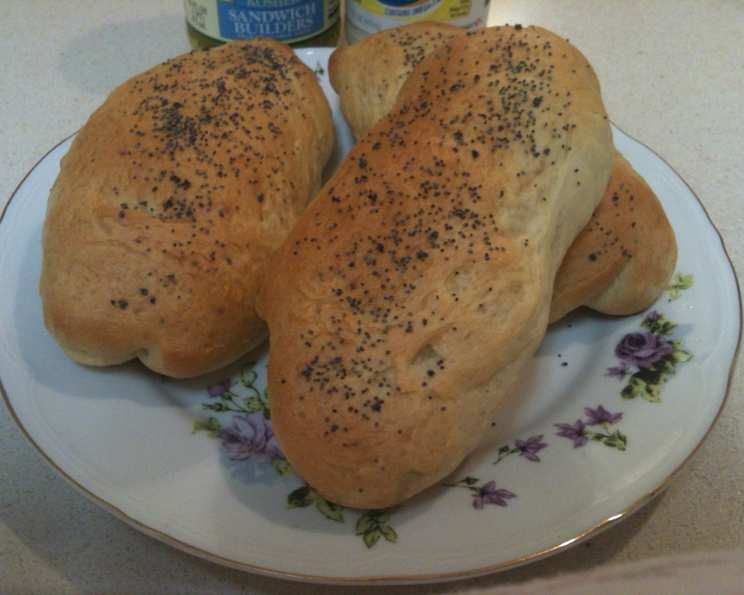
Pammy’s Hoagies: Homemade Happiness from Your Bread Machine
I can still remember the aroma wafting through our kitchen every Saturday morning. Mom would fire up her trusty bread machine, not for a loaf of sandwich bread, but for hoagie rolls. They were destined for the most epic Saturday lunch spread – Italian cold cuts, provolone sharper than my kid wit, shredded lettuce, and a tangy vinaigrette, all piled high on those perfectly soft-yet-slightly-chewy rolls. That memory, that taste, is pure, unadulterated comfort. Recreating those hoagies, making them fresh in my own kitchen, feels like a warm hug from the past.
Recipe Overview
- Prep Time: 15 minutes
- Cook Time: 20-25 minutes
- Total Time: 2 hours 15 minutes (includes dough cycle and rise time)
- Servings: 6
- Yield: 6 hoagie rolls
- Dietary Type: Vegetarian
Ingredients
- 1 cup water (Temp. 110-115 degrees F.)
- 2 teaspoons sugar
- 4 teaspoons vegetable oil
- 1 teaspoon salt
- 2 3/4 cups all-purpose flour
- 2 1/4 teaspoons bread machine yeast
Equipment Needed
- Bread Machine
- Waxed Paper
- Cookie Sheet
- Kitchen Scissors
- Pam or cooking spray
- Knife
Instructions
- If desired (for easier release and cleanup), consider spraying the inside of your bread machine pan with Pam or another cooking spray.
- Place the ingredients into the bread machine pan in the order listed: water, sugar, vegetable oil, salt, all-purpose flour, and finally, bread machine yeast. It’s often recommended to keep the salt and yeast separate at first.
- Select the dough cycle on your bread machine. Most dough cycles run for approximately 1 1/2 hours.
- While the dough cycle is running, prepare a clean work surface. Lay out a piece of waxed paper and lightly sprinkle it with flour. This will prevent the dough from sticking.
- Once the dough cycle is complete, gently punch down the dough to release any excess air.
- Grease your hands lightly with Pam or vegetable oil. This is crucial, as the dough tends to be quite sticky.
- Carefully remove the dough from the bread machine and place it onto the prepared floured surface (the waxed paper).
- Sprinkle a little flour on the top of the dough and gently smooth it over the surface. This will make it easier to handle.
- Using a knife sprayed with Pam or cooking spray (to prevent sticking), cut the dough into 6 equal pieces.
- Spray a cookie sheet with Pam or cooking spray.
- Place the dough pieces evenly spaced apart on the prepared cookie sheet.
- Shape each piece of dough into an oval shape, resembling a hoagie roll.
- Using kitchen scissors, make a shallow “snip” in the center of each roll, about 1 to 2 inches long and about 1/4 inch deep. This helps the rolls rise evenly and creates a classic hoagie look.
- Cover the rolls loosely and let them rise for 20 minutes. A warm environment, like the top of a preheating stove, can speed up the rising process. Make sure your oven is preheated to 400 degrees F (200 degrees C).
- Bake in the preheated oven at 400 degrees F (200 degrees C) for 20 to 25 minutes, or until the rolls are golden brown. For a “harder” crust, bake them a few minutes longer, keeping a close eye to prevent burning.
Expert Tips & Tricks
- Temperature is key: Ensure the water is between 110-115°F (43-46°C) to properly activate the yeast. Too hot, and you’ll kill the yeast; too cold, and it won’t activate properly.
- Sticky situation: Don’t be afraid to use flour! This dough is naturally sticky, so keep your hands and work surface lightly floured to prevent frustration.
- The snip: The scissor snip isn’t just for looks. It allows the rolls to expand properly during baking, creating that signature hoagie shape.
- Oven variances: Every oven is different. Keep an eye on the rolls during baking, adjusting the time as needed to achieve that perfect golden-brown color. Rotate the baking sheet halfway through to ensure even baking.
- Make ahead: You can prepare the dough the night before, let it complete the dough cycle in the bread machine, and then refrigerate it (covered) until you’re ready to shape and bake the rolls the next day. Just let it sit at room temperature for about 30 minutes before shaping.
Serving & Storage Suggestions
Serve these homemade hoagie rolls warm or at room temperature, sliced and filled with your favorite ingredients. They’re perfect for classic cold-cut hoagies, cheesesteaks, meatball subs, or even just a simple buttered roll alongside soup or salad.
- Room Temperature: Store cooled hoagie rolls in an airtight container at room temperature for up to 2 days.
- Refrigerator: For longer storage, keep them in an airtight container in the refrigerator for up to 5 days.
- Freezer: For extended storage, freeze the rolls in a freezer-safe bag or container for up to 2 months. Thaw completely before using.
- Reheating: To reheat, wrap the rolls in foil and bake in a preheated oven at 350°F (175°C) for 5-10 minutes, or until warmed through. You can also microwave them for a few seconds, but they may become slightly chewy.
Nutritional Information
Please note: These values are estimates and can vary based on specific ingredients and serving sizes.
| Nutrient | Amount per Serving | % Daily Value |
|---|---|---|
| Calories | 245 kcal | N/A |
| Total Fat | 3.7g | 5% |
| Saturated Fat | 0.5g | 2% |
| Cholesterol | 0mg | 0% |
| Sodium | 391mg | 16% |
| Total Carbohydrate | 46g | 15% |
| Dietary Fiber | 1.9g | 7% |
| Sugars | 1.6g | N/A |
| Protein | 6.5g | 13% |
Variations & Substitutions
- Whole Wheat Hoagies: Substitute up to half of the all-purpose flour with whole wheat flour for a nuttier flavor and added fiber.
- Herb-Infused: Add 1-2 teaspoons of dried herbs, such as Italian seasoning, oregano, or rosemary, to the dough for an extra layer of flavor.
- Garlic Hoagies: Mix 1-2 teaspoons of garlic powder into the dough.
- Gluten-Free: While this recipe is designed for all-purpose flour, you can experiment with gluten-free bread flour blends. Keep in mind that you might need to adjust the liquid content to achieve the right dough consistency.
- Vegan: This recipe is already easily vegan since it uses vegetable oil. Just make sure your sugar is processed without bone char (if this is a concern).
FAQs (Frequently Asked Questions)
Q: Can I make this dough without a bread machine?
A: Yes, you can! Combine the ingredients in a bowl, knead for 8-10 minutes until smooth and elastic, let it rise in a warm place for 1-1.5 hours, and then proceed with the recipe.
Q: Why is my dough so sticky?
A: This dough is naturally sticky, so don’t worry too much. Make sure to grease your hands and work surface well, and use a little extra flour if needed.
Q: Can I freeze the dough before baking?
A: Yes, you can! After the dough cycle is complete, punch down the dough, shape it into rolls, and then freeze them on a baking sheet. Once frozen solid, transfer them to a freezer-safe bag. When ready to bake, thaw them overnight in the refrigerator and let them rise before baking.
Q: My rolls are browning too quickly. What should I do?
A: If your rolls are browning too quickly, tent them with foil to prevent further browning while allowing them to continue baking through.
Q: Can I use active dry yeast instead of bread machine yeast?
A: Yes, but you’ll need to proof the active dry yeast first. Dissolve it in the warm water with the sugar and let it sit for 5-10 minutes until it’s foamy. Then, add it to the bread machine along with the other ingredients.
Final Thoughts
Don’t be intimidated by making your own hoagie rolls. This Pammy’s Hoagie recipe is surprisingly simple thanks to the bread machine, and the taste of fresh, homemade bread is absolutely worth the effort. Gather your favorite fillings, invite some friends over, and enjoy the satisfaction of creating a truly special meal from scratch. I encourage you to give this recipe a try and put your own spin on it. Let me know in the comments how they turned out, and what delicious fillings you chose!