
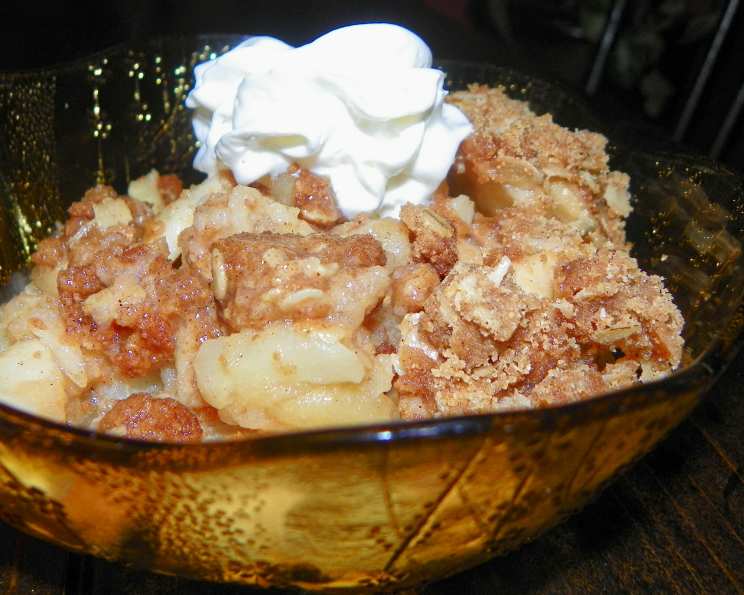
Pampered Chef Style Apple Crisp: Microwave or Oven Perfection
I can still picture my Aunt Carol’s kitchen, bathed in the warm glow of a late afternoon sun. It was my first Pampered Chef party, and the air hung thick with the scent of cinnamon and baked apples. Aunt Carol, a whirlwind of energy, effortlessly assembled this apple crisp while regaling us with stories. I remember being amazed at how simple, yet utterly comforting, this dessert was. Even though I’ve expanded my culinary horizons since then, the memory of that crisp, warm apple dessert always brings me back to that cozy kitchen, a reminder of the simple joys of home cooking.
Recipe Overview
- Prep Time: 20 minutes
- Cook Time (Microwave): 12-15 minutes
- Cook Time (Oven): 30-35 minutes
- Total Time (Microwave): 32-35 minutes
- Total Time (Oven): 50-55 minutes
- Servings: 6-8
- Dietary Type: Vegetarian
Ingredients
- 4-6 large tart baking apples, peeled, cored, and sliced thinly (such as Granny Smith)
- 8 graham cracker squares (2 1/2 inches each)
- 3/4 cup brown sugar, packed
- 1/2 cup rolled oats (such as Quaker old fashioned or quick oats, not instant)
- 1/2 cup all-purpose flour
- 1 teaspoon ground cinnamon
- 1/2 teaspoon ground nutmeg
- 1/2 cup sweet unsalted butter or 1/2 cup margarine, melted
- Whipped cream (optional) or ice cream, for garnish (optional)
Equipment Needed
- 12″ round stoneware baking pan (such as the Pampered Chef deep dish baker)
- Cutting board
- Knife or apple peeler/corer/slicer
- Mixing bowl
- Measuring cups and spoons
- Microwave or oven
Instructions
-
Begin by preparing your apples. Peel, core, and thinly slice 4-6 large tart baking apples. The number of apples will depend on their size. Granny Smith apples provide a delightful tartness that balances the sweetness of the topping, but you can also use Honeycrisp or a blend for a more complex flavor. The slices should be uniformly thin to ensure even cooking.
-
Next, prepare the crisp topping. Finely chop 8 graham cracker squares. This can be done in a food processor for speed or by hand using a knife. In a mixing bowl, combine the chopped graham crackers with 1/2 cup rolled oats, 3/4 cup packed brown sugar, 1/2 cup all-purpose flour, 1 teaspoon ground cinnamon, and 1/2 teaspoon ground nutmeg.
-
Add the melted fat. Pour 1/2 cup melted sweet unsalted butter (or margarine) into the dry ingredients. Mix well until the mixture resembles coarse crumbs. Make sure all the dry ingredients are moistened by the melted butter or margarine.
-
Assemble the crisp. Arrange the sliced apples in the 12″ round stoneware baking pan. You want to fill the pan approximately 3/4 full with the apple slices. If the apples are piled too high, they won’t cook evenly.
-
Top with the crisp mixture. Spoon the graham cracker-oat mixture evenly over the apple slices, ensuring that the entire surface is covered. Gently press down on the topping to help it adhere to the apples.
-
Choose your cooking method:
- Microwave Method: Microwave on high for 12-15 minutes, or until the apples are tender. Be sure to turn the dish halfway through the cooking time (after about 6 minutes) to ensure even cooking. The timing may vary depending on the wattage of your microwave, so start checking for doneness around 12 minutes.
- Oven Method: Preheat your oven to 350°F (175°C). Bake for 30-35 minutes, or until the apples are tender and the topping is golden brown. Check for doneness by inserting a fork into the apples – they should be easily pierced.
-
Let cool slightly. Allow the apple crisp to cool for a few minutes before serving. This will allow the flavors to meld and prevent burning your mouth.
-
Serve and enjoy! Serve warm, with a dollop of whipped cream or a scoop of ice cream, if desired. A sprinkle of extra cinnamon adds a lovely finishing touch.
Expert Tips & Tricks
- Preventing Brown Apples: To prevent your apples from browning while you prepare the topping, toss them with a tablespoon of lemon juice or a splash of apple cider vinegar.
- Crisp Topping Perfection: For an extra-crispy topping, consider adding a tablespoon of cornstarch to the dry ingredients. This will help absorb any excess moisture from the apples.
- Nutty Flavor: Toast the oats in a dry skillet for a few minutes before adding them to the topping for a richer, nuttier flavor. Be sure to watch them carefully to avoid burning.
- Enhance Apple Flavor: A pinch of ground cloves or allspice added to the apple slices will deepen the warm, spicy flavor of the crisp.
- Make-Ahead Magic: Assemble the apple crisp ahead of time and store it in the refrigerator until you’re ready to bake. This is a great option for busy weeknights. Simply add a few extra minutes to the baking time if baking from cold.
- Stoneware Tip: If using stoneware, it heats evenly and retains heat well. You may need to reduce the oven baking time by a few minutes. Always handle stoneware with oven mitts, as it gets very hot.
Serving & Storage Suggestions
This apple crisp is best served warm, either on its own or with a complementary topping. A scoop of vanilla ice cream is a classic choice, but a dollop of whipped cream or a drizzle of caramel sauce also works beautifully.
Leftover apple crisp can be stored at room temperature for up to 2 days, or in the refrigerator for up to 4 days. To reheat, simply microwave individual portions for 30-60 seconds, or bake in a preheated oven at 350°F (175°C) for 10-15 minutes until warmed through. For longer storage, freeze the apple crisp in an airtight container for up to 2 months. Thaw overnight in the refrigerator before reheating.
Nutritional Information
(Please note that these values are estimates and can vary based on specific ingredients and portion sizes.)
| Nutrient | Amount per Serving | % Daily Value |
|---|---|---|
| Calories | 462 kcal | N/A |
| Total Fat | 18g | 27% |
| Saturated Fat | 10g | 50% |
| Cholesterol | 41mg | 13% |
| Sodium | 101mg | 4% |
| Total Carbohydrate | 75g | 24% |
| Dietary Fiber | 5g | 21% |
| Sugars | 48g | N/A |
| Protein | 4g | 7% |
Variations & Substitutions
- Gluten-Free Apple Crisp: Substitute the all-purpose flour with a gluten-free all-purpose flour blend. Ensure the rolled oats are certified gluten-free as well.
- Dairy-Free Apple Crisp: Use a plant-based butter alternative such as coconut oil or a dairy-free margarine. Serve with a non-dairy ice cream or whipped topping.
- Different Fruits: Experiment with other fruits such as pears, peaches, or berries. Adjust the sweetness accordingly.
- Nutty Topping: Add chopped nuts, such as pecans or walnuts, to the crisp topping for extra crunch and flavor.
- Spice it Up: Incorporate warming spices like ginger, cardamom, or cloves to create unique flavor profiles.
FAQs (Frequently Asked Questions)
Q: Can I use different types of apples?
A: Absolutely! While Granny Smith apples are a classic choice for their tartness, feel free to experiment with other varieties like Honeycrisp, Fuji, or Gala, or a mix for more complex flavors.
Q: Can I make this apple crisp without graham crackers?
A: Yes, you can substitute the graham crackers with crushed vanilla wafers or shortbread cookies for a similar texture and flavor. You could also use more oats and flour.
Q: How do I know when the apple crisp is done?
A: The apple crisp is done when the apples are tender and the topping is golden brown and slightly crisp. You should be able to easily pierce the apples with a fork.
Q: Can I freeze the apple crisp?
A: Yes, you can freeze the assembled or baked apple crisp. Wrap it tightly in plastic wrap and then foil, or place it in an airtight container. Thaw overnight in the refrigerator before reheating.
Q: My topping is getting too brown before the apples are cooked. What should I do?
A: Cover the apple crisp loosely with aluminum foil during the last part of the baking time to prevent the topping from burning.
Final Thoughts
Whether you’re seeking a quick microwave dessert or a cozy oven-baked treat, this Pampered Chef Style Apple Crisp is sure to delight. Its simplicity is its charm, and the combination of tart apples and a sweet, crumbly topping is simply irresistible. Don’t hesitate to experiment with different variations and substitutions to make it your own. Gather your ingredients, preheat your oven (or grab your microwave), and prepare to enjoy a slice of comforting homemade goodness. And be sure to share your creations and variations with friends and family – the best part of cooking is sharing the love!