
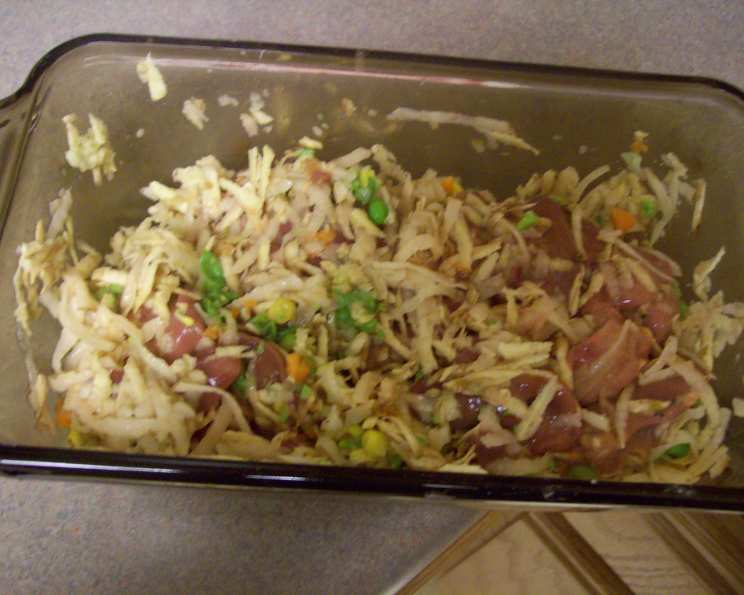
Pam’s Puppy Pate: A Homemade Delight for Your Furry Friend
I’ll never forget the first time I made this pate. My old golden retriever, Buster, had become a picky eater in his later years, turning his nose up at even the most expensive kibble. Desperate to find something he would enjoy and that would keep him healthy, I turned to my culinary instincts. The moment Buster got a whiff of this cooking, his tail started wagging like a metronome gone wild. Seeing him devour it with such gusto filled my heart with joy – and it quickly became a staple in his diet, and I’m sure it will for you too!
Recipe Overview
- Prep Time: 15 minutes
- Cook Time: 30 minutes
- Total Time: 45 minutes
- Yields: Approximately 18 pate balls
- Serves: 2 (depending on dog size/appetite)
- Dietary Type: Homemade Dog Food
Ingredients
- 1-2 lb chicken liver (beef liver can be substituted)
- ½ lb russet potato, shredded
- ½ lb sweet potato, shredded
- 2 cloves garlic, finely minced (optional)
- 1 cup mixed vegetables, cooked (peas, carrots, green beans, etc.)
Equipment Needed
- Loaf Pan
- Microwave-safe dish
- Foil
- Meat Thermometer
- Food Processor
- Medium-sized scoop
- Plate
- Freezer-safe container or plastic storage bag
Instructions
-
Begin by rinsing the chicken livers thoroughly under cold water. This step is crucial to remove any impurities and ensure a clean flavor. Once rinsed, place the livers in a loaf pan.
-
Next, prepare the potatoes. Shred both the russet potato and the sweet potato. Place the shredded potatoes in a microwave-safe dish. Microwave on high for 5-7 minutes, or until the potatoes are soft and easily pierced with a fork. The microwave time may vary slightly depending on your microwave’s power.
-
While the potatoes are cooking, finely chop the cooked mixed vegetables. If you’re using frozen vegetables, make sure they are thawed and cooked according to package instructions before chopping.
-
In the loaf pan containing the chicken livers, add the microwaved potatoes, minced garlic (if using), and finely chopped mixed vegetables. Mix all the ingredients together thoroughly, ensuring they are evenly distributed.
-
Cover the loaf pan tightly with foil. This will help to trap the steam and ensure that the pate cooks evenly.
-
Bake in a preheated oven at 350ºF (175ºC) for 30 minutes, or until a meat thermometer inserted into a chicken liver registers 170ºF (77ºC). Achieving this internal temperature is vital for food safety and ensures the livers are fully cooked.
-
Halfway through the cooking process (after approximately 15 minutes), carefully remove the loaf pan from the oven. Give the mixture a good stir to ensure the chicken livers are cooking evenly throughout. Recover the pan with foil and return it to the oven.
-
With approximately 5 minutes remaining in the cooking time, remove the pan from the oven again and stir the mixture. This time, return the pan to the oven without the foil cover. This will allow the top of the pate to brown slightly.
-
Once the dish is fully cooked, remove it from the oven and let it cool slightly. Transfer the cooked mixture to a food processor. Pulse the mixture until it is completely combined and reaches an almost smooth pate-like consistency. You may need to scrape down the sides of the food processor occasionally to ensure even processing.
-
Using a medium-sized scoop, form the pate into balls. Place the balls on a plate to cool for a few minutes. Then, transfer the plate to the freezer to flash freeze the meatballs.
-
Once the pate balls are frozen solid, transfer them to a freezer-safe container or plastic storage bag. They can now be stored in the freezer for future use. The individual freezing allows you to easily remove only the amount you need each day.
-
Serve the pate to your dog! If you have any cooked brown rice on hand, you can serve the pate with it. Alternatively, you can use doggie biscuits (homemade or store bought) and dip them into the pate as a special treat.
Expert Tips & Tricks
- For a smoother pate, add a small amount of chicken broth (unsalted) or water to the food processor while blending.
- If you don’t have a food processor, you can mash the cooked mixture with a potato masher or fork, though the texture will be less smooth.
- Consider adding a spoonful of plain, unsweetened yogurt to the pate for added probiotics and digestive benefits (ensure your dog isn’t lactose intolerant).
- To ensure even cooking, spread the mixture evenly in the loaf pan before baking.
- If you’re using beef liver, be mindful that it can have a stronger flavor than chicken liver. Some dogs may prefer the milder taste of chicken liver.
Serving & Storage Suggestions
Serve Pam’s Puppy Pate chilled or at room temperature, depending on your dog’s preference. Always ensure fresh water is available.
- Refrigerator: Store cooked pate in an airtight container in the refrigerator for up to 3-4 days.
- Freezer: Frozen pate balls can be stored in a freezer-safe container or bag for up to 2-3 months.
- Reheating (optional): If you prefer to serve the pate slightly warmed, microwave it for a few seconds (ensure it’s not too hot before serving to your dog).
Nutritional Information
Note: Nutritional information is an estimate and can vary based on ingredient quantities and preparation methods.
| Nutrient | Amount per Serving (approx. 3 balls) |
|---|---|
| Calories | 250-350 kcal |
| Protein | 25-35g |
| Fat | 10-20g |
| Carbohydrates | 20-30g |
| Fiber | 3-5g |
Variations & Substitutions
- Grain-Free: Omit the russet potato and increase the amount of sweet potato, or substitute with pumpkin puree.
- Protein Source: Substitute chicken liver with beef liver, turkey liver, or even ground turkey.
- Vegetable Boost: Add other dog-safe vegetables like spinach, kale, or zucchini.
- Omega-3 Boost: Add a teaspoon of flaxseed oil or salmon oil to the pate after cooking (ensure it’s dog-safe).
FAQs (Frequently Asked Questions)
Q: Can I use canned vegetables instead of fresh/frozen?
A: Yes, you can use canned vegetables, but be sure to choose varieties that are low in sodium and rinse them thoroughly before adding them to the recipe.
Q: Is garlic safe for dogs?
A: Garlic is a controversial ingredient. While small amounts are generally considered safe, larger quantities can be toxic to dogs. Use sparingly or omit it altogether if you’re concerned.
Q: My dog has allergies. Can I still make this?
A: Absolutely! Tailor the ingredients to your dog’s specific needs. For example, if your dog is allergic to chicken, try using ground turkey or beef liver instead.
Q: How much of this pate should I feed my dog each day?
A: The amount you feed your dog will depend on their size, age, activity level, and overall health. Start with a small portion and adjust as needed, consulting with your veterinarian for specific recommendations.
Q: Can I freeze the entire loaf of pate instead of making balls?
A: Yes, you can freeze the entire loaf. However, portioning it into balls makes it easier to thaw and serve only what you need.
Final Thoughts
Pam’s Puppy Pate is a labor of love, a simple yet nourishing way to show your furry friend just how much you care. It’s incredibly rewarding to see them enjoy something you’ve made from scratch, knowing exactly what ingredients are going into their bowl. Don’t be afraid to experiment with different variations and find the perfect combination that your dog adores. I encourage you to give this recipe a try, and I’d love to hear your feedback and see pictures of your happy pups enjoying their homemade pate!