
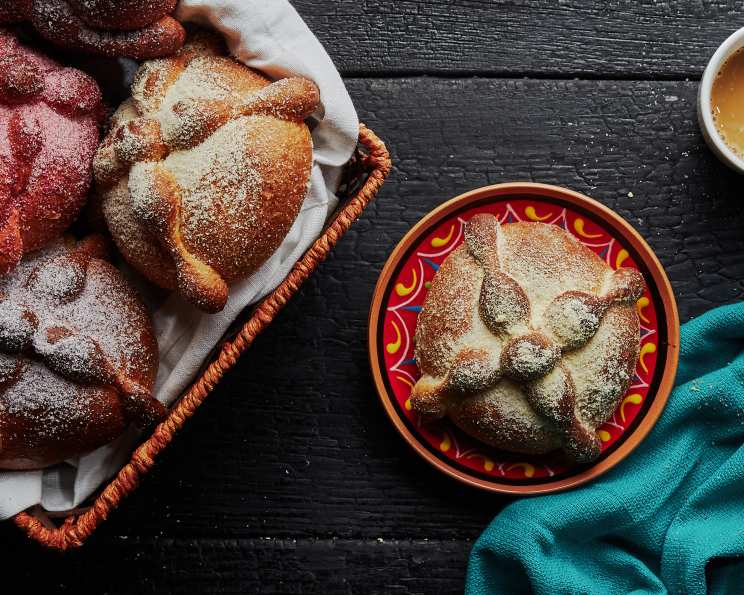
Pan de Muerto: A Sweet Offering for Día de los Muertos
The aroma alone transports me back to my grandmother’s kitchen, filled with the comforting scent of orange zest, yeast, and warm butter. As a child, I remember eagerly awaiting Día de los Muertos, not just for the colorful ofrendas and family gatherings, but for the Pan de Muerto. The sweet, slightly floral bread, adorned with dough “bones” and a dusting of sugar, was more than just a treat; it was a tangible link to our ancestors, a delicious way to honor their memory. Now, making it myself, I feel that connection even stronger, a comforting warmth spreading through my heart as I knead the dough.
Recipe Overview
- Prep Time: 2 hours
- Cook Time: 30-40 minutes
- Total Time: 14 hours 10 minutes (including rising/chilling time)
- Servings: 8
- Yield: 8 loaves
- Dietary Type: Not specified (contains dairy, eggs)
Ingredients
- 2 ounces freeze dried fruit or 1 ounce freshly dried herbs
- 3/4 cup sugar, divided
- 1/2 cup whole milk (warmed to 110 degrees F)
- 1 1/4 ounces envelope active dry yeast (about 2-1/4 teaspoons)
- 2 teaspoons kosher salt
- 3 large eggs, room temperature
- 1 teaspoon finely grated orange zest
- 3 tablespoons nonfat dry milk powder
- 3 cups bread flour, plus more for surface
- 14 tablespoons unsalted butter, cut into pieces, room temperature, plus more for bowl
- Nonstick cooking spray
Equipment Needed
- Blender
- Small bowl
- Fine mesh sieve
- Stand mixer (or large bowl for hand kneading)
- Dough hook attachment (if using stand mixer)
- Large bowl
- Plastic wrap
- 2 rimmed baking sheets
- Parchment paper
- Wire rack
Instructions
-
Prepare the Fruit Sugar: Pulverize the freeze-dried fruit or dried herbs in a blender until very finely ground. Transfer to a small bowl and whisk in 1/2 cup of the sugar. Sift the mixture through a fine mesh sieve, discarding any large pieces of fruit or herbs. Store the sifted fruit sugar in an airtight container until ready to use. This flavored sugar is what gives Pan de Muerto its distinctive sweetness and aroma.
-
Activate the Yeast: Whisk the warmed milk and yeast in the bowl of a stand mixer (or a large bowl if kneading by hand). Let sit for 10 minutes to dissolve. You might see only a few bubbles; it doesn’t need to be foamy.
-
Combine Wet Ingredients: In a separate small bowl, whisk together the remaining 1/4 cup sugar, salt, eggs, and orange zest.
-
Form the Dough: Add the milk powder, bread flour, and egg mixture to the yeast mixture. Mix with a wooden spoon until a shaggy dough forms.
-
Knead the Dough: Transfer the dough to the stand mixer fitted with the dough hook. Mix on medium speed until the dough comes together but is still slightly tough, about 3 minutes. Increase the speed to medium-high and add the butter, 1 tablespoon at a time. The dough will look broken after each addition, but it will eventually come together. Continue mixing until the dough is smooth, elastic, and very tacky but pulls away from the sides of the bowl, about 12 minutes. This may seem like a long time, but the extended kneading develops the gluten, which is crucial for the bread’s texture. Alternatively, knead the dough on a lightly floured surface, adding 1 tablespoon of butter at a time, until smooth and elastic, about 15 minutes.
-
First Rise (Proofing): Lightly butter a large bowl. Scrape the dough into the bowl. Cover with plastic wrap and let the dough rise in a warm, draft-free area until doubled in volume, about 35–50 minutes. This is one of those steps where visual cues are more important than the timer. If the dough is allowed to overproof, it will start to smell like alcohol and develop off flavors. Check it at 35 minutes; it should smell buttery and yeasty, and if it’s doubled, it’s done. If not, check again in 10 minutes.
-
Chill the Dough: Gently deflate the dough by lifting it up around the edges and letting it fall back into the bowl, turning the bowl and repeating if needed. Cover the bowl tightly with plastic wrap and chill for at least 12 hours and up to 3 days. An overnight rest works great for developing flavor.
-
Shape the Loaves: Line 2 rimmed baking sheets with parchment paper and lightly coat the parchment with nonstick spray. Turn the dough out onto a clean work surface and divide it into 8 equal pieces. Then, tear off a tablespoon-sized piece of dough from each piece and set it aside. Re-shape the larger 8 pieces into smooth, round balls and transfer them to the prepared sheet, spacing them evenly apart.
-
Make the “Bones” and “Tears”: Pinch off a ½ teaspoon-sized piece of dough from each of the remaining smaller 8 pieces. Roll each tiny piece into a smooth, round ball and transfer them to the second prepared sheet in a single row on one of the narrow ends, spaced about 1” apart. These are the “tears,” representing the souls of the departed.
-
Divide the remaining 8 pieces of dough in half; you should now have 16 small pieces of dough. Working one piece at a time, roll it using the palm of your hand into a 3” thin rope. Use your index finger to roll and press the center of the rope so that the middle is thinner and both ends are thicker. Next, use your two index fingers to roll and press the centers of the two thicker ends so that the centers are thin and the ends are thicker. The dough should look like a rope of 4 links of sausage; these are the bones. Carefully transfer them to the second prepared sheet tray and repeat with the remaining dough, spacing evenly apart on the prepared sheet.
-
Second Rise: Spray two large sheets of plastic wrap with non-stick spray and loosely cover the shaped loaves and bones. Let them rise in a warm, draft-free area until almost doubled in size, about 1½ hours.
-
Assemble and Bake: Position a rack in the center of the oven and preheat to 350°F (175°C). Remove the plastic wrap and carefully pick up one of the bones, lifting from the ends (it will stretch and deflate slightly). Drape it over one of the larger dough rounds, positioning it at 12 o’clock and 6 o’clock. Repeat with the second bone, positioning it at 9 o’clock and 3 o’clock. Carefully place one of the small balls (the “tear”) in the center, at the point where the bones overlap, gently pressing the edges of the ball into the bones and the larger ball, crowning the loaf.
-
Bake until deep golden brown, 30–40 minutes.
-
Cool and Finish: Transfer the pan to a wire rack and let cool for 10 minutes. Remove the loaves from the pan and brush them with melted butter. Immediately sprinkle generously with the prepared fruit sugar. Let cool completely on a wire rack for at least 1 hour before serving. The sugar coating will create a beautiful, slightly crunchy crust.
Expert Tips & Tricks
- Don’t skip the chilling time! This step is crucial for developing the complex flavors of the bread.
- If your kitchen is cold, you can create a warm place for the dough to rise by placing it in a turned-off oven with a bowl of hot water.
- For a richer flavor, use European-style butter with a higher fat content.
- Be careful not to overbake the bread, as it can become dry. Check for doneness by inserting a toothpick into the center; it should come out clean.
- The fruit sugar can be made a day or two in advance.
Serving & Storage Suggestions
Pan de Muerto is best served warm or at room temperature. It’s traditionally enjoyed with a cup of hot chocolate or coffee. Store leftover bread tightly wrapped at room temperature for up to 3 days. To refresh slightly stale bread, you can wrap it in foil and warm it in a low oven (300°F/150°C) for 10-15 minutes. While not ideal, it can also be frozen for up to 2 months. Thaw completely before serving.
Nutritional Information
Note: Nutritional information is an estimate and may vary based on specific ingredients and portion sizes.
| Nutrient | Amount per Serving | % Daily Value |
|---|---|---|
| Calories | 666.8 kcal | N/A |
| Calories from Fat | 279 g | 42% |
| Total Fat | 31.1 g | 47% |
| Saturated Fat | 18.4 g | 91% |
| Cholesterol | 167 mg | 55% |
| Sodium | 849.4 mg | 35% |
| Total Carbohydrate | 84.6 g | 28% |
| Dietary Fiber | 4.1 g | 16% |
| Sugars | 28.2 g | N/A |
| Protein | 14.5 g | 29% |
Variations & Substitutions
- Citrus Variations: Instead of orange zest, try using lime, grapefruit, or lemon zest for a different flavor profile.
- Anise Flavor: Add 1 teaspoon of anise seeds to the dough for a more traditional flavor.
- Gluten-Free Pan de Muerto: Substitute the bread flour with a gluten-free bread flour blend. You may need to adjust the liquid content.
- Vegan Pan de Muerto: Substitute the milk with non-dairy milk (such as almond or soy milk), the butter with vegan butter, and the eggs with flax eggs (1 tablespoon of ground flaxseed mixed with 3 tablespoons of water per egg).
- Seasonal Fruit Sugar: Experiment with different freeze-dried fruits depending on the season, such as strawberries in the spring or cranberries in the fall.
FAQs (Frequently Asked Questions)
Q: Why do I need to chill the dough overnight?
A: Chilling the dough allows the gluten to relax, making it easier to handle and resulting in a more tender crumb. It also develops deeper, more complex flavors.
Q: Can I use regular all-purpose flour instead of bread flour?
A: Bread flour is recommended because it has a higher protein content, which creates a chewier texture. However, you can use all-purpose flour, but the bread will be slightly less chewy.
Q: The dough seems too sticky. What should I do?
A: Resist the urge to add too much flour. A slightly sticky dough is normal. If it’s unmanageable, add flour one tablespoon at a time until it becomes easier to handle.
Q: My fruit sugar is clumping. How can I prevent this?
A: Make sure the freeze-dried fruit is completely pulverized before mixing it with the sugar. Store the fruit sugar in an airtight container in a cool, dry place.
Q: Can I make the dough ahead of time and freeze it?
A: Yes, you can freeze the dough after the first rise. Thaw it in the refrigerator overnight before shaping and baking.
Final Thoughts
Making Pan de Muerto is more than just baking; it’s an act of remembrance, a sweet tribute to those who came before us. Gather your family, embrace the tradition, and fill your home with the comforting aromas of this special bread. Don’t be afraid to experiment with different flavors and decorations to create your own unique Pan de Muerto. Share your creations with loved ones, and let the sweetness of this bread connect you to the past, present, and future. Enjoy!