
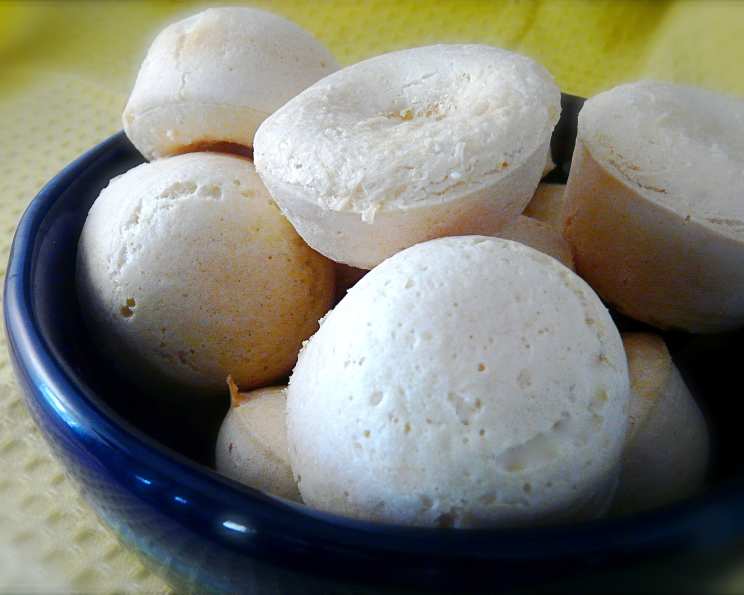
Pão De Queijo: The Irresistible Brazilian Cheese Puff
The first time I tasted Pão de Queijo, I was wandering through a bustling market in Rio de Janeiro. The air was thick with the scent of spices, tropical fruits, and something else… a warm, cheesy aroma that drew me in like a moth to a flame. A vendor with a beaming smile offered me one of these golden, puffy balls. The slightly chewy exterior gave way to a soft, airy interior, bursting with the distinctive tang of cheese. It was unlike anything I’d ever tasted, and I was instantly hooked. Ever since, I’ve been on a quest to recreate that perfect bite, and I’m thrilled to share my version with you.
Recipe Overview
- Prep Time: 10 minutes
- Cook Time: 18 minutes
- Total Time: 28 minutes
- Servings: 24-48 mini cheese breads (depending on muffin tin size)
- Yield: 2-4 dozen
- Dietary Type: Gluten-Free
Ingredients
- 3 cups tapioca starch
- 1 cup milk
- ½ cup vegetable oil
- 3 eggs
- 1 teaspoon salt
- 1 ½ cups grated Parmesan cheese
Equipment Needed
- Blender
- Mini-muffin tin (24 or 48 count)
- Oven
Instructions
-
Preheat your oven to 350°F (175°C). This is crucial for the puffs to rise properly and achieve their signature airy texture.
-
Prepare your mini-muffin tin. Generously grease the bottoms of either 24 or 48 mini-muffin cups. Alternatively, you can use a baking spray that contains flour for extra insurance against sticking. Proper greasing will ensure the Pão de Queijo release easily without tearing.
-
In your blender, combine the milk, oil, and eggs. Blend these wet ingredients until they are well combined, creating a smooth emulsion. This even distribution of liquids is key to achieving the right consistency.
-
Add the tapioca starch and salt to the blender. Blend again until just combined. Don’t over-blend at this stage; a few small lumps are perfectly fine. Over-blending can develop the gluten in the tapioca starch, resulting in a slightly tougher texture.
-
Finally, add the grated Parmesan cheese. Blend until the cheese is fully incorporated into the batter. The mixture will be quite liquid – this is exactly what you want. The liquid consistency is essential for the airy texture of Pão de Queijo.
-
Pour the batter into the prepared mini-muffin cups, filling each cup about 2/3 full. Leaving space allows the puffs to expand properly in the oven without overflowing.
-
Optionally, sprinkle the tops of the filled muffin cups with a bit more grated Parmesan cheese. This creates a beautifully golden and crisp topping.
-
Bake in the preheated oven for approximately 18 minutes, or until the Pão de Queijo are golden brown and have doubled in size. The baking time may vary slightly depending on your oven, so keep a close eye on them. The puffs should be firm to the touch and spring back slightly when pressed.
-
Serve the Pão de Queijo warm. They are at their absolute best when fresh from the oven!
Tips for Success:
- Tapioca Starch is Key: Don’t substitute tapioca starch (also known as tapioca flour) with other starches. It’s what gives Pão de Queijo its characteristic chewiness.
- Hot Oven, Happy Puffs: Make sure your oven is fully preheated before baking. A consistent, high temperature is crucial for the puffs to rise properly.
- Don’t Overmix: Overmixing the batter can lead to a slightly denser texture. Blend until just combined.
- Cheese Choice Matters: While Parmesan is traditional, you can experiment with other hard cheeses like Asiago or Provolone. Just make sure they are finely grated for even distribution.
- Listen to Your Oven: Baking times can vary. Use the golden brown color and doubled size as your visual cues for doneness.
Expert Tips & Tricks
- Freeze for Later: Pão de Queijo batter can be made ahead and frozen. Pour the batter into the muffin tins, then freeze until solid. Transfer the frozen puffs to a freezer bag and bake directly from frozen, adding a few extra minutes to the baking time.
- Crispy Bottoms: For extra crispy bottoms, place a baking sheet on the rack below the muffin tin. This helps to conduct heat more directly to the base of the puffs.
- Flavor Boosters: Add a pinch of garlic powder or onion powder to the batter for a more savory flavor. A sprinkle of dried herbs like oregano or thyme also works well.
- Troubleshooting: If your Pão de Queijo don’t rise, your oven temperature may be too low, or the batter may be too thick. If they are browning too quickly, lower the oven temperature slightly.
- Make it Spicy: For a kick, add a pinch of red pepper flakes or a dash of hot sauce to the batter.
Serving & Storage Suggestions
Pão de Queijo are best served warm, ideally within a few hours of baking. Their soft, chewy texture and cheesy flavor are most pronounced when fresh.
- Serving: Serve them as a delightful breakfast item, a savory snack, or a delicious accompaniment to soups and salads. They are also fantastic as part of a cheese board or appetizer spread.
- Storage: Leftover Pão de Queijo can be stored at room temperature in an airtight container for up to 2 days. They will lose some of their crispness over time, but can be easily reheated.
- Reheating: To reheat, bake in a preheated oven at 350°F (175°C) for a few minutes, or microwave for a short burst. For best results, reheat in the oven to restore some of their original texture.
- Freezing (Baked): Baked Pão de Queijo can also be frozen for longer storage. Allow them to cool completely, then freeze in a single layer on a baking sheet. Once frozen, transfer to a freezer bag. Reheat directly from frozen in a preheated oven.
Nutritional Information
Note: Nutritional information is an estimate and may vary based on specific ingredients and portion sizes.
| Nutrient | Amount per Serving | % Daily Value |
|---|---|---|
| Calories | 80 kcal | 4% |
| Total Fat | 5g | 6% |
| Saturated Fat | 3g | 15% |
| Cholesterol | 25mg | 8% |
| Sodium | 100mg | 4% |
| Total Carbohydrate | 5g | 2% |
| Dietary Fiber | 0g | 0% |
| Sugars | 0g | 0% |
| Protein | 2g | 4% |
Variations & Substitutions
- Cheese Variations: Experiment with different hard cheeses or a blend of cheeses. Try using Gruyere, Gouda, or even a sharp cheddar for a bolder flavor.
- Herb Infusion: Add fresh herbs like rosemary, thyme, or chives to the batter for an aromatic twist.
- Spicy Kick: Incorporate a pinch of cayenne pepper or a finely chopped jalapeño for a spicy version.
- Dairy-Free Option: While traditional Pão de Queijo relies on cheese, you can attempt a dairy-free version using nutritional yeast and a blend of plant-based cheeses (although the texture will be different). Use plant-based milk, as well.
- Sweet Variation: For a slightly sweet treat, add a tablespoon of sugar to the batter and serve with fruit preserves.
FAQs (Frequently Asked Questions)
Q: Can I use a different type of starch instead of tapioca starch?
A: While you can experiment, tapioca starch is essential for the unique chewy texture of Pão de Queijo. Other starches will result in a different consistency.
Q: My Pão de Queijo are not rising. What am I doing wrong?
A: Make sure your oven is fully preheated to the correct temperature. Also, avoid opening the oven door frequently during baking, as this can cause the puffs to deflate.
Q: Can I make the batter ahead of time and refrigerate it?
A: It’s best to bake the Pão de Queijo immediately after making the batter. The texture can change if the batter sits for too long. However, you can freeze the batter in the muffin tins before baking, as mentioned above.
Q: What is the best way to reheat leftover Pão de Queijo?
A: Reheating in a preheated oven at 350°F (175°C) for a few minutes will restore some of the original texture. You can also microwave them, but they may become a bit softer.
Q: Can I add other ingredients to the batter?
A: Absolutely! Get creative and experiment with adding spices, herbs, or even small pieces of cooked bacon for added flavor.
Final Thoughts
Now that you’re armed with this recipe and a few expert tips, it’s time to embark on your own Pão de Queijo adventure! This simple yet satisfying bread is a guaranteed crowd-pleaser, whether you serve it for breakfast, as a snack, or as part of a larger meal. Don’t be afraid to experiment with variations and substitutions to create your own signature version. Share your creations with friends and family, and most importantly, savor every cheesy, chewy bite. Bom apetite!