
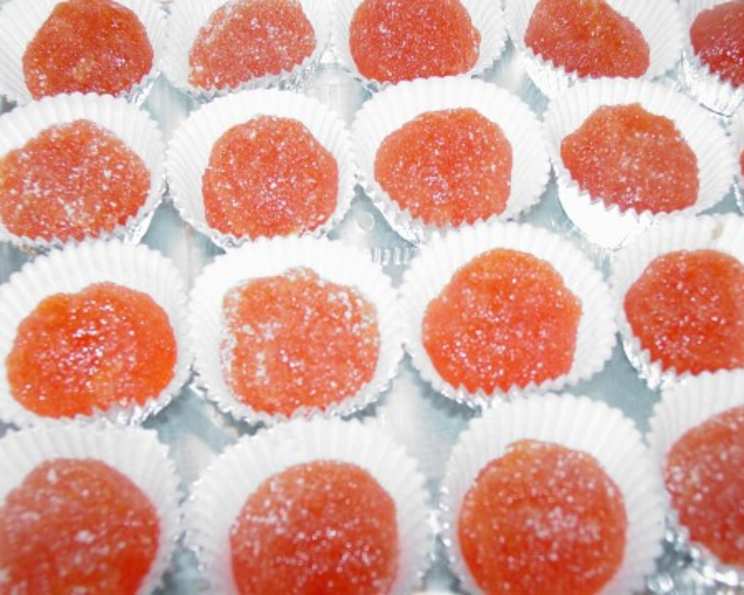
Papaya Balls: A Taste of Trinidadian Christmas
The first time I tried papaya balls was at a Christmas party hosted by my friend, Anya. She was born and raised in Trinidad, and her holiday celebrations were always a vibrant explosion of flavors, music, and laughter. Amongst the callaloo, pastelles, and black cake, sat a bowl of these unassuming little balls. They were soft, chewy, bursting with a unique sweetness, and tinged with a festive green that reminded me of tiny jewels. I popped one into my mouth and was instantly transported to a sun-drenched Caribbean Christmas. From that moment on, papaya balls became synonymous with holiday joy in my mind. Anya generously shared her family recipe, and now I’m sharing it with you.
Recipe Overview
- Prep Time: 20 minutes
- Cook Time: 1 hour – 1 hour 30 minutes (depending on desired consistency)
- Total Time: 1 hour 20 minutes – 1 hour 50 minutes
- Servings: Varies (Approximately 24-30 small balls)
- Yield: About 2 dozen small papaya balls
- Dietary Type: Vegetarian, Gluten-Free (potentially vegan depending on sugar source)
Ingredients
- 1 papaya, peeled and grated
- 1 teaspoon lime zest
- 2 teaspoons lime juice
- Approximately 3 cups sugar (adjust based on papaya quantity – use ¾ cup sugar per 1 cup of grated papaya)
- A few drops of green food coloring or red food coloring
- Granulated sugar, for rolling
Equipment Needed
- Grater
- Measuring cups and spoons
- Large saucepan
- Wooden spoon or spatula
- Bowls for mixing and cooling
- Baking sheet or tray (optional, for setting the balls)
Instructions
-
Begin by preparing the papaya. Peel it thoroughly and then grate it using a box grater or food processor with a grating attachment.
-
Once grated, place the papaya in a clean kitchen towel or cheesecloth. Squeeze out as much excess juice as possible. This step is crucial to achieving the right consistency for the final product. Discard the juice.
-
Measure the squeezed papaya to determine the correct amount of sugar to use. For every 1 cup of grated and squeezed papaya, you will need ¾ cup of sugar. This ratio is essential for the papaya balls to set properly.
-
In a large saucepan, combine the grated papaya, sugar, lime zest, and lime juice. Stir well to ensure the sugar is evenly distributed throughout the papaya.
-
Place the saucepan over medium-low heat. It’s crucial to cook the mixture slowly to prevent burning and allow the sugar to dissolve completely.
-
Cook, stirring frequently with a wooden spoon or spatula, until the mixture thickens and “gels”. This process can take anywhere from 1 hour to 1 hour and 30 minutes, depending on the heat and the moisture content of the papaya. The mixture is ready when you can drag your spoon through the pan and the mixture doesn’t immediately flow back to fill the gap. It should hold its shape for a few seconds.
-
Once the mixture has gelled, remove the saucepan from the heat. Add a few drops of green food coloring or red food coloring, depending on your preference. Stir until the color is evenly distributed. Remember, a little goes a long way, so start with just a drop or two and add more until you achieve the desired shade.
-
Allow the mixture to cool completely. This can be done at room temperature, but to speed up the process, you can transfer it to a shallow dish and refrigerate it for a couple of hours.
-
Once the mixture is cool enough to handle, shape it into small balls, about 1 inch in diameter. The cooled mixture will be sticky, so you might want to lightly grease your hands with a little oil or water to prevent sticking.
-
Roll each ball in granulated sugar until it is evenly coated. The sugar coating adds sweetness and prevents the balls from sticking to each other.
-
Place the coated papaya balls on a baking sheet or tray lined with parchment paper to set completely. This will help them maintain their shape. Let them sit for at least 30 minutes before serving.
Expert Tips & Tricks
- Papaya Selection: Choose a papaya that is ripe but still firm. Overripe papaya will be too soft and watery, making it difficult to achieve the desired consistency.
- Squeezing is Key: Don’t skimp on squeezing out the excess juice from the grated papaya. This is crucial for preventing the mixture from being too runny.
- Low and Slow Cooking: Cooking the mixture over low heat is essential to prevent burning and allow the sugar to dissolve properly.
- Sugar Adjustment: The amount of sugar needed can vary depending on the sweetness of the papaya. Taste the papaya after squeezing out the juice and adjust the sugar accordingly.
- Gel Point: Determining when the mixture has reached the “gel” point can be tricky. The mixture should be thick and sticky, and a small amount dropped onto a cold plate should set quickly.
- Troubleshooting: If the mixture is too runny after cooking, continue cooking over low heat until it thickens. If it becomes too thick, add a tablespoon of water or lime juice and stir until it loosens slightly.
Serving & Storage Suggestions
Papaya balls are best served at room temperature. Arrange them artfully on a platter for a festive presentation. They make a delightful addition to any dessert table, especially during the holidays.
To store, place the papaya balls in an airtight container at room temperature. They will keep for up to 3-4 days. Avoid refrigerating them, as this can make them sticky. They can also be frozen for longer storage. To freeze, place the balls in a single layer on a baking sheet lined with parchment paper and freeze until solid. Then, transfer them to a freezer-safe bag or container. They can be stored in the freezer for up to 2 months. Thaw them at room temperature before serving.
Nutritional Information
| Nutrient | Amount per Serving | % Daily Value |
|---|---|---|
| Calories | 203.6 kcal | N/A |
| Fat | 0 g | 0% |
| Saturated Fat | 0 g | 0% |
| Cholesterol | 0 mg | 0% |
| Sodium | 0.8 mg | 0% |
| Carbohydrate | 52.5 g | 17% |
| Fiber | 0.5 g | 1% |
| Sugars | 51.5 g | 205% |
| Protein | 0.2 g | 0% |
Note: Nutritional information is an estimate and may vary based on ingredient amounts and brands.
Variations & Substitutions
- Spice it up: Add a pinch of ground cinnamon, nutmeg, or cloves to the mixture for a warm, spicy flavor.
- Citrus Zest: Experiment with different citrus zest, such as orange or grapefruit, for a unique twist.
- Nuts: Add chopped nuts, such as almonds, walnuts, or pecans, to the mixture for added texture and flavor.
- Coconut: Roll the papaya balls in shredded coconut instead of granulated sugar for a tropical flavor.
- Vegan Option: Ensure the sugar used is vegan-friendly, as some refined sugars are processed using bone char.
FAQs (Frequently Asked Questions)
Q: Can I use frozen papaya for this recipe?
A: While fresh papaya is preferred for its texture and flavor, you can use frozen papaya. Make sure to thaw it completely and squeeze out any excess water before grating.
Q: How do I know when the mixture is ready?
A: The mixture is ready when it thickens and “gels.” You should be able to drag your spoon through the pan, and the mixture shouldn’t immediately flow back to fill the gap. It should hold its shape for a few seconds.
Q: My papaya balls are too sticky. What did I do wrong?
A: This usually means there was too much moisture in the mixture. Make sure you squeeze out as much excess juice as possible from the grated papaya. You may also need to cook the mixture longer to allow it to thicken.
Q: Can I make these ahead of time?
A: Yes, you can make papaya balls ahead of time. Store them in an airtight container at room temperature for up to 3-4 days.
Q: What can I use instead of food coloring?
A: You can use natural food coloring alternatives, such as beetroot juice for red or spinach juice for green. However, these may slightly alter the flavor and texture.
Final Thoughts
I truly hope you give these delightful Papaya Balls a try. They are a wonderful way to bring a taste of the Caribbean to your kitchen and a guaranteed conversation starter at any gathering. Don’t be afraid to experiment with different variations and find what suits your taste buds best. And remember, cooking is all about sharing joy and creating memories, so gather your loved ones, put on some music, and enjoy the process of making these little bites of sunshine! I’d love to hear about your experience and any creative twists you add to the recipe. Happy cooking!