
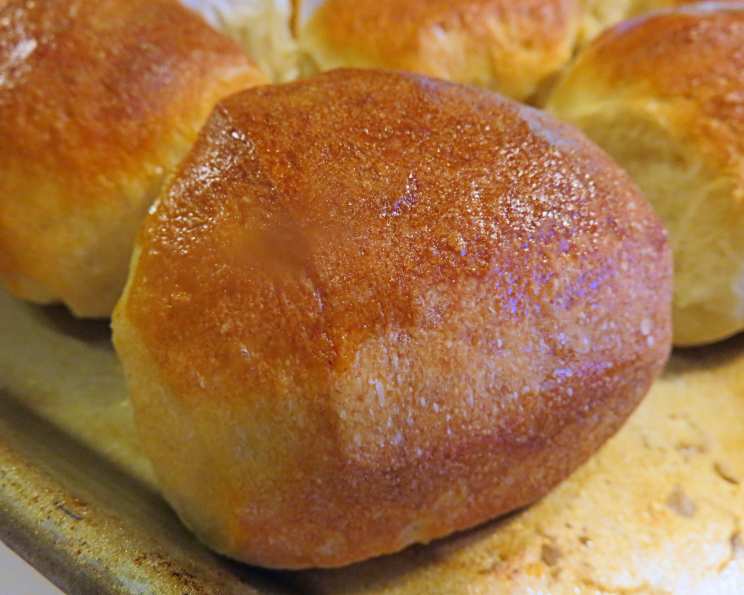
Parker House Rolls: A Culinary Classic, Perfected
The aroma of baking bread has always transported me back to my grandmother’s kitchen. I remember being barely tall enough to see over the counter, mesmerized as she transformed simple ingredients into golden-brown treasures. While she made many wonderful things, her Parker House rolls were legendary – light, fluffy clouds of buttery goodness that vanished almost as quickly as they appeared. I’ve spent years trying to recreate that magic, and this recipe, adapted from Cook’s Illustrated, comes remarkably close. These rolls aren’t just bread; they’re edible memories, warm and comforting with every bite.
Recipe Overview
- Prep Time: 1 hour 30 minutes
- Rise Time: 1 hour 30 minutes
- Cook Time: 20-25 minutes
- Total Time: 3 hours
- Yield: 16 rolls
- Dietary Type: Vegetarian
Ingredients
- 1 1⁄2 cups plus 1 tablespoon water, room temperature (12 1/2 ounces)
- 1 1⁄2 teaspoons instant yeast or 1 1/2 teaspoons fast rise yeast
- 2 teaspoons honey
- 3 cups plus 1 tablespoon bread flour (16 1/2 ounces), plus extra bread flour for forming rolls
- 3 tablespoons whole wheat flour (about 1 ounce)
- 1 1⁄2 teaspoons table salt
Equipment Needed
- Stand mixer with dough hook
- 2-quart bowl
- Plastic wrap
- Bench scraper
- Two 9-inch round cake pans
- Rimmed baking sheet
- Wire rack
Instructions
-
In the bowl of a stand mixer, whisk together the water, yeast, and honey until well combined, ensuring no honey sticks to the bottom of the bowl.
-
Add the bread flour and whole wheat flour and mix on low speed with the dough hook until a cohesive dough is formed, about 3 minutes. Cover the bowl with plastic wrap and let sit at room temperature for 30 minutes. This rest period, known as an autolyse, helps the flour fully hydrate and develop gluten, resulting in a more tender crumb.
-
Remove the plastic wrap and evenly sprinkle the salt over the dough. Knead on low speed (speed 2 on KitchenAid) for 5 minutes. If the dough creeps up the attachment, stop the mixer and scrape it down using well-floured hands or a greased spatula.
-
Increase the speed to medium and continue to knead until the dough is smooth and slightly tacky, about 1 minute. If the dough is very sticky, add 1 to 2 tablespoons of flour and continue mixing for another minute.
-
Lightly spray a 2-quart bowl with nonstick cooking spray. Transfer the dough to the bowl and cover with plastic wrap. Let the dough rise in a warm, draft-free place until doubled in size, about 1 hour. This first rise is crucial for developing the flavor and texture of the rolls.
-
Fold the dough over itself; rotate the bowl a quarter turn and fold again. Rotate the bowl again and fold once more. This folding technique helps to strengthen the gluten structure and redistribute the yeast activity.
-
Cover with plastic wrap and let rise for 30 minutes. Repeat the folding process, replace the plastic wrap, and let the dough rise until doubled in volume again, about 30 minutes.
-
Spray two 9-inch round cake pans with nonstick cooking spray and set aside.
-
Transfer the dough to a floured work surface and sprinkle the top with more flour. Using a bench scraper, cut the dough in half and gently stretch each half into 16-inch cylinders.
-
Divide each cylinder into quarters, then each quarter into 2 pieces (you should have 16 pieces total). Dust the top of each piece with more flour.
-
With floured hands, gently pick up each piece and roll in your palms to coat with flour, shaking off the excess.
-
Place the dough pieces in the prepared cake pans. Arrange 8 dough pieces in each cake pan, placing one piece in the middle and the others around it, with the long side of each piece running from the center of the pan to the edge, making sure the cut-side faces up. The arrangement is important for ensuring even baking and a visually appealing finished product.
-
Loosely cover the cake pans with plastic wrap and let the rolls rise until doubled in size, about 30 minutes. The dough is ready when it springs back slowly when pressed lightly with a finger.
-
Thirty minutes before baking, adjust the rack to the middle position and heat the oven to 500 degrees Fahrenheit.
-
Remove the plastic wrap from the cake pans, spray the rolls lightly with water, and place them in the oven. Bake for 10 minutes until the tops of the rolls are lightly brown. The initial high temperature creates a quick burst of steam, helping the rolls rise even further.
-
Remove from the oven and reduce the oven temperature to 400 degrees Fahrenheit. Using kitchen towels or oven mitts, invert the rolls from both cake pans onto a rimmed baking sheet.
-
When the rolls are cool enough to handle, turn them right-side up, pull them apart, and space them evenly on the baking sheet.
-
Continue to bake until the rolls develop a deep golden-brown crust and sound hollow when tapped on the bottom, 10 to 15 minutes, rotating the baking sheet halfway through the baking time. The hollow sound indicates that the rolls are fully cooked through.
-
Transfer the rolls to a wire rack and cool to room temperature, about 1 hour. This allows the internal moisture to redistribute, preventing a gummy texture.
Expert Tips & Tricks
- Don’t skip the autolyse: That 30-minute rest period significantly impacts the tenderness of the rolls.
- Temperature matters: Ensure your ingredients are at room temperature for optimal yeast activity.
- Proof your yeast: If you’re unsure about the freshness of your yeast, proof it by adding it to warm water with a pinch of sugar. It should bubble within 5-10 minutes.
- Don’t over-knead: Over-kneading can lead to tough rolls. Stop kneading when the dough is smooth and elastic.
- Watch your oven: Ovens can vary, so keep a close eye on the rolls during baking. Adjust the baking time as needed to prevent burning.
- For extra richness: Brush the baked rolls with melted butter immediately after removing them from the oven.
Serving & Storage Suggestions
Serve these Parker House rolls warm with a generous pat of butter. They’re perfect alongside soups, stews, salads, or as a delightful addition to any holiday meal. Leftover rolls can be stored at room temperature in an airtight container for up to 2 days. For longer storage, freeze them in a freezer-safe bag for up to 2 months. To reheat, wrap the rolls in foil and bake in a preheated oven at 350 degrees Fahrenheit for 10-15 minutes, or until warmed through. You can also microwave them for a shorter period, but the texture may be slightly different.
Nutritional Information
| Nutrient | Amount per Serving | % Daily Value* |
|---|---|---|
| Calories | 63.8 kcal | N/A |
| Total Fat | 0.2 g | 0% |
| Saturated Fat | 0 g | 0% |
| Cholesterol | 0 mg | 0% |
| Sodium | 146.3 mg | 6% |
| Total Carbohydrate | 13.4 g | 4% |
| Dietary Fiber | 0.6 g | 2% |
| Sugars | 0.5 g | N/A |
| Protein | 1.9 g | 3% |
*Percent Daily Values are based on a 2,000 calorie diet. Your daily values may be higher or lower depending on your calorie needs.
Variations & Substitutions
- Garlic Herb Rolls: Add 1-2 teaspoons of garlic powder and 1-2 tablespoons of chopped fresh herbs (such as rosemary, thyme, or parsley) to the dough during the kneading process.
- Sweet Potato Rolls: Substitute 1/2 cup of the water with 1/2 cup of mashed sweet potato for a slightly sweet and tender roll.
- Whole Wheat Rolls: Replace up to half of the bread flour with whole wheat flour for a nuttier flavor and added fiber. Note that this will result in a denser roll.
- Dairy-Free Rolls: While this recipe does not include dairy, make sure to use a plant-based butter substitute when serving.
FAQs (Frequently Asked Questions)
Q: Why is my dough so sticky?
A: Dough stickiness can be caused by several factors, including humidity, flour type, and inaccurate measurements. Try adding flour 1 tablespoon at a time during the kneading process until the dough reaches the desired consistency.
Q: Can I use active dry yeast instead of instant yeast?
A: Yes, but you’ll need to proof the active dry yeast first. Dissolve it in the warm water with the honey and let it sit for 5-10 minutes until foamy before adding it to the other ingredients.
Q: My rolls didn’t rise properly. What went wrong?
A: Yeast requires a warm environment to thrive. Ensure your dough is in a warm, draft-free place during the rising process. Also, check the expiration date on your yeast to ensure it’s still active.
Q: Can I make the dough ahead of time?
A: Yes, you can prepare the dough through the first rise, then refrigerate it for up to 24 hours. Let the dough come to room temperature before shaping and baking.
Q: How do I get the rolls to be perfectly golden brown?
A: Rotating the baking sheet halfway through baking and ensuring even spacing of the rolls will help promote even browning. You can also brush the tops with an egg wash before baking for a richer color.
Final Thoughts
These Parker House rolls are more than just a recipe; they’re a connection to the past, a comforting embrace in every bite. Don’t be intimidated by the multiple steps – each one contributes to the final perfection. I encourage you to try this recipe and experience the joy of baking these delightful rolls. Share them with your loved ones, savor the moment, and perhaps even create your own culinary memories. And of course, I’d love to hear about your experience – feel free to share your tips, variations, or stories! These rolls pair beautifully with a hearty pot roast or a creamy tomato soup. Enjoy!