
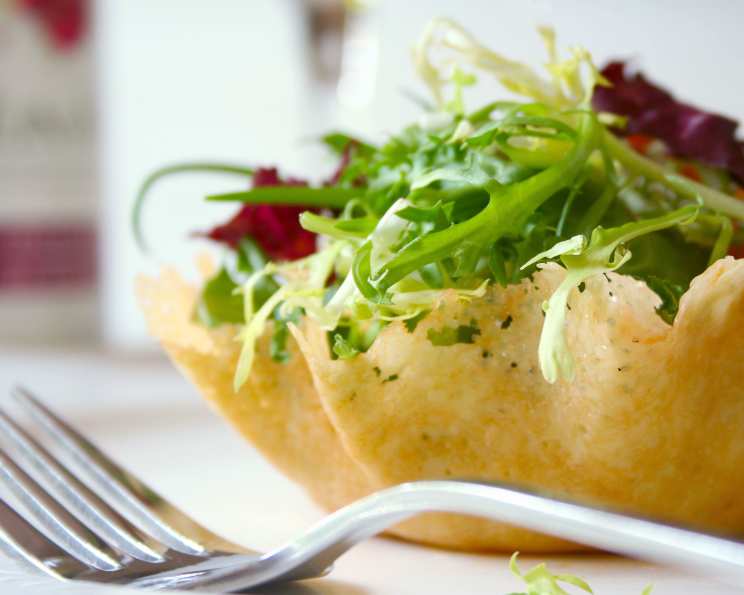
Lacy Parmesan Baskets: An Edible Masterpiece
I’ll never forget the first time I saw a parmesan basket. It was at a small bistro in Rome, perched atop a simple arugula salad, and it transformed the entire dish into something truly special. The server placed it before me, and for a moment, I almost hesitated to eat it. It was so delicate, so perfectly formed, like edible spun gold. That day, I vowed to recreate that little piece of culinary artistry at home. And I’m excited to share that journey with you.
Recipe Overview
- Prep Time: 5 minutes
- Cook Time: 3-5 minutes per basket
- Total Time: 10-20 minutes
- Servings: 6
- Yield: 6 baskets
- Dietary Type: Gluten-Free
Ingredients
- 1 cup (or more, as needed) shredded parmesan cheese (the inexpensive kind works great!)
- 1 drinking glass (for shaping the baskets)
Equipment Needed
- 10-inch non-stick skillet
- Spatula
- Oven mitts
- Plate or tray lined with parchment paper
Instructions
- Place your 10-inch skillet over medium-high heat. Make sure the pan is heated evenly to ensure the cheese melts consistently.
- Once the skillet is hot, begin sprinkling the shredded parmesan cheese into the pan. Form a circular disk, concentrating the cheese towards the center and using less cheese around the edges. This helps create that beautiful lacy texture that characterizes a perfect parmesan basket. The amount of cheese will vary slightly depending on the size of your skillet and desired basket size.
- Allow the parmesan cheese to melt and cook undisturbed. Watch carefully for the cheese underneath to begin to turn a light golden-brown color. This is crucial for structural integrity and flavor development. This usually takes about 3-5 minutes. Do not let it burn!
- Once the cheese is golden underneath, carefully loosen the edges of the parmesan disk with a spatula. Gently slide the spatula underneath the entire disk, being careful not to break it.
- Working quickly, remove the parmesan disk from the skillet with the spatula. Invert a drinking glass (or small bowl) onto a work surface. Drape the cheese disk over the inverted glass, ensuring the golden side is facing up.
- Gently press the cheese against the glass to mold it into a bowl shape. Work quickly, as the cheese will begin to harden as it cools. Shape the edges of the basket as desired. If the cheese cools too quickly and becomes difficult to mold, you can briefly reheat it in the pan.
- Allow the parmesan basket to cool completely on the glass. This will help it retain its shape. It usually takes about 5-10 minutes. Once cooled, carefully remove the basket from the glass.
- Repeat steps 2-7 until you have the desired number of baskets.
Expert Tips & Tricks
- Cheese Choice: While inexpensive shredded parmesan works well, you can experiment with different types of parmesan or blends for varied flavors. Just make sure it melts evenly.
- Lacy Edges: For more defined lacy edges, use a very thin layer of cheese around the perimeter of the disk.
- Non-Stick is Key: Using a good non-stick skillet is essential to prevent the cheese from sticking and tearing.
- Adjusting for Humidity: On humid days, the cheese may take longer to crisp. You can try using a lower heat setting and cooking for a slightly longer time.
- Basket Size: Adjust the amount of cheese to create larger or smaller baskets. A smaller basket is great for individual appetizers, while a larger one can hold a full salad.
- Prevent Sticking: If the cheese sticks to the pan despite using a non-stick skillet, try lightly spraying the pan with cooking spray before adding the cheese.
- Salvaging a Broken Basket: If your basket breaks, don’t despair! You can gently reheat the broken pieces in the skillet and reform them. Or, simply crumble the cheese and use it as a topping for your salad.
- Even Cooking: Ensure your skillet heats evenly. Uneven heating leads to some parts of the cheese burning while others remain unmelted.
- Cooling time: Make sure the basket is completely cool before removing it from the glass. This prevents breakage.
- Experiment: Try adding a sprinkle of dried herbs like oregano or thyme to the cheese as it melts for extra flavor.
Serving & Storage Suggestions
These parmesan baskets are best served immediately after making them. They are a stunning addition to salads, appetizers, or even as edible serving vessels for dips or small bites. Fill them with a vibrant green salad with a light vinaigrette, a creamy shrimp salad, or a colorful vegetable medley.
To store leftover baskets, place them in an airtight container lined with paper towels to absorb any moisture. They can be stored at room temperature for up to a day, but they will lose some of their crispness. Refrigerating them is not recommended as they tend to become soggy. Due to their delicate nature, freezing is also not advised. If you must store them, consume them as soon as possible to enjoy their optimal texture.
Nutritional Information
| Nutrient | Amount per Serving | % Daily Value |
|---|---|---|
| Calories | 72 kcal | 4% |
| Total Fat | 4.8g | 7% |
| Saturated Fat | 2.9g | 14% |
| Cholesterol | 14.7mg | 4% |
| Sodium | 254.8mg | 10% |
| Total Carbohydrate | 0.7g | 0% |
| Dietary Fiber | 0g | 0% |
| Sugars | 0.1g | 0% |
| Protein | 6.4g | 12% |
Variations & Substitutions
- Different Cheeses: While parmesan is traditional, try using other hard cheeses like Grana Padano, Asiago, or a blend of cheeses for a different flavor profile.
- Herbed Baskets: Add a pinch of dried herbs like rosemary, thyme, or Italian seasoning to the cheese before melting for an extra layer of flavor.
- Spiced Baskets: For a touch of heat, add a pinch of red pepper flakes to the cheese.
- Garlic Baskets: Sprinkle a small amount of garlic powder to the cheese before melting for a savory garlic flavor.
- Shaped Baskets: Instead of a round glass, try using other shapes to mold the baskets, such as small bowls or ramekins, for a different presentation.
- Smoked Paprika: A dash of smoked paprika added to the cheese gives a wonderful smoky flavor.
FAQs (Frequently Asked Questions)
Q: How do I prevent the cheese from burning in the skillet?
A: Keep the heat at medium-high and watch the cheese carefully. Remove it from the heat as soon as it turns golden brown underneath.
Q: My parmesan basket keeps breaking. What am I doing wrong?
A: Make sure the cheese is cooked enough to hold its shape but not so much that it becomes brittle. Allow the basket to cool completely on the glass before removing it.
Q: Can I make these baskets ahead of time?
A: They are best served fresh, but you can make them a few hours in advance and store them in an airtight container lined with paper towels.
Q: What can I fill these parmesan baskets with?
A: Anything you like! Salads, dips, appetizers, even desserts. Get creative!
Q: Can I use pre-shredded parmesan cheese?
A: Yes, pre-shredded parmesan works just fine for this recipe, just make sure it’s good quality. Avoid the powdery, overly processed kind.
Final Thoughts
Creating these parmesan baskets is surprisingly simple, yet the visual impact is incredibly impressive. They are guaranteed to elevate any dish and impress your guests. Don’t be afraid to experiment with different cheeses and flavor combinations to create your own unique masterpiece. So, grab your skillet and a bag of parmesan cheese, and let’s create some edible magic! I hope you enjoy making and sharing these delightful parmesan baskets as much as I do.