
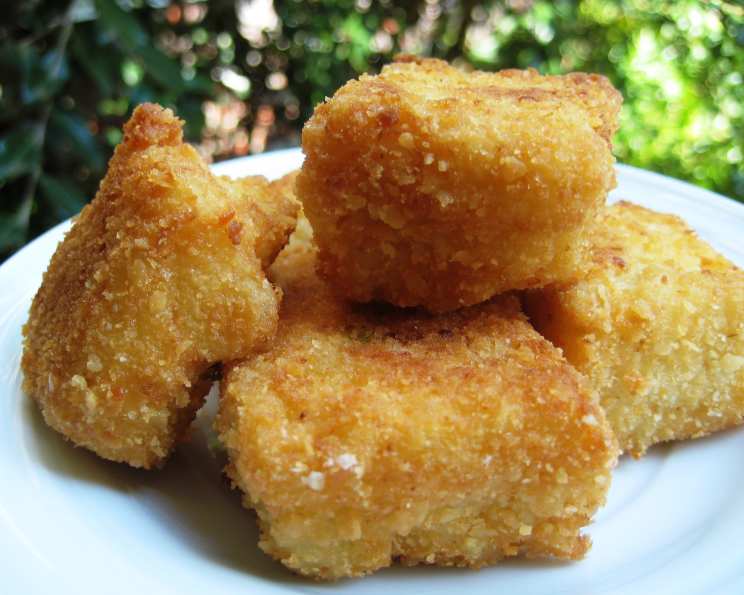
Pasta Croquettes: A Crispy, Cheesy Delight
The first time I tasted these pasta croquettes, I was transported back to my childhood. Not literally this specific dish, of course, but the feeling it evoked. Growing up, my grandmother would always fry up leftover pasta, transforming a simple meal into something special. This recipe, with its creamy interior and golden-brown crust, captures that same magic. It’s the perfect marriage of comfort food and elegant presentation, a delightful surprise in every bite.
Recipe Overview
- Prep Time: 30 minutes
- Cook Time: 40 minutes
- Total Time: 1 hour 10 minutes
- Servings: 12
- Yield: 12 croquettes
- Dietary Type: Vegetarian
Ingredients
- 1 (8 ounce) package noodles
- 6 tablespoons butter
- 3 tablespoons chopped green onions
- 6 tablespoons flour
- 1/4 teaspoon salt
- 1/8 teaspoon white pepper
- 2 cups milk
- 1/2 cup parmesan cheese
- 1 egg, beaten
- Flour (for coating)
- 2 eggs, beaten with 2 tablespoons water
- Panko breadcrumbs
- Vegetable oil (for frying)
Equipment Needed
- Medium saucepan
- 9-inch square pan
- Aluminum foil
- Shallow dishes (3)
- Paper towels
- Deep-fry thermometer (optional)
Instructions
- Begin by cooking the noodles according to the package directions. Once cooked, drain them very well. You want to eliminate excess water to prevent soggy croquettes.
- While the noodles are cooking, prepare the cheese sauce. In a medium saucepan, melt the butter over medium heat.
- Add the chopped green onions to the melted butter and sauté until they soften, about 2-3 minutes. This step infuses the butter with a subtle onion flavor.
- Stir in the flour, salt, and white pepper into the butter and green onion mixture. Cook, stirring constantly, until the mixture is bubbly. This process creates a roux, which will thicken the sauce.
- Gradually stir in the milk, ensuring there are no lumps. Continue to cook, stirring constantly, until the sauce thickens and becomes bubbly. This may take about 5-7 minutes. Constant stirring is key to preventing scorching and ensuring a smooth sauce.
- Remove the saucepan from the heat and stir in the Parmesan cheese until it is completely melted and incorporated into the sauce. The cheese adds a rich, savory flavor to the sauce.
- Temper the beaten egg by stirring a small amount of the hot cheese sauce into it. This prevents the egg from scrambling when added to the hot sauce.
- Pour the tempered egg mixture back into the saucepan and bring it just to a boiling point, stirring constantly. Do not overcook, as this can result in a curdled sauce.
- Pour the cheese sauce over the drained noodles and mix thoroughly until all the noodles are evenly coated.
- Press the noodle mixture into a well-greased 9-inch square pan.
- Cover the top of the noodle mixture with a square of aluminum foil, pressing down firmly to pack the noodles tightly into the pan. This helps the croquettes hold their shape when cut.
- Chill the noodle mixture in the refrigerator until it is completely cold and firm. This may take several hours or preferably overnight. The chilling process is essential for easy handling and frying.
- Once the noodle mixture is chilled, prepare the breading station. Place the flour, the egg-water mixture (beaten eggs with 2 tablespoons of water), and the Panko breadcrumbs in separate shallow dishes.
- Heat the vegetable oil in a deep fryer or large pot to 375°F (190°C). Use a deep-fry thermometer to ensure the oil is at the correct temperature for even cooking.
- Cut the chilled noodle mixture into squares. The size of the squares is up to you, but aim for approximately 2-inch squares.
- Coat each noodle square first with flour, then dip it into the egg-water mixture, and finally coat it thoroughly with Panko breadcrumbs, ensuring all sides are covered. The Panko breadcrumbs will create a crispy, golden-brown crust.
- Carefully fry the noodle squares in the hot oil, 1 or 2 at a time, until they are golden brown and heated through, about 2-3 minutes per side. Avoid overcrowding the fryer, as this can lower the oil temperature and result in soggy croquettes.
- Remove the fried pasta croquettes from the oil and drain them on paper towels to remove excess oil.
- Serve hot and enjoy!
Expert Tips & Tricks
- Make-Ahead Tip: The noodle mixture can be prepared a day or two in advance and stored in the refrigerator until ready to bread and fry. This makes these pasta croquettes a great option for entertaining.
- Crispy Crust Secret: Using Panko breadcrumbs is key to achieving a super crispy crust. Their larger size and irregular shape create more surface area for browning.
- Even Frying: Maintain a consistent oil temperature throughout the frying process for even cooking. If the oil temperature drops too low, the croquettes will absorb more oil and become greasy.
- Cheese Variation: Experiment with different types of cheese in the sauce. Gruyere, cheddar, or even a blend of cheeses can add unique flavor profiles.
- Spice it Up: Add a pinch of red pepper flakes to the cheese sauce for a touch of heat.
Serving & Storage Suggestions
Serve these pasta croquettes hot as an appetizer, side dish, or even a light meal. They pair well with marinara sauce, pesto, or a creamy dipping sauce. For an extra touch, top them with a slice of provolone cheese immediately after frying so it melts beautifully over the crispy crust. A drizzle of bolognese sauce, with or without cheese, elevates them even further.
Leftover pasta croquettes can be stored in an airtight container in the refrigerator for up to 3 days. Reheat them in a preheated oven at 350°F (175°C) until heated through and crispy, about 10-15 minutes. You can also reheat them in an air fryer for a quicker and crispier result. Freezing is not recommended as it can affect the texture.
Nutritional Information
| Nutrient | Amount per Serving | % Daily Value |
|---|---|---|
| Calories | 200.5 kcal | N/A |
| Calories from Fat | 94 g | 47% |
| Total Fat | 10.5 g | 16% |
| Saturated Fat | 5.9 g | 29% |
| Cholesterol | 87.1 mg | 29% |
| Sodium | 204.9 mg | 8% |
| Total Carbohydrate | 18.8 g | 6% |
| Dietary Fiber | 0.8 g | 3% |
| Sugars | 0.5 g | 1% |
| Protein | 7.7 g | 15% |
Variations & Substitutions
- Gluten-Free: Use gluten-free noodles and gluten-free breadcrumbs to make these pasta croquettes gluten-free.
- Dairy-Free: Substitute the butter with plant-based butter and the milk with unsweetened almond milk or soy milk. Use a dairy-free Parmesan cheese alternative.
- Vegetable Additions: Add finely chopped vegetables like bell peppers, zucchini, or mushrooms to the cheese sauce for added nutrients and flavor.
- Herb Infusion: Experiment with different herbs in the cheese sauce. Fresh parsley, basil, or oregano can add a delightful aroma and flavor.
FAQs (Frequently Asked Questions)
Q: Can I use different types of pasta for this recipe?
A: Yes, you can use various pasta shapes such as penne, rigatoni, or even macaroni. Just make sure the pasta is well-drained after cooking.
Q: How do I prevent the croquettes from falling apart during frying?
A: Ensure the noodle mixture is well-chilled before cutting and breading. Also, be gentle when handling the croquettes during the breading process.
Q: Can I bake these instead of frying them?
A: Yes, you can bake them for a healthier option. Preheat your oven to 400°F (200°C), place the breaded croquettes on a baking sheet, and bake for about 20-25 minutes, or until golden brown and heated through.
Q: What’s the best way to ensure the oil is at the right temperature for frying?
A: Using a deep-fry thermometer is the most accurate way to monitor the oil temperature. If you don’t have one, you can test the oil by dropping a small piece of bread into it. If the bread browns quickly and evenly, the oil is ready.
Q: Can I add meat to these pasta croquettes?
A: Absolutely! Cooked and crumbled sausage, ground beef, or shredded chicken can be added to the noodle mixture for a heartier version.
Final Thoughts
These pasta croquettes are a true crowd-pleaser, perfect for any occasion. Whether you’re looking for a unique appetizer, a comforting side dish, or a fun twist on leftover pasta, this recipe is sure to impress. So, gather your ingredients, put on your apron, and get ready to create a culinary masterpiece. Don’t be afraid to experiment with flavors and make it your own. And most importantly, enjoy the process and share your delicious creations with family and friends. Bon appétit!