
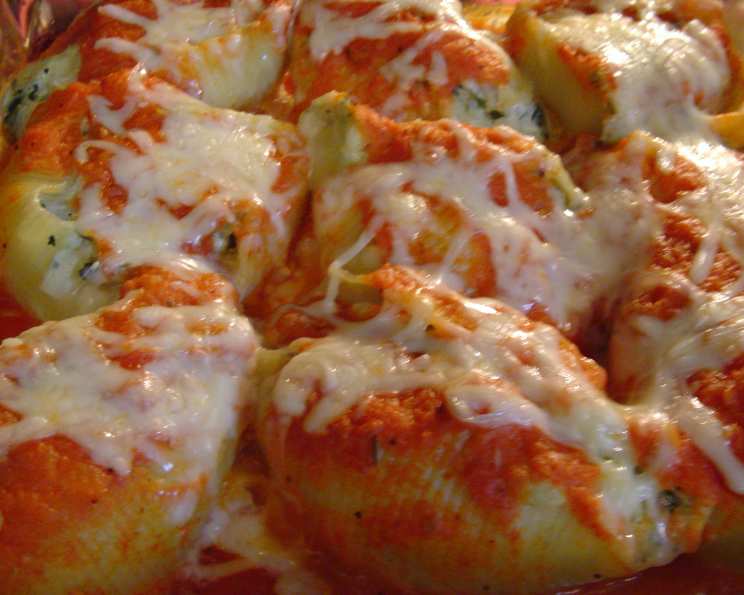
Pasta Shells With Zucchini & Spinach: A Culinary Embrace
The aroma of simmering tomato sauce, mingled with the subtle sweetness of sautéed zucchini and the comforting scent of baked pasta – it instantly transports me back to my grandmother’s sun-drenched kitchen. Every Sunday was a symphony of flavors, and this pasta shell creation was always the star. The memory of those afternoons, surrounded by family and the warmth of her love, fuels my passion for sharing this dish with you. It’s more than just a meal; it’s a taste of home.
Recipe Overview
- Prep Time: 1 hour 30 minutes
- Cook Time: 1 hour
- Total Time: 2 hours 30 minutes
- Servings: 8-10
- Dietary Type: Vegetarian
Ingredients
- 1 lb jumbo pasta shells
- 1 cup freshly grated Parmesan cheese
FILLING
- ¼ cup unsalted butter
- 2 onions, finely chopped
- 1 garlic clove, minced
- 3 medium zucchini
- 1 bunch spinach (about ½ lb)
- 1 lb ricotta cheese
- 1 cup freshly grated Parmesan cheese
- 2 eggs
- 1 teaspoon salt
- ¼ teaspoon pepper
- ¼ teaspoon nutmeg
- ¼ cup chopped fresh parsley or ¼ cup fresh basil
SAUCE
- ¼ cup unsalted butter or ¼ cup olive oil
- 2 onions, finely chopped
- 2 garlic cloves, minced
- 2 (28 ounce) cans plum tomatoes, undrained
- ½ teaspoon salt
- ½ teaspoon pepper
Equipment Needed
- Large pot
- Dutch oven or large, heavy pot
- Colander
- Clean tea towel or paper towels
- Medium-sized bowl
- Wooden spoon
- Blender or food processor (optional)
- 13×9 inch casserole dish
Instructions
-
Prepare the Filling: In a large, heavy Dutch oven over medium heat, melt the butter. Add the finely chopped onions and minced garlic. Cook, stirring occasionally, until the onions are tender and wilted. This usually takes about 5-7 minutes.
-
Prepare the Zucchini: Wash the zucchini well. Taste a small piece of the skin from each zucchini. If the skin tastes bitter, peel it. If not, leave the skin on. Grate the zucchini and place it in a colander set in the sink. Sprinkle the grated zucchini with about 2 teaspoons of salt. Let the excess liquid drain for 30 minutes. The salt helps to draw out the moisture, preventing a soggy filling.
-
Rinse and Dry the Zucchini: After 30 minutes, rinse the zucchini with cold water to remove most of the salt. Then, toss it on a clean tea towel (or paper towels) to dry thoroughly before cooking. This step is crucial for achieving the right texture.
-
Cook the Zucchini: Add the drained zucchini to the Dutch oven with the onions and garlic. Cook until any remaining moisture evaporates, stirring occasionally. This may take about 10-15 minutes.
-
Prepare the Spinach: Wash the spinach well and trim off any tough stems. Place the spinach leaves, with the water from washing still clinging to them, in a large pot. Cook for a few minutes, or just until the spinach leaves have wilted.
-
Dry the Spinach: Let the spinach cool slightly, then wring it dry in a clean tea towel. This is essential to remove excess water. Chop the spinach and add it to the Dutch oven with the zucchini mixture. Combine thoroughly.
-
Cool the Vegetable Mixture: Remove the Dutch oven from the heat and allow the vegetable mixture to cool slightly. Drain off any excess liquid that may have accumulated.
-
Prepare the Ricotta Mixture: In a medium-sized bowl, beat the eggs. Add the ricotta cheese and beat until smooth. Add 1 cup of Parmesan cheese, salt, pepper, and nutmeg. Mix well.
-
Combine Filling Ingredients: Combine the ricotta mixture with the vegetable mixture in the Dutch oven. Mix thoroughly until all ingredients are well combined. Set aside.
-
Prepare the Sauce: In a large, heavy pot, melt the butter (or heat the olive oil) over medium heat. Add the finely chopped onions and minced garlic. Cook until the onions are tender and wilted, about 5-7 minutes.
-
Add Tomatoes: Add the canned plum tomatoes, including their liquid, to the pot. Use a wooden spoon to break up the tomatoes.
-
Simmer the Sauce: Cook the sauce for 30-45 minutes, or until it has thickened to your desired consistency. Stir occasionally to prevent sticking.
-
Puree and Season the Sauce: Once the sauce has thickened, you can purée it using an immersion blender or transfer it to a regular blender or food processor. This step is optional, but it creates a smoother sauce. Taste the sauce and adjust the seasonings (add more salt and pepper, if needed). Set aside.
-
Cook the Pasta Shells: Cook the jumbo pasta shells in a large pot of salted water according to the package directions until al dente. Al dente means “to the tooth” in Italian, and refers to pasta that is cooked firm to the bite.
-
Drain the Pasta Shells: Drain the pasta shells well and rinse them with cold water to stop the cooking process and prevent them from sticking together.
-
Drain Excess Water: Using a colander, gently shake the shells to drain any excess water.
-
Assemble the Dish: Lightly grease a 13×9 inch casserole dish.
-
Stuff the Shells: Spoon some of the filling into each pasta shell and arrange them, stuffed side up, in the casserole dish.
-
Add Sauce and Cheese: Pour the sauce over the stuffed shells and sprinkle with the remaining 1 cup of Parmesan cheese.
-
Bake: Bake in a preheated oven at 350°F (175°C) for 40-50 minutes, or until the dish is heated through and bubbling.
Expert Tips & Tricks
- Zucchini Prep is Key: Don’t skip the salting and draining of the zucchini. This step prevents the filling from becoming watery.
- Don’t Overcook the Pasta: Al dente pasta holds its shape better during baking.
- Make Ahead: Assemble the dish ahead of time and refrigerate it until ready to bake. Add about 15 minutes to the baking time if baking from cold.
- Freezing: This dish freezes well. Assemble the dish in a freezer-safe container, wrap tightly in plastic wrap, and then foil. Freeze for up to 3 months. Thaw in the refrigerator overnight before baking.
- Flavor Boost: Add a pinch of red pepper flakes to the sauce for a subtle kick. A splash of dry red wine to the sauce while simmering adds depth of flavor.
- Fresh Herbs: Using fresh parsley and basil elevates the flavor of the filling.
Serving & Storage Suggestions
Serve the pasta shells with zucchini and spinach hot, straight from the oven. Garnish with a sprinkle of fresh parsley or basil for added visual appeal. This dish pairs perfectly with a simple green salad and garlic bread.
Storage:
- Room Temperature: Do not leave at room temperature for more than 2 hours.
- Refrigerator: Store leftovers in an airtight container in the refrigerator for up to 3-4 days.
- Freezer: Store in a freezer-safe container for up to 2-3 months.
Reheating:
- Oven: Reheat in a preheated oven at 350°F (175°C) until heated through. Cover with foil to prevent the top from browning too much.
- Microwave: Reheat individual portions in the microwave until heated through.
Nutritional Information
| Nutrient | Amount per Serving | % Daily Value |
|---|---|---|
| Calories | 622.2 kcal | N/A |
| Calories from Fat | 260 g | 42% |
| Total Fat | 28.9 g | 44% |
| Saturated Fat | 17.1 g | 85% |
| Cholesterol | 134.4 mg | 44% |
| Sodium | 941.9 mg | 39% |
| Total Carbohydrate | 63.5 g | 21% |
| Dietary Fiber | 6.9 g | 27% |
| Sugars | 10.6 g | N/A |
| Protein | 29.7 g | 59% |
Note: Nutritional information is an estimate and can vary based on specific ingredients and serving sizes.
Variations & Substitutions
- Gluten-Free: Use gluten-free pasta shells for a gluten-free option.
- Vegan: Substitute the butter with olive oil, ricotta cheese with a vegan ricotta alternative, Parmesan cheese with nutritional yeast, and use a flax egg replacer.
- Different Vegetables: Add other vegetables like mushrooms, bell peppers, or eggplant to the filling.
- Spicy: Add a pinch of red pepper flakes to the filling or sauce for a spicy kick.
- Cheese Variety: Experiment with different cheeses in the filling, such as mozzarella, provolone, or fontina.
FAQs (Frequently Asked Questions)
Q: Can I use frozen spinach?
A: Yes, you can use frozen spinach. Make sure to thaw it completely and squeeze out all the excess water before adding it to the filling.
Q: Can I make this dish ahead of time?
A: Absolutely! This dish is perfect for making ahead of time. Assemble it and store it in the refrigerator for up to 24 hours before baking.
Q: How do I prevent the pasta shells from sticking together after cooking?
A: Rinsing the pasta shells with cold water after cooking and tossing them with a little olive oil will help prevent them from sticking together.
Q: Can I freeze this dish?
A: Yes, this dish freezes well. Make sure to wrap it tightly in plastic wrap and then foil to prevent freezer burn.
Q: What can I substitute for ricotta cheese?
A: If you don’t have ricotta cheese, you can use cottage cheese or a mixture of cream cheese and sour cream as a substitute.
Final Thoughts
I hope this recipe brings as much joy to your table as it has to mine over the years. The combination of simple ingredients and heartwarming flavors makes this dish a true crowd-pleaser. Don’t be afraid to experiment with the variations and make it your own. I would love to hear about your culinary creations and any personal touches you add! Enjoy, and happy cooking!