
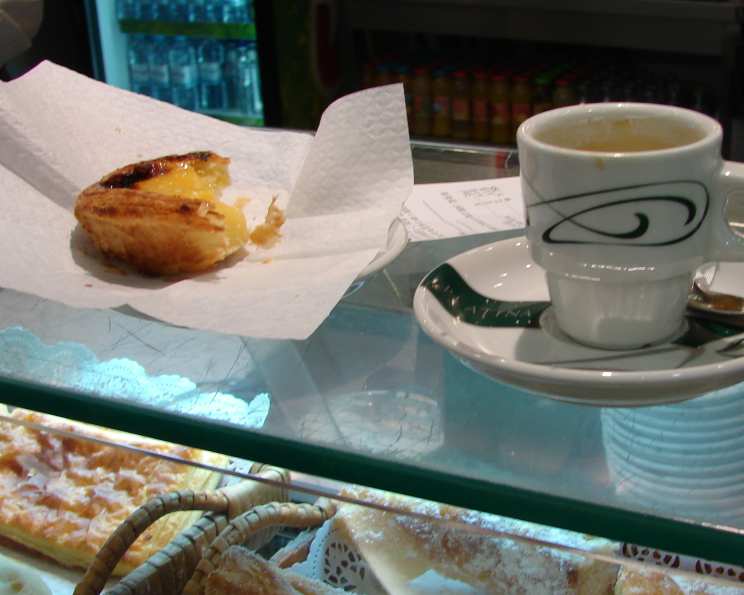
Pasteis de Nata: A Taste of Lisbon in Your Own Kitchen
The first time I tasted a Pastel de Nata, I was wandering through the narrow, sun-drenched streets of Lisbon. The warm, sweet aroma wafted from a tiny bakery, drawing me in like a moth to a flame. That first bite – the shatteringly crisp pastry giving way to the creamy, subtly sweet custard, the hint of cinnamon dusting my lips – was pure magic. It was a culinary epiphany, a reminder that sometimes the simplest things are the most extraordinary. From then on, no trip to Portugal was complete without several (okay, maybe a dozen) of these little treasures. Now, I’m excited to share a recipe that brings that same joy to my own kitchen, and hopefully, to yours.
Recipe Overview
- Prep Time: 60 minutes
- Cook Time: 30 minutes
- Total Time: 90 minutes
- Servings: 12
- Yield: 12 tartlets
- Dietary Type: Vegetarian
Ingredients
Pastry:
- 2 cups all-purpose flour, plus more for rolling
- 1 teaspoon salt
- 2 tablespoons granulated sugar
- 10 tablespoons (1 1/4 sticks) chilled unsalted butter, cut into 1/4-inch cubes
- 5-7 tablespoons ice water
Custard:
- 1 tablespoon cornstarch
- 1 1/2 cups heavy cream
- 1 cup granulated sugar
- 6 egg yolks
Equipment Needed
- Food processor
- Plastic wrap
- Rolling pin
- 4 1/2-inch cookie cutter or wide-mouth jar
- 12-cup (4-ounce capacity) nonstick muffin tin
- Cupcake papers (optional)
- Dried beans or pastry weights
Instructions
-
Make the Pastry: In the bowl of a food processor fitted with a metal blade, pulse the flour, salt, and sugar to combine. This ensures even distribution of the dry ingredients.
-
Add the chilled butter and pulse until the flour resembles coarse, uneven cornmeal, about 10 1-second pulses. The goal here is to break the butter down into small pieces without melting it. Chilled butter is key to creating flaky layers in the crust.
-
Drizzle 5 tablespoons of the ice water over the mixture. Pulse several times to work the water into the flour.
-
Add the remaining ice water, 1 tablespoon at a time, and continue pulsing until the mixture develops small curds. Be careful not to over-process the dough, as this can lead to a tough crust. You want the dough to just come together.
-
Turn the dough out onto a work surface, shape it into a disc, and cover with plastic wrap. Refrigerate for at least 1 hour. This allows the gluten to relax, making the dough easier to roll out.
-
On a lightly floured surface, roll half the dough to 1/16-inch thickness. The thinner the dough, the crispier the crust will be.
-
Cut out 6 (4 1/2-inch) circles. If you don’t have a cookie cutter, a wide-mouth jar works well.
-
Ease the dough circles into a 12-cup (4-ounce capacity) nonstick muffin tin, pressing out any overlapping folds. Make sure the pastry fits snugly into each cup.
-
Repeat with the remaining dough.
-
Place the tin in the freezer for 5 minutes. This helps the pastry retain its shape during baking and prevents it from shrinking.
-
Remove and trim any overhang with the back of a knife so that the pastry cups are flush with the top of the tins. This creates a clean, professional look.
-
Line dough cups with cupcake papers (optional) and fill with dried beans or pastry weights. The paper liners can help prevent the crust from sticking. The weights will prevent the crust from puffing up too much during the par-baking process.
-
Bake at 350°F (180°C) for 8 to 10 minutes to set. The crust should be lightly golden, but not fully baked.
-
Make the Custard: Dissolve the cornstarch in 1/4 cup of the cream in a medium bowl. This prevents the cornstarch from clumping when added to the hot mixture.
-
Add the remaining cream and sugar, and stir until the mixture is smooth and the sugar dissolves.
-
Check for sugar granules with a spoon; none should remain. Undissolved sugar can result in a grainy custard.
-
In a small bowl, blend the egg yolks with a fork until smooth. This ensures they incorporate evenly into the cream mixture.
-
Add the yolks to the cream mixture, stirring gently to combine. Avoid over-mixing, as this can create air bubbles in the custard.
-
Ladle the egg mixture into the partially baked pastry cups, filling to 2/3 capacity. This allows room for the custard to puff up during baking.
-
Bake at 350°F (180°C) until the edges of the custard are puffed and middle is still jiggly, about 20 to 25 minutes. The custard will continue to cook after it’s removed from the oven.
-
Cool completely in the tin. The pastéis are best when eaten the same day.
Expert Tips & Tricks
-
Chilled ingredients are key. Make sure your butter and water are very cold for the pastry. This creates steam during baking, resulting in a flaky crust.
-
Don’t overwork the dough. Over-mixing develops gluten, leading to a tough crust. Pulse the ingredients just until they come together.
-
Par-baking is essential. This prevents a soggy bottom and ensures a crisp crust.
-
Watch the custard carefully. The cooking time can vary depending on your oven. The custard should be set around the edges but still slightly jiggly in the center.
-
For a caramelized top: If you want that signature dark, caramelized top, broil the tarts for the last minute or two of baking, watching very carefully to prevent burning.
Serving & Storage Suggestions
Pastéis de Nata are best served warm, ideally on the same day they’re made. A sprinkle of cinnamon and powdered sugar adds a touch of elegance. They pair wonderfully with a strong espresso or a glass of chilled Vinho Verde.
To store leftovers, keep them in an airtight container at room temperature for up to 2 days. While they’re best fresh, you can reheat them gently in a warm oven (around 300°F/150°C) for a few minutes to crisp up the crust. Freezing is not recommended as it can affect the texture of the custard.
Nutritional Information
| Nutrient | Amount per Serving | % Daily Value |
|---|---|---|
| Calories | 363 kcal | – |
| Calories from Fat | 205g | 57% |
| Total Fat | 22.8 g | 35% |
| Saturated Fat | 13.7 g | 68% |
| Cholesterol | 149.2 mg | 49% |
| Sodium | 212.2 mg | 8% |
| Total Carbohydrate | 36.4 g | 12% |
| Dietary Fiber | 0.6 g | 2% |
| Sugars | 18.9 g | 75% |
| Protein | 4.1 g | 8% |
Note: Nutritional information is an estimate and may vary depending on specific ingredients and portion sizes.
Variations & Substitutions
-
Gluten-Free Pastéis: Substitute the all-purpose flour with a gluten-free blend and follow the recipe as directed. Be mindful that the texture of the crust may be slightly different.
-
Dairy-Free Custard: While it will alter the flavour somewhat, you can substitute the heavy cream with full-fat coconut milk for a dairy-free alternative. Note that the custard may not set as firmly.
-
Citrus Infusion: Add a teaspoon of orange or lemon zest to the custard mixture for a bright, citrusy twist.
-
Spice it up: A pinch of nutmeg or cardamom in the custard adds warmth and complexity.
FAQs (Frequently Asked Questions)
Q: Why is my pastry crust tough?
A: Overworking the dough is the most common cause of a tough crust. Be sure to pulse the ingredients in the food processor just until they come together and avoid excessive rolling.
Q: My custard is lumpy. What did I do wrong?
A: Make sure the cornstarch is fully dissolved in the cold cream before adding it to the hot mixture. Stir the custard gently and constantly while cooking to prevent lumps from forming.
Q: Can I make the pastry dough ahead of time?
A: Absolutely! The pastry dough can be made up to 2 days in advance and stored in the refrigerator, wrapped tightly in plastic wrap. You can also freeze the dough for up to a month. Thaw overnight in the refrigerator before using.
Q: How do I get the caramelized tops like the ones in Portugal?
A: The secret is to broil the tarts for the last minute or two of baking, watching them very carefully to prevent burning. The high heat will caramelize the sugar in the custard, creating that signature dark top.
Q: My tarts are sticking to the muffin tin. What can I do?
A: Using a nonstick muffin tin is helpful, but you can also line the cups with cupcake papers to ensure easy removal.
Final Thoughts
These Pasteis de Nata may seem a bit daunting at first, but trust me, they are absolutely worth the effort. The combination of flaky pastry and creamy custard is simply irresistible. Don’t be afraid to experiment with variations and make them your own. I encourage you to give this recipe a try, share your creations, and let me know what you think! Enjoy a taste of Portugal, right in your own home. Bom apetite!