
Pat-in-Pan Pie Crust: The Easiest Homemade Crust You’ll Ever Make
My grandmother, bless her heart, believed store-bought anything was a cardinal sin, especially when it came to pie crust. I remember countless afternoons spent in her sun-drenched kitchen, watching her effortlessly whip up flaky, buttery crusts. The whole process felt like a sacred ritual. But between you and me, as much as I loved those afternoons, I’m eternally grateful for this pat-in-pan recipe. It delivers the same homemade goodness with a fraction of the effort, letting me enjoy a slice of nostalgia without spending hours at the counter.
Recipe Overview
- Prep Time: 10 minutes
- Cook Time: 15 minutes (for pre-baking)
- Total Time: 25 minutes
- Yields: 1 8-9 inch pie crust
- Dietary Type: Vegetarian (easily adaptable to vegan)
Ingredients
- 1 1/2 cups flour
- 3 tablespoons flour
- 1 1/2 teaspoons sugar
- 1/2 teaspoon salt
- 1/2 cup vegetable oil (canola, sunflower, or vegetable blend work well)
- 3 tablespoons cold milk (dairy or non-dairy milk alternative)
Equipment Needed
- 8 or 9-inch pie pan
- Measuring cups and spoons
- Fork
Instructions
- Begin by prepping your pie pan. No greasing is necessary!
- In the pie pan, combine 1 1/2 cups of the flour, the 1 1/2 teaspoons of sugar, and the 1/2 teaspoon of salt. Use your fingertips to thoroughly blend these dry ingredients together. The goal is to ensure even distribution of the salt and sugar throughout the flour.
- In a separate measuring cup, pour in the 1/2 cup of vegetable oil and the 3 tablespoons of cold milk. Use a fork to beat these two ingredients together until the mixture appears somewhat creamy and emulsified. Don’t worry if it doesn’t fully combine; the goal is just to get them started.
- Pour the oil and milk mixture all at once over the flour mixture in the pie pan.
- Using a fork, gently mix the wet and dry ingredients together until the flour is completely moistened. Be careful not to overmix; just ensure there are no dry pockets of flour remaining. The dough will be shaggy and a little oily, that’s perfectly normal.
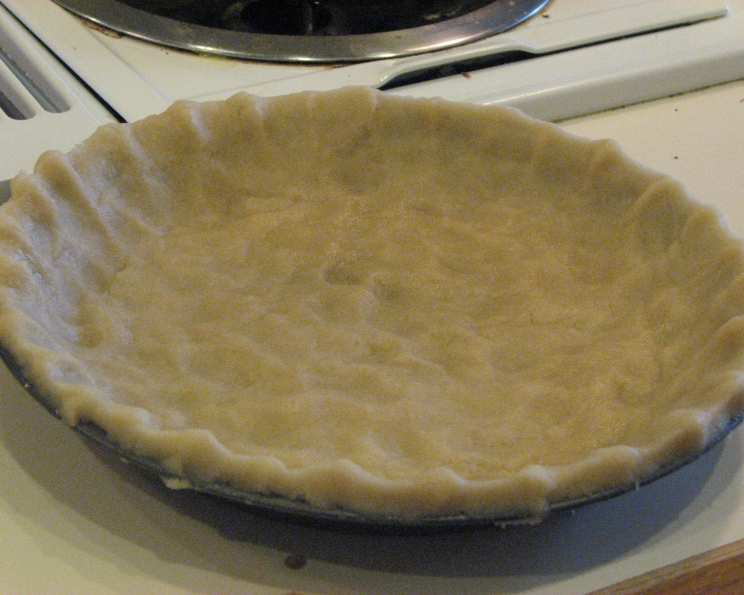
- Now comes the “pat-in-pan” magic! Using your fingertips, begin to pat the dough evenly across the bottom of the pie pan. Once the bottom is covered, start patting the dough up the sides of the pan, working your way around until the entire pan is lined with the dough. Aim for a consistent thickness throughout.
- Flute the edges of the crust to create a decorative finish. You can use a fork to press down along the edges, or use your fingers to pinch and shape the dough.
- At this stage, your pie shell is ready to be filled and baked according to your chosen pie recipe.
- If you are preparing the crust to fill later, or if your pie recipe calls for a pre-baked crust, preheat your oven to 425°F (220°C).
- Before baking the crust, prick the bottom of the pastry several times with a fork. This will prevent the crust from puffing up during baking.
- Bake the pre-pricked pastry for approximately 15 minutes, or until the crust is lightly golden brown. Keep a close eye on it, as oven temperatures can vary.
Expert Tips & Tricks
- Chill Out: For an even flakier crust, chill the dough in the pie pan for 30 minutes before pre-baking. This helps the gluten relax and prevents shrinkage during baking.
- Blind Baking Bliss: When pre-baking the crust, especially for fillings that don’t require further baking (like a chocolate cream pie), use pie weights or dried beans to weigh down the crust. This prevents it from puffing up and losing its shape. Line the crust with parchment paper before adding the weights.
- Grease is the Word (Sometimes): While this recipe doesn’t require greasing the pan, a light spray of cooking spray can help the crust release cleanly after baking.
- Preventing a Soggy Bottom: For fillings that are particularly moist, brush the bottom of the pre-baked crust with a thin layer of melted chocolate or egg white before adding the filling. This creates a barrier that helps prevent the crust from becoming soggy.
- Salt Selection: A pinch of flaky sea salt sprinkled on the baked crust adds a gourmet touch and enhances the flavors.
Serving & Storage Suggestions
Serve your pie chilled or at room temperature, depending on the filling. A dollop of whipped cream or a scoop of vanilla ice cream makes a perfect accompaniment.
Leftover pie can be stored at room temperature for up to 2 days, or in the refrigerator for up to 4 days. To maintain the crust’s crispness, loosely cover the pie with plastic wrap or foil.
For longer storage, you can freeze the baked pie. Wrap it tightly in plastic wrap and then in foil. Frozen pie can be stored for up to 2 months. Thaw the pie in the refrigerator overnight before serving.
Nutritional Information
(Estimates based on the crust alone, without filling. Values will vary depending on specific ingredients and serving size.)
| Nutrient | Amount per Serving | % Daily Value |
|---|---|---|
| Calories | 220 kcal | 11% |
| Total Fat | 15g | 23% |
| Saturated Fat | 2g | 10% |
| Cholesterol | 0mg | 0% |
| Sodium | 150mg | 7% |
| Total Carbohydrate | 20g | 7% |
| Dietary Fiber | 1g | 4% |
| Sugars | 2g | 4% |
| Protein | 3g | 6% |
Variations & Substitutions
- Vegan Crust: Substitute the milk with any non-dairy milk alternative, such as almond milk, soy milk, or oat milk. Ensure the vegetable oil is plant-based.
- Whole Wheat Crust: Replace up to half of the all-purpose flour with whole wheat flour for a nuttier flavor and added fiber.
- Gluten-Free Crust: Use a gluten-free all-purpose flour blend. You may need to add a little extra liquid (water or milk) to achieve the right consistency.
- Herb Crust: Add 1-2 tablespoons of dried herbs like rosemary, thyme, or oregano to the flour mixture for a savory crust. This is perfect for quiches or pot pies.
- Citrus Zest: Add the zest of one lemon or orange to the flour mixture for a bright, citrusy flavor. This pairs well with fruit fillings.
FAQs (Frequently Asked Questions)
Q: Can I use butter instead of vegetable oil?
A: While this recipe is designed for vegetable oil, you can substitute with melted and cooled butter. However, the texture will be slightly different, resulting in a richer, more crumbly crust.
Q: What if my dough is too dry and crumbly?
A: Add a teaspoon or two of cold water or milk at a time until the dough comes together. Be careful not to add too much liquid, as this can make the crust tough.
Q: How do I prevent the edges of the crust from burning?
A: If the edges of the crust are browning too quickly during pre-baking, you can cover them with strips of aluminum foil.
Q: Can I make this crust ahead of time?
A: Yes! You can prepare the dough, pat it into the pie pan, and then wrap it tightly in plastic wrap and refrigerate for up to 2 days. You can also freeze the unbaked crust for up to a month.
Q: My crust shrunk during baking. What did I do wrong?
A: Shrinkage can be caused by overworking the dough, using too much liquid, or not chilling the dough properly. Make sure to follow the recipe carefully and chill the dough before baking.
Final Thoughts
There you have it – a foolproof pat-in-pan pie crust recipe that’s perfect for bakers of all skill levels. Don’t be intimidated by homemade pie crusts any longer. With this recipe, you can enjoy the satisfaction of creating something delicious from scratch without spending hours in the kitchen. I encourage you to give it a try, experiment with different fillings, and share your creations with loved ones. And don’t forget to let me know how it turns out! Happy baking!