
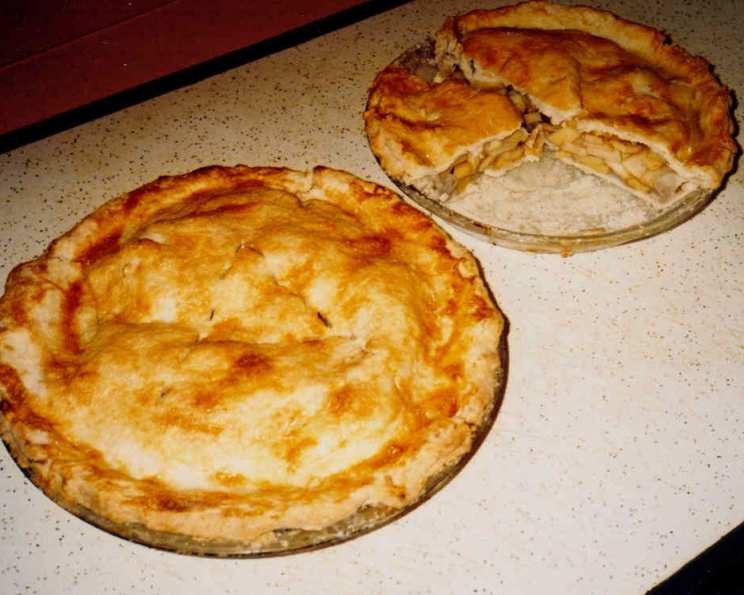
Pat’s Appalachian Apple Pie (From Scratch)
The memory is etched in my mind: a bustling kitchen, the scent of cinnamon hanging heavy in the air, and my grandmother, Pat, her hands dusted with flour, patiently showing me the art of pie making. It wasn’t just a recipe; it was a tradition passed down through generations, each slice carrying the warmth of her love and the taste of home. I can almost feel the warmth of the oven on my face and the anticipation of that first, glorious bite of perfectly spiced apples nestled in a flaky crust. This is her recipe, shared with love and adapted only slightly over the years.
Recipe Overview
- Prep Time: 45 minutes
- Cook Time: 45 minutes
- Total Time: 1 hour 30 minutes
- Servings: 6
- Yield: 1 pie
- Dietary Type: Vegetarian
Ingredients
For the Crust:
- 3 ½ cups all-purpose flour, divided (3 ¼ cups + ¼ cup for dusting)
- 1 teaspoon salt
- ⅔ cup Crisco shortening, divided (1 teaspoon for greasing pan, remainder for dough)
- 3 tablespoons salted butter
- ½ cup water, plus more as needed
For the Filling:
- 8 large apples (such as Granny Smith, Honeycrisp, or a mix)
- ½ cup sugar, divided (reserve 1 teaspoon)
- 2 teaspoons cinnamon
- ¼ teaspoon allspice
- 1 lemon
- 1 egg white
- A couple of dashes of salt (optional)
Equipment Needed
- 9 or 10-inch pyrex (glass) pie pan
- Large mixing bowl
- Flat working surface
- Rolling pin
- Paring knife or scissors
- Second bowl for apple slices
- Small brush (optional)
- Whisk or fork
Instructions
-
Prepare the Pie Pan: Begin by greasing your pie pan with about 1 teaspoon of Crisco shortening. Ensure the entire surface is lightly coated to prevent sticking.
-
Preheat the Oven: Preheat your oven to 400°F (200°C). This high temperature helps create a flaky and golden-brown crust.
-
Prepare Your Work Surface: Lightly dust your flat working surface with ¼ cup of flour. This will prevent the dough from sticking as you roll it out.
-
Combine Dry Ingredients: In a large mixing bowl, pour in 3 cups of the flour. Add the salt and mix it well with the flour. This ensures even distribution of the salt throughout the crust.
-
Incorporate Fats: Add the remaining Crisco shortening and the butter to the flour mixture. Use your hands (or a pastry blender) to work the fats into the flour until the mixture resembles coarse crumbs, about the size of peas. This “grainy” texture is crucial for a flaky crust.
-
Add Water: Add ½ cup of water to the flour and fat mixture. Blend with your hands or a fork until the dough just comes together. If the dough is too dry, add additional water, 1 tablespoon at a time, until it forms a cohesive ball. Be careful not to overwork the dough.
-
Adjust Consistency (If Necessary): If the dough becomes sticky, you’ve likely added too much water. To remedy this, add a little more flour until the consistency is right. The dough should be pliable but not sticky.
-
Divide and Shape the Dough: Cut the dough in half and shape each half into a fat pancake with your hands. Place one portion of the dough back into the mixing bowl and cover it with a slightly dampened towel to prevent it from drying out. Lay the second portion on your floured working surface.
-
Roll Out the Bottom Crust: Use a rolling pin to carefully roll out the dough into a circle shape. Start from the center and roll outwards, rotating the dough as needed. Avoid rolling back and forth, as this can develop the gluten too much and result in a tough crust. Dust the top of the dough with a little of the remaining flour as needed to prevent it from sticking to the rolling pin. If the rolling pin is sticking, wipe it down and dust it with flour occasionally. Aim for a thickness of about 1/16 inch.
-
Fold and Transfer to Pie Pan: Once the dough is rolled out, dust the top with a little more flour. Carefully fold one side of the dough back onto itself to form a half-moon shape. Dust the exposed half with flour, flip it over, and lightly dust the second half. Gently lift the folded dough and lay it into the greased pie pan, still folded in half. Unfold it to cover the entire plate.
-
Shape the Bottom Crust: Carefully ease the dough into the pan without stretching it, as this can cause it to shrink during baking. Use a sharp paring knife or scissors to trim the dough around the pan, leaving about ¾ inch hanging over the edge. After trimming, fold the excess dough back up with your fingers and press it along the top edge to form a roughly shaped crust edge. This doesn’t need to be perfect.
-
Blind Bake the Bottom Crust: Place the crust in the preheated oven and bake for about 15 minutes, or until the edge begins to show the slightest bit of brown in one or two spots. Remove from the oven and set aside. This partial baking, called “blind baking,” helps prevent the bottom crust from becoming soggy.
-
Prepare the Apples: Peel the apples, quarter them, and immediately drop them into a bowl of water. Cut the lemon in half and squeeze all of the juice into the water before adding the peeled apples. The lemon juice prevents the apples from browning.
-
Slice the Apples: Have a second bowl ready at hand for the apple slices. Cut the core portions from each apple quarter and slice up the remaining apple piece into 4-5 slices each.
-
Combine Apple Filling Ingredients: When all the apple slices are in the second bowl, add the sugar (reserving 1 teaspoon), cinnamon, and allspice. You can also add a couple of dashes of salt if you wish.
-
Macerate the Apples: Mix the apples with the sugar and spices using a spoon and allow the mixture to sit for at least 10 minutes. This allows the flavors to meld and the apples to release some of their juices.
-
Fill the Pie: Next, fill the baked pie crust with the apple slices, adding as much syrup from the bottom of the bowl as you like. Mound the apples up in the center of the pie to about ¾-1 inch above the pie pan edge. The apples will cook down during baking.
-
Roll Out the Top Crust: Make your pie crust top the same way you made the bottom crust. Roll it out on the floured surface to a 1/16″ thickness.
-
Cover and Seal the Pie: Carefully lay the top crust over the filling. Trim it, leaving about ¾ inch extra “hangover”. Pull the extra crust up and, as you did before, roughly (but carefully!) form it on to the existing edge. Don’t worry about making it pretty; a rustic edge is part of the charm of this pie.
-
Egg Wash and Sugar: Add ½ teaspoon of water to your egg white and whisk with a fork in a bowl. Use a small brush or your fingers to rub the egg white onto the pie crust top, getting the edges as well. This will give the crust a beautiful shine and help it brown evenly. Once you have done this, sprinkle your remaining teaspoon of sugar over the top.
-
Cut Air Vents: Use a sharp knife to cut some air holes into the pie crust top. Cut a design (like an “A”!) or simple slits to allow steam to escape during baking. This prevents the crust from becoming soggy and helps it bake evenly.
-
Bake the Pie: Bake the pie at the same temperature (400°F/200°C) for about 30 minutes. When the crust is golden brown on top, it’s done.
-
Cool and Serve: Allow the pie to rest for at least 30 minutes before slicing and serving. This allows the filling to set slightly, making it easier to slice. Serve warm with vanilla ice cream on the side for the ultimate indulgence.
Expert Tips & Tricks
- Apple Selection: Don’t be afraid to mix different varieties of apples for a more complex flavor profile. Granny Smith apples provide tartness, while Honeycrisp or Fuji apples offer sweetness and crispness.
- Crisco is Key: The use of Crisco is crucial for the crust’s tenderness. While butter adds flavor, Crisco creates flakiness.
- Keep Everything Cold: Cold ingredients are essential for a flaky crust. Use ice water and ensure your butter and Crisco are well-chilled.
- Don’t Overmix: Overmixing the dough develops the gluten, leading to a tough crust. Mix just until the ingredients come together.
- Prevent a Soggy Bottom Crust: Blind baking the bottom crust and brushing it with egg white before filling can help prevent a soggy bottom.
- Apple Syrup Variation: For a gooier filling, macerate the apples with the sugar and spices for longer, allowing them to release more juices. You can then thicken the juices with cornstarch before adding them back to the apples, as described in the original recipe.
Serving & Storage Suggestions
Serve Pat’s Appalachian Apple Pie warm, either on its own or with a scoop of vanilla ice cream or a dollop of whipped cream. A sprinkle of cinnamon on top adds a nice finishing touch.
Store leftover pie at room temperature for up to 2 days or in the refrigerator for up to 4 days. To reheat, warm individual slices in the microwave for 30-60 seconds or bake the entire pie in a preheated oven at 350°F (175°C) for 10-15 minutes.
For longer storage, the pie can be frozen. Wrap it tightly in plastic wrap and then in aluminum foil. Frozen pie will keep for up to 3 months. Thaw overnight in the refrigerator before reheating.
Nutritional Information
| Nutrient | Amount per Serving | % Daily Value |
|---|---|---|
| Calories | 738 kcal | N/A |
| Total Fat | 30g | 45% |
| Saturated Fat | 10g | 47% |
| Cholesterol | 15mg | 5% |
| Sodium | 443mg | 18% |
| Total Carbohydrate | 114g | 37% |
| Dietary Fiber | 10g | 40% |
| Sugars | 46g | N/A |
| Protein | 9g | 18% |
Note: Nutritional information is an estimate and may vary based on specific ingredients and portion sizes.
Variations & Substitutions
- Gluten-Free Crust: Substitute the all-purpose flour with a gluten-free all-purpose flour blend for a gluten-free version. You may need to adjust the amount of water.
- Spiced Crust: Add a pinch of cinnamon or nutmeg to the crust dough for a warm, spiced flavor.
- Different Fruits: Experiment with other fruits, such as peaches, blueberries, or cherries, for a seasonal twist.
- Vegan Option: Substitute the butter with a vegan butter alternative and use a flax egg (1 tablespoon ground flaxseed mixed with 3 tablespoons water) instead of the egg white for the egg wash.
- Maple Syrup Sweetener: Substitute the granulated sugar with maple syrup for a richer and more complex flavor.
FAQs (Frequently Asked Questions)
Q: Can I use pre-made pie crust for this recipe?
A: While this recipe is best with a homemade crust, you can use pre-made pie crust in a pinch. Just be sure to choose a good quality crust and follow the package directions for baking.
Q: What kind of apples are best for apple pie?
A: A mix of tart and sweet apples works best. Granny Smith apples provide tartness, while Honeycrisp or Fuji apples add sweetness.
Q: Can I make the pie ahead of time?
A: Yes, you can make the pie a day or two in advance. Store it in the refrigerator and reheat it before serving.
Q: How do I prevent the pie crust from burning?
A: If the crust starts to brown too quickly, you can tent it with aluminum foil during the last part of baking.
Q: Why is my apple pie filling runny?
A: A runny filling can be caused by not using enough thickener or not baking the pie long enough. Macerating the apples and then thickening the juices before baking helps, as does ensuring the pie is fully cooked.
Final Thoughts
Pat’s Appalachian Apple Pie is more than just a dessert; it’s a taste of tradition, a symbol of home, and a labor of love. From the flaky crust to the perfectly spiced apple filling, every element of this pie is crafted with care. I encourage you to gather your ingredients, preheat your oven, and embark on this baking adventure. Share it with your loved ones, savor each bite, and create your own cherished memories around this classic dessert. And if you tweak the recipe, add your own signature flourish, or simply enjoy the process, I’d love to hear about it. Happy baking!