
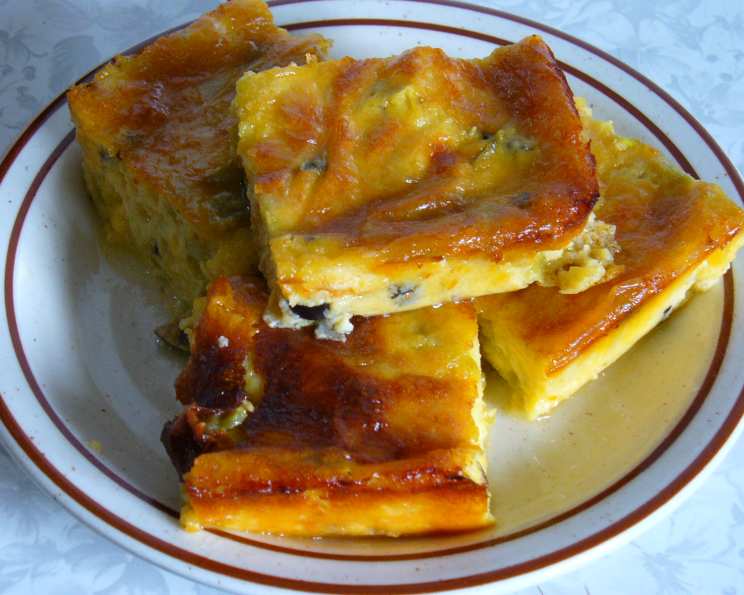
Pat’s Chiles Rellenos Squares: A Taste of Comfort and Celebration
Some of my fondest memories are from family gatherings, where tables overflowed with homemade goodness. I vividly remember one particular potluck where a bubbling, cheesy dish sat unassuming amongst the salads and roasts. One bite of those savory, mildly spicy chiles rellenos squares and I was hooked. The flavors transported me back to my grandmother’s kitchen, filled with the comforting aroma of simple, honest cooking. I knew then I had to recreate this gem.
Recipe Overview
- Prep Time: 15 minutes
- Cook Time: 50-60 minutes
- Total Time: 1 hour 5-15 minutes
- Servings: Varies, great for large parties or appetizers
- Yield: 1 (9×13 inch) casserole
- Dietary Type: Gluten-Free (naturally)
Ingredients
- 2 (7 ounce) cans Ortega diced green chilies
- 1 lb grated longhorn cheese (or 1 lb cheddar cheese or 1 lb Tillamook cheese)
- 1 lb grated Monterey Jack cheese
- 1 (13 ounce) can low-fat evaporated milk
- 3 tablespoons flour
- 4 whole eggs
- Optional: sliced black olives
- Optional: fresh tomato
- Optional: picante sauce
Equipment Needed
- 9 x 13-inch casserole dish
- Mixing bowl
- Grater
- Measuring cups and spoons
Instructions
-
Preheat your oven to 325°F (160°C). Ensure your oven rack is positioned in the center for even baking.
-
In a large mixing bowl, combine all of the ingredients: the 2 cans of diced green chilies, 1 pound of grated Longhorn (or Cheddar or Tillamook) cheese, 1 pound of grated Monterey Jack cheese, 1 (13 ounce) can of low-fat evaporated milk, 3 tablespoons of flour, and 4 whole eggs.
-
Mix all of the ingredients thoroughly until they are well combined. Make sure the flour is evenly distributed to prevent any clumps.
-
Pour the mixture into a 9 x 13-inch casserole dish. Ensure the mixture is spread evenly across the dish.
-
Bake in the preheated oven for 50 to 60 minutes. The chiles rellenos squares are done when the top is golden brown and a toothpick inserted into the center comes out clean. Keep a close eye on the baking process; baking times can vary depending on your oven.
-
(Optional) As soon as the casserole is removed from the oven, you can add optional toppings such as a small can of sliced black olives and/or cover the top with thinly sliced tomatoes. This adds a nice visual appeal and fresh flavor.
-
Let the casserole stand for a few minutes before cutting. This allows it to firm up slightly and makes it easier to cut into neat squares or slices.
Expert Tips & Tricks
-
Cheese Selection: While the recipe suggests Longhorn, Cheddar, or Tillamook, feel free to experiment with other melting cheeses. A blend of cheeses, like Colby Jack or pepper jack for a little kick, can also work well.
-
Spice Level: If you prefer a spicier version, consider using hot diced green chilies or adding a pinch of cayenne pepper to the mixture.
-
Preventing Soggy Squares: Ensure the green chilies are well-drained before adding them to the mixture. Excess moisture can make the squares soggy.
-
Make-Ahead Option: You can assemble the casserole a day in advance and store it in the refrigerator. Add about 10-15 minutes to the baking time if baking directly from the fridge.
-
Even Baking: If your oven tends to bake unevenly, rotate the casserole dish halfway through the baking time.
Serving & Storage Suggestions
These chiles rellenos squares are incredibly versatile. They can be served as a main course with a side salad or rice, or as a delicious appetizer for parties and gatherings. Cut them into small squares for easy serving as finger food.
Serving: Serve warm. A dollop of sour cream or guacamole can be a nice addition. For those who enjoy a bit more heat, serve with picante sauce on the side.
Storage: Leftovers can be stored in an airtight container in the refrigerator for up to 3-4 days.
Reheating: Reheat individual portions in the microwave or bake in a preheated oven at 350°F (175°C) until heated through.
Freezing: For longer storage, the casserole can be frozen. Cut into individual squares, wrap tightly in plastic wrap, and then place in a freezer bag. It can be frozen for up to 2 months. Thaw overnight in the refrigerator before reheating.
Nutritional Information
(Estimated, per serving – will vary based on cheese and additions)
| Nutrient | Amount per Serving | % Daily Value |
|---|---|---|
| Calories | 250 kcal | 13% |
| Total Fat | 18g | 28% |
| Saturated Fat | 11g | 55% |
| Cholesterol | 100mg | 33% |
| Sodium | 400mg | 17% |
| Total Carbohydrate | 5g | 2% |
| Dietary Fiber | 1g | 4% |
| Sugars | 2g | – |
| Protein | 15g | 30% |
Variations & Substitutions
- Dairy-Free Version: Substitute the cheese with your favorite dairy-free cheese alternative and use plant-based milk instead of evaporated milk. Note that the taste and texture will differ.
- Vegetarian Boost: Add other vegetables like corn, bell peppers, or zucchini to the mixture for added nutrients and flavor.
- Meat Lovers: Incorporate cooked and crumbled chorizo or ground beef for a heartier casserole.
- Spicier Kick: Add a can of diced jalapeños for a more pronounced heat.
FAQs (Frequently Asked Questions)
Q: Can I use regular milk instead of evaporated milk?
A: While you can, evaporated milk is recommended for its thicker consistency, which contributes to the creamy texture of the casserole. If using regular milk, you may want to add a bit more flour to help thicken the mixture.
Q: Can I make this ahead of time?
A: Yes, you can assemble the casserole a day in advance and store it in the refrigerator. Add about 10-15 minutes to the baking time if baking directly from the fridge.
Q: How do I know when the casserole is done?
A: The casserole is done when the top is golden brown and a toothpick inserted into the center comes out clean. The center should be set and not jiggly.
Q: Can I freeze this casserole?
A: Yes, it freezes well. Cut into individual squares, wrap tightly in plastic wrap, and then place in a freezer bag. It can be frozen for up to 2 months. Thaw overnight in the refrigerator before reheating.
Q: What kind of green chilies should I use?
A: Ortega diced green chilies are readily available and work well in this recipe. However, you can experiment with other brands or even roast your own fresh green chilies for a more intense flavor.
Final Thoughts
Pat’s Chiles Rellenos Squares are more than just a recipe; they’re a comforting taste of home and a celebration of simple, flavorful ingredients. This dish is guaranteed to be a crowd-pleaser at your next potluck or family gathering. Don’t hesitate to make it your own with a few personalized touches. I encourage you to try it out and share your feedback, or maybe even pair it with a crisp margarita! Enjoy!