
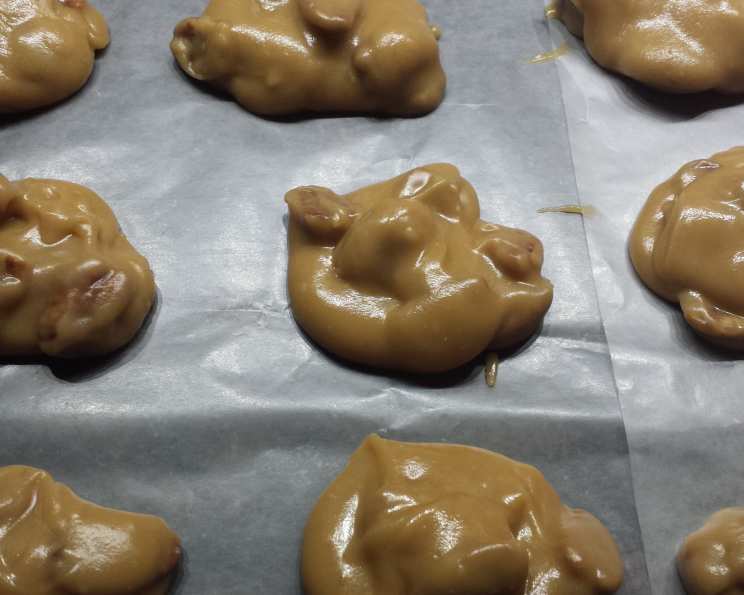
Paula Deen’s Divine Pralines: A Southern Comfort Classic
I remember the first time I tasted a praline. It was a sweltering summer day in Savannah, Georgia, the air thick with humidity and the scent of blooming magnolias. I’d ducked into a candy shop for refuge from the heat, and the sweet aroma of caramel and pecans drew me in like a moth to a flame. That first bite, that creamy, nutty, melt-in-your-mouth sensation, transported me. It was pure Southern comfort, an experience I’ve chased ever since.
Recipe Overview
- Prep Time: 5 minutes
- Cook Time: 25 minutes
- Cooling Time: 10 minutes
- Total Time: 40 minutes
- Servings: About 12
- Dietary Type: Gluten-Free
Ingredients
- ½ cup sugar
- 1 ½ cups packed light brown sugar
- ⅛ teaspoon salt
- 3 tablespoons dark corn syrup
- 1 cup evaporated milk
- 2 tablespoons butter
- 1 teaspoon pure vanilla extract
- 1 ½ cups pecan halves
Equipment Needed
- Heavy 2-quart saucepan
- Wooden spoon
- Candy thermometer (optional)
- Waxed paper
Instructions
-
First, prepare your workspace. Lightly butter the sides of a heavy 2-quart saucepan. This will help prevent sugar crystals from forming and ruining your pralines. Have your waxed paper ready on a flat surface as well, ready to receive the finished candies.
-
In the buttered saucepan, combine the sugar, brown sugar, salt, dark corn syrup, evaporated milk, and butter.
-
Place the saucepan over medium heat. Using a wooden spoon, stir constantly to dissolve the sugars completely. This is crucial; undissolved sugar can lead to a grainy texture.
-
Once the sugars have dissolved and the mixture begins to boil, continue to cook, still stirring constantly, until the mixture reaches the soft ball stage. This typically registers approximately 236 degrees F on a candy thermometer.
-
If you don’t have a candy thermometer, you can perform the cold water test. Drizzle a small drop of the candy mixture into a glass of very cold water. If it forms a soft, pliable ball that flattens easily when you take it out of the water and press it between your fingers, it’s at the soft ball stage.
-
Remove the saucepan from the heat and allow the mixture to cool for 10 minutes. This cooling period is vital; it allows the mixture to thicken slightly, preventing the pralines from spreading too thin on the waxed paper.
-
After the cooling period, add the vanilla extract and pecan halves to the saucepan.
-
Now comes the crucial part: beating the mixture. Using the wooden spoon, vigorously beat the candy by hand for approximately 2 minutes, or until it thickens slightly and begins to lose its glossy sheen. The mixture will start to look a little less shiny and more opaque. Do not overbeat, or the pralines will become too grainy.
-
Working quickly, drop heaping tablespoons of the mixture onto the prepared waxed paper. If the mixture becomes too stiff to drop easily, add a few drops of hot water to the saucepan and stir to loosen it.
-
Allow the pralines to cool and set completely on the waxed paper before serving. This usually takes about an hour.
Expert Tips & Tricks
- Patience is key: Don’t rush the cooking process. Achieving the soft ball stage is essential for the right texture.
- Constant stirring: Stirring prevents scorching and ensures even cooking.
- Don’t overbeat: Overbeating the mixture after adding the vanilla and pecans can cause the sugar to crystallize, resulting in grainy pralines. Beat just until the mixture thickens and loses its gloss.
- Humidity matters: On humid days, the pralines may take longer to set. If they are not setting properly, you can try placing them in the refrigerator for a short period to help them firm up.
- Troubleshooting: If your pralines turn out too hard, you likely overcooked them. If they are too soft and spread out, you may have undercooked them.
Serving & Storage Suggestions
These pralines are best enjoyed at room temperature. Their creamy, nutty texture and sweet, caramel-like flavor make them a perfect standalone treat or an elegant addition to a dessert platter.
To store, place the pralines in an airtight container at room temperature. They will keep for up to a week. Do not refrigerate, as this can cause them to become sticky. While freezing is not recommended, if you must, individually wrap the pralines in plastic wrap before placing them in an airtight container. Thaw at room temperature.
Nutritional Information
| Nutrient | Amount per Serving | % Daily Value |
|---|---|---|
| Calories | 339 kcal | N/A |
| Calories from Fat | 134 g | 40% |
| Total Fat | 14.9 g | 22% |
| Saturated Fat | 3.5 g | 17% |
| Cholesterol | 13.4 mg | 4% |
| Sodium | 94.7 mg | 3% |
| Total Carbohydrate | 51.7 g | 17% |
| Dietary Fiber | 1.4 g | 5% |
| Sugars | 44.2 g | N/A |
| Protein | 3.1 g | 6% |
Note: Nutritional information is an estimate and can vary based on specific ingredients and portion sizes.
Variations & Substitutions
- Different Nuts: While pecans are traditional, you can experiment with other nuts like walnuts or almonds.
- Spiced Pralines: Add a pinch of cinnamon, nutmeg, or cardamom to the mixture for a warm, spiced flavor.
- Chocolate Pralines: Drizzle melted chocolate over the cooled pralines for an extra decadent treat.
- Bourbon Pralines: Add a tablespoon of bourbon to the mixture along with the vanilla extract for an adult twist.
- Maple Pralines: Substitute maple syrup for the dark corn syrup for a richer, more complex flavor.
FAQs (Frequently Asked Questions)
Q: Why are my pralines grainy?
A: Grainy pralines are usually caused by undissolved sugar or overbeating the mixture after adding the vanilla and nuts. Make sure to stir the mixture constantly until the sugar is completely dissolved and avoid overbeating.
Q: How do I know when the pralines are ready?
A: The best way is to use a candy thermometer and cook to the soft ball stage (236°F). If you don’t have a thermometer, use the cold water test to check for doneness.
Q: Can I use regular milk instead of evaporated milk?
A: Evaporated milk has a higher sugar content and contributes to the unique texture of pralines. Regular milk will not work as well and may result in a thinner, less creamy candy.
Q: My pralines are spreading too thin. What did I do wrong?
A: This usually means the mixture was undercooked. Make sure to cook it to the soft ball stage, which will allow it to thicken properly.
Q: How long do pralines last?
A: Pralines will last for up to a week stored in an airtight container at room temperature.
Final Thoughts
Making pralines is a rewarding experience, a journey into the heart of Southern baking. While the process requires a little patience and attention to detail, the result – a creamy, nutty, melt-in-your-mouth piece of heaven – is well worth the effort. So gather your ingredients, put on some good music, and embark on this delicious adventure. And when you’ve created your own batch of perfect pralines, don’t forget to share them with someone you love, spreading a little bit of Southern sweetness with every bite. Perhaps pair them with a strong cup of coffee or a glass of sweet tea to complete the experience. Enjoy!