
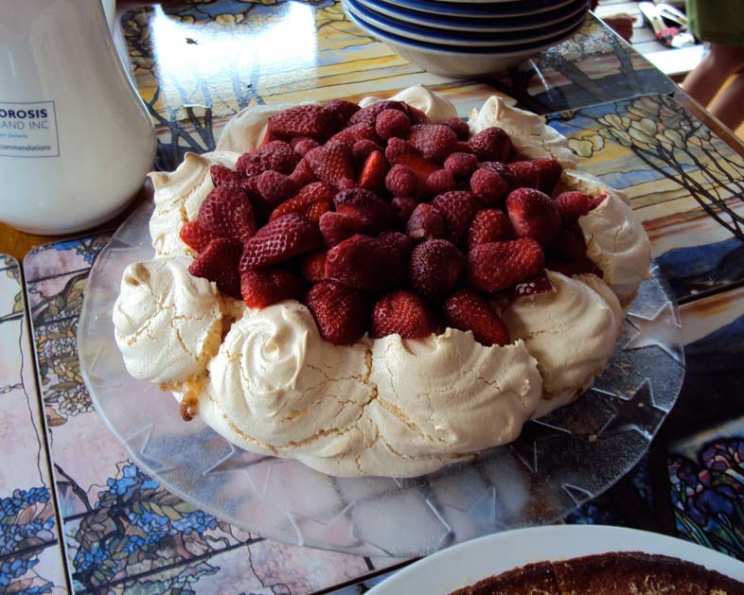
Pavlova: A Cloud of Sweetness from New Zealand
The first time I tasted pavlova, I was a wide-eyed child at my Kiwi aunt’s summer barbecue. The sight of that towering meringue, adorned with ruby-red strawberries and a swirl of whipped cream, felt like something out of a fairytale. Biting into it, the crisp shell gave way to a marshmallowy interior, a textural symphony that, combined with the tartness of the berries, instantly cemented pavlova as my all-time favorite dessert. That memory, the taste of sunshine and family laughter, is forever entwined with this iconic New Zealand treat.
Recipe Overview
- Prep Time: 20 minutes
- Cook Time: 1 hour
- Cooling Time: 2 hours
- Total Time: 3 hours 20 minutes
- Servings: 6
- Dietary Type: Gluten-Free
Ingredients
- 4 egg whites
- 1 1/2 cups caster sugar (fine ground)
- 1 teaspoon white vinegar
- 1 teaspoon vanilla extract
- 1 tablespoon cornstarch
- Whipped Cream, for serving
- Fresh Berries, for serving
- Mint Leaves, for serving
Equipment Needed
- Electric mixer
- Small bowl
- Oven tray
- Baking paper or aluminum foil
- Pencil
- Serving plate
Instructions
-
Preheat your oven to 180°C (350°F). This initial blast of heat is crucial for the pavlova’s structure.
-
Using an electric mixer, begin to beat the egg whites. Once they form soft peaks, gradually add the caster sugar, a little at a time, while continuing to beat. This is where patience is key. Beat the mixture for 10-15 minutes, or until it becomes thick, glossy, and forms stiff, unwavering peaks. The sugar needs to dissolve completely into the egg whites, creating a stable meringue. Rub a little of the mixture between your fingers; if it feels gritty, keep beating.
-
In a small bowl, mix together the white vinegar, vanilla extract, and cornstarch. This combination acts as a stabilizer and contributes to the pavlova’s signature marshmallowy center.
-
Add the vinegar mixture to the meringue and beat on high speed for a further 5 minutes. This step incorporates the ingredients thoroughly and further stabilizes the meringue.
-
Line an oven tray with baking paper (or aluminum foil, if baking paper is unavailable). Using a pencil, draw a 22cm (approximately 9 inches) circle on the baking paper. This will serve as a guide for shaping your pavlova.
-
Spread the meringue mixture onto the baking paper, staying within 2cm (about 1 inch) of the drawn circle’s edge. Aim to keep the shape as round and even as possible.
-
Smooth the top surface of the pavlova with a spatula or spoon. This helps ensure even baking and a more attractive presentation.
-
Place the pavlova in the preheated oven, then immediately reduce the temperature to 100°C (210°F). This lower temperature is essential for slow baking, which creates the desired crisp shell and soft interior.
-
Bake the pavlova for 1 hour.
-
After the baking time is complete, turn off the oven. Open the oven door slightly (propping it open with a wooden spoon works well) and leave the pavlova in the cooling oven until it is completely cool. This gradual cooling process prevents the pavlova from cracking. This might take approximately 2 hours.
-
Once the pavlova is completely cool, carefully lift it onto a serving plate.
-
Just before serving, decorate with whipped cream, fresh berries, and mint leaves. The whipped cream and berries add moisture and a burst of flavor that perfectly complements the sweetness of the meringue.
Expert Tips & Tricks
- Egg whites at room temperature whip up to a greater volume than cold egg whites. Separate your eggs a few hours beforehand or gently warm them in a bowl of lukewarm water for a few minutes.
- Ensure your bowl and whisk are impeccably clean. Any traces of fat can inhibit the egg whites from whipping properly. Wipe them down with a little lemon juice or vinegar before starting.
- Don’t overbake! The pavlova should be crisp on the outside and soft and marshmallowy on the inside. Overbaking will result in a dry, brittle meringue.
- If your pavlova cracks, don’t worry! It’s a common occurrence and doesn’t affect the taste. Simply cover the cracks with whipped cream and berries.
- For a more intense flavor, try using a flavored extract instead of vanilla. Almond, lemon, or even a touch of rosewater can add a unique twist.
- Baking in a humid environment: If you live in a humid climate, consider adding an extra tablespoon of cornstarch to the meringue mixture to help stabilize it.
- Preventing a sticky pavlova: The vinegar and cornstarch help to create that signature marshmallowy center, but also prevent the pavlova from becoming overly sticky. Don’t skip these ingredients!
Serving & Storage Suggestions
Pavlova is best served soon after it’s decorated with whipped cream and fruit. The moisture from these toppings can soften the meringue over time.
- Serving: Arrange the whipped cream and berries attractively on top of the pavlova just before serving. A dusting of powdered sugar adds a touch of elegance. Fresh mint leaves provide a refreshing garnish.
- Storage: An undecorated pavlova can be stored in an airtight container at room temperature for up to 2 days. Once decorated, it’s best consumed within a few hours. Leftovers can be stored in the refrigerator, but the meringue will soften. Freezing is not recommended, as it will drastically alter the texture.
Nutritional Information
| Nutrient | Amount per Serving | % Daily Value |
|---|---|---|
| Calories | 212 kcal | N/A |
| Total Fat | 0 g | 0% |
| Saturated Fat | 0 g | 0% |
| Cholesterol | 0 mg | 0% |
| Sodium | 37 mg | 1% |
| Total Carbohydrate | 52 g | 17% |
| Dietary Fiber | 0 g | 0% |
| Sugars | 50 g | N/A |
| Protein | 2 g | 4% |
Note: Nutritional information is an estimate and may vary based on specific ingredients and serving sizes.
Variations & Substitutions
- Berry Medley: While strawberries and raspberries are classic choices, feel free to use any combination of your favorite berries. Blackberries, blueberries, and even sliced stone fruits like peaches or nectarines work beautifully.
- Tropical Pavlova: Top with mango, kiwi, and passionfruit for a tropical twist. A sprinkle of toasted coconut adds extra flavor and texture.
- Chocolate Pavlova: Add a tablespoon of cocoa powder to the meringue mixture for a subtle chocolate flavor. Drizzle with melted chocolate before serving.
- Citrus Pavlova: Zest a lemon, lime, or orange and add it to the meringue mixture. The citrus zest adds a bright, aromatic flavor.
- Mini Pavlovas: Spoon individual portions of the meringue onto the baking sheet to create mini pavlovas. These are perfect for parties or individual desserts. Adjust baking time accordingly.
- Vegan Pavlova: Although difficult, there are modern recipes using aquafaba (the liquid from canned chickpeas) to make a vegan meringue. Keep in mind the baking times and texture will differ.
FAQs (Frequently Asked Questions)
Q: Why did my pavlova crack?
A: Cracking is normal! It’s often caused by temperature fluctuations. Cooling the pavlova slowly in the oven usually minimizes cracking, but it won’t affect the taste.
Q: My pavlova is sticky. What went wrong?
A: This could be due to underbaking or too much humidity. Ensure you bake the pavlova for the full hour and cool it completely in the oven. Adding an extra tablespoon of cornstarch can also help.
Q: Can I make pavlova ahead of time?
A: Yes! The undecorated pavlova can be stored in an airtight container at room temperature for up to 2 days. Decorate just before serving.
Q: Can I use brown sugar instead of caster sugar?
A: Caster sugar is recommended for its fine texture, which dissolves easily into the egg whites. Brown sugar may not dissolve completely and could affect the texture of the meringue.
Q: What’s the best way to whip cream for pavlova?
A: Use chilled heavy cream and a chilled bowl and beaters. Whip until soft peaks form, being careful not to overwhip. A touch of vanilla extract adds extra flavor.
Final Thoughts
Pavlova is more than just a dessert; it’s a celebration of textures and flavors, a reminder of warm summer days and shared moments. Don’t be intimidated by its delicate appearance – with a little patience and attention to detail, you can easily create this stunning centerpiece at home. I encourage you to try this recipe, experiment with different toppings, and share your own pavlova creations. And if you are feeling particularly festive, why not pair it with a glass of chilled New Zealand Sauvignon Blanc? Enjoy!