
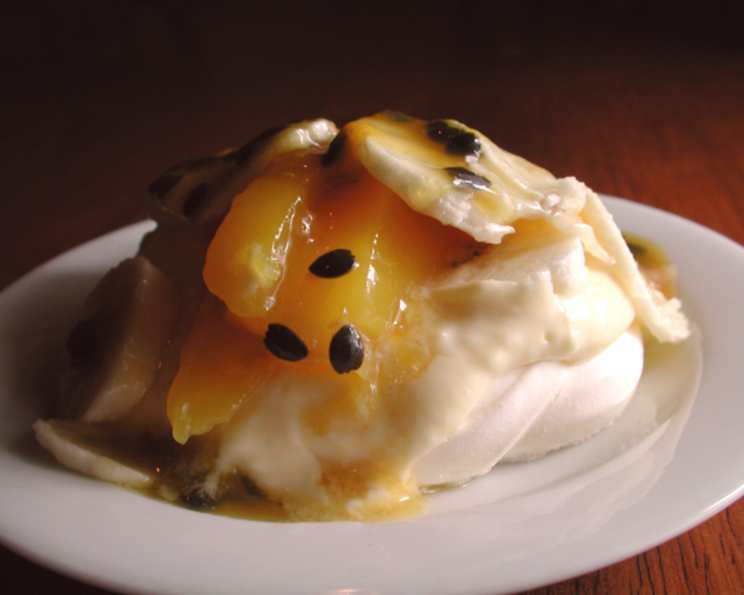
Pavlovas With Lemon Curd and Tropical Fruit
The first time I had a pavlova, it was at my Aunt Carol’s summer garden party. The sun was dappling through the leaves, the air smelled of roses and freshly cut grass, and there it was – a mountain of meringue crowned with a riot of berries and cream. I remember thinking it was the most beautiful thing I’d ever seen, and the taste – the shattering crispness of the meringue giving way to the pillowy softness and tart fruit – was pure magic. Ever since then, pavlova has always felt like sunshine and celebration to me, and these mini versions are just as delightful and much easier to share…or not!
Recipe Overview
- Prep Time: 20 minutes
- Cook Time: 30 minutes
- Total Time: 50 minutes
- Servings: 6
- Yield: 6 mini pavlovas
- Dietary Type: Gluten-Free
Ingredients
For the Mini Pavlovas:
- 4 egg whites
- 1 cup caster sugar
- 1 teaspoon vanilla essence
For the Lemon Curd:
- 1 tablespoon lemon rind, grated
- 2 tablespoons lemon juice
- ¼ cup caster sugar
- 2 eggs
- 50 g butter (1 3/4 oz)
For the Filling:
- 1 cup cream, whipped
- 2 bananas, sliced
- 1 mango, sliced
- 8 passion fruit
Equipment Needed
- Electric mixer
- Baking tray
- Baking paper
- Heatproof bowl
- Saucepan
- Whisk
- Plastic wrap
Instructions
-
Preheat the oven to 150°C (300°F/Gas 2). This initial high temperature helps the meringue to rise and form its characteristic crust.
-
In a clean, dry bowl (ensure no traces of grease or yolk are present, as this will prevent the egg whites from whipping properly), beat the egg whites with an electric mixer until soft peaks form. Soft peaks will hold their shape briefly but will droop at the tip.
-
Gradually add the caster sugar, beating well after each addition. This is crucial for creating a stable meringue. The sugar should be fully incorporated before adding more. Continue beating until the meringue is thick and glossy with stiff peaks. Stiff peaks will stand straight up when the beaters are lifted. The mixture should be smooth and not grainy.
-
Stir in the vanilla essence. Be gentle not to deflate the meringue too much. Vanilla adds depth of flavor to the pavlovas.
-
Line a baking tray with baking paper. This prevents the pavlovas from sticking.
-
Spoon the meringue mixture into six small nests on the prepared tray. You can use a spoon, a piping bag, or even a ziplock bag with a corner cut off to create the nests. Aim for even size and shape.
-
Bake for 20 minutes at 150°C (300°F/Gas 2).
-
Then, reduce the oven temperature to 120°C (250°F/Gas 1/2) and bake for another 10 minutes. Lowering the temperature helps to dry out the meringue without browning it excessively.
-
Turn off the oven and leave the pavlovas to cool completely inside the oven with the door ajar. This slow cooling process is essential for preventing the pavlovas from cracking. The gradual temperature change allows the meringue to set properly.
-
To make the lemon curd, put the lemon rind, lemon juice, sugar, eggs, and butter in a heatproof bowl. Whisk together until well combined.
-
Place the bowl over a pan of barely simmering water, making sure the base of the bowl is not touching the water (this is called a bain-marie). This gentle heat prevents the eggs from scrambling and ensures a smooth, creamy curd.
-
Stir continuously for about 15 minutes, or until the curd is thick enough to coat the back of a spoon – do not allow it to boil. The curd is ready when it leaves a clear trail when a finger is run across the back of the spoon.
-
Remove the bowl from the heat and lay plastic wrap directly on the surface of the lemon curd. This prevents a skin from forming as it cools.
-
Let the lemon curd cool completely.
-
Gently fold the whipped cream into the cooled lemon curd. This lightens the curd and adds a luxurious texture.
-
Spoon the lemon curd mixture into the cooled pavlova nests.
-
Top with banana slices, mango slices, and passion fruit pulp. Get creative with your arrangement!
Expert Tips & Tricks
- Perfecting the Meringue: The key to a successful pavlova lies in the meringue. Ensure your bowl and beaters are spotlessly clean and dry. If you’re having trouble getting stiff peaks, try adding a pinch of cream of tartar to the egg whites before beating. This helps stabilize the meringue.
- Lemon Curd Consistency: If your lemon curd is too thin, continue cooking it over the simmering water, stirring constantly. If it curdles, remove it from the heat immediately and whisk vigorously to smooth it out.
- Preventing Cracks: Cooling the pavlovas slowly in the oven is crucial for preventing cracks. If you still get cracks, don’t worry! They add character and won’t affect the taste.
- Make-Ahead Tip: You can make the pavlova shells and lemon curd a day ahead. Store the pavlovas in an airtight container at room temperature and the lemon curd in the refrigerator. Assemble just before serving to prevent the meringue from softening.
Serving & Storage Suggestions
Serve the pavlovas immediately after assembling for the best texture. The meringue will soften over time due to the moisture from the lemon curd and fruit.
If you have leftover assembled pavlovas, store them in the refrigerator for up to a few hours, but be aware that the meringue will lose its crispness. It’s best to store the components separately, if possible. The lemon curd can be stored in an airtight container in the refrigerator for up to 3 days. The pavlova shells are best eaten on the same day, but can be stored in an airtight container at room temperature for 1 day.
Nutritional Information
| Nutrient | Amount per Serving | % Daily Value |
|---|---|---|
| Calories | 350 kcal | 18% |
| Total Fat | 15g | 23% |
| Saturated Fat | 9g | 45% |
| Cholesterol | 120mg | 40% |
| Sodium | 50mg | 2% |
| Total Carbohydrate | 50g | 17% |
| Dietary Fiber | 2g | 8% |
| Sugars | 40g | N/A |
| Protein | 5g | 10% |
Note: Nutritional information is an estimate and can vary based on specific ingredients and portion sizes.
Variations & Substitutions
- Berry Pavlova: Substitute the tropical fruit with a mix of fresh berries like strawberries, raspberries, and blueberries.
- Chocolate Pavlova: Add 2 tablespoons of cocoa powder to the meringue mixture for a chocolatey twist. You can also drizzle melted chocolate over the finished pavlovas.
- Dairy-Free Option: Use a non-dairy whipped cream alternative, such as coconut cream or cashew cream.
- Lime Curd: Replace the lemon juice and rind with lime juice and rind for a tangy lime curd.
- Different Fruits: Use any combination of seasonal fruits you enjoy. Kiwi, pineapple, and passionfruit work particularly well.
FAQs (Frequently Asked Questions)
Q: Why is my meringue cracking?
A: Cracking is often caused by cooling the pavlovas too quickly. Make sure to turn off the oven and let them cool inside with the door ajar.
Q: Can I make the pavlovas ahead of time?
A: Yes, you can make the pavlova shells a day ahead and store them in an airtight container at room temperature. Assemble the pavlovas just before serving to prevent the meringue from softening.
Q: How do I prevent my lemon curd from curdling?
A: Cook the lemon curd over a gentle heat (bain-marie) and stir continuously. If it does curdle, remove it from the heat and whisk vigorously to smooth it out.
Q: My meringue is sticky. What did I do wrong?
A: Sticky meringue can be caused by overbaking or using too much sugar. Ensure you bake the pavlovas at the correct temperature and measure the sugar accurately.
Q: Can I use a stand mixer instead of a hand mixer?
A: Yes, a stand mixer works perfectly well for making meringue. Use the whisk attachment and follow the recipe instructions.
Final Thoughts
This Pavlova recipe is a guaranteed showstopper for any occasion. The combination of the crisp meringue, tangy lemon curd, and sweet tropical fruit is simply irresistible. Don’t be intimidated by the steps – with a little patience and attention to detail, you’ll be rewarded with a stunning dessert that will impress your family and friends. So go ahead, give it a try, and let me know what you think! I’d love to hear about your own variations and fruit combinations. Happy baking!