
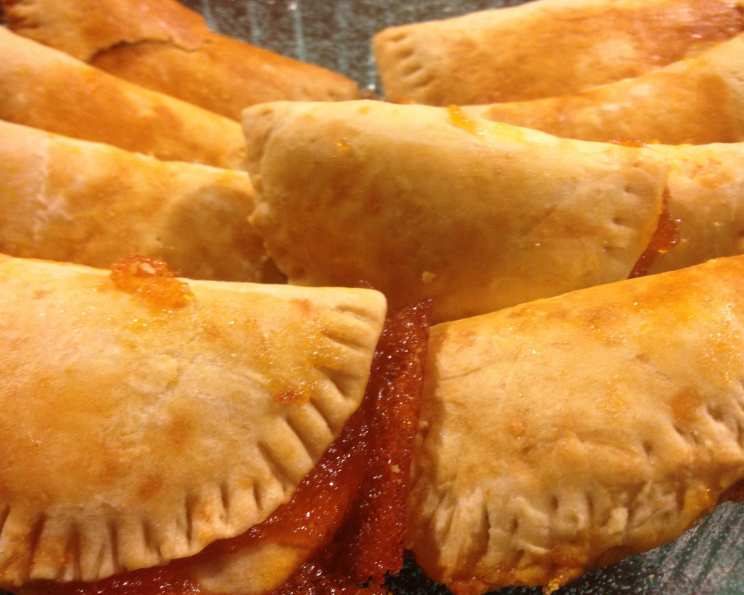
Pawpaw Tartlets: A Taste of Tropical Sunshine
There’s something so inherently joyful about miniature desserts. Perhaps it’s the permission to indulge without guilt, or the perfect portion that satisfies a craving. But my fondest memory of these Pawpaw Tartlets takes me back to my grandmother’s kitchen in Barbados. I can almost smell the sweet, syrupy scent of ripe papaya simmering on the stove, mingling with the buttery aroma of freshly baked pastry. They were her signature treat for afternoon tea, a tiny taste of island paradise served with a warm smile. Each bite was sunshine captured in a crust.
Recipe Overview
- Prep Time: 40 minutes
- Cook Time: 25 minutes
- Total Time: 1 hour 5 minutes
- Servings: 6
- Yield: 12 tarts
- Dietary Type: Vegetarian
Ingredients
For the Pawpaw Filling:
- 3 cups green papayas (1 large or two medium), peeled, seeded, and cubed
- 2 cups sugar, plus more to taste
- 3 tablespoons lime juice (about 4 limes), freshly squeezed
- 1 1/2 teaspoons vanilla extract
- 1/2 teaspoon cinnamon
- 1/2 teaspoon nutmeg
- 2 tablespoons margarine
- 1 pinch salt
For the Crust:
- 4 cups all-purpose flour
- 4 teaspoons baking powder
- 1/2 teaspoon salt
- 1 1/4 cups margarine, cold and cubed
- 1/2 cup sugar
- 1 1/3 cups milk
Equipment Needed
- Large pot
- Strainer or food mill
- Mixing bowls
- Fork or pastry blender
- Rolling pin
- Large round cookie cutter (or a knife)
- Cookie sheet
- Spatula
Instructions
-
Prepare the Pawpaw Filling: Begin by peeling your green pawpaw and carefully remove all the seeds. Cut the pawpaw into roughly 1-inch cubes. This is an important step, as the size of the chunks affects the cooking time.
-
Boil the Pawpaw: Place the cubed papaya in a large pot. Cover it with water and add the pinch of salt. The salt helps to tenderize the fruit. Cover the pot and bring the mixture to a boil over medium-high heat. Boil until the papaya is very soft, about 15-20 minutes. Check for doneness by piercing a piece with a fork; it should yield easily.
-
Strain the Pawpaw: Once the pawpaw is soft, carefully drain off all the water. Allow the papaya to cool slightly. Then, using a large cooking spoon or spatula, mash and force the papaya through a strainer or food mill. This step is crucial for achieving a smooth, jam-like consistency. Discard any fibrous pulp that remains in the strainer.
-
Add Flavor: Squeeze the limes to extract the juice and add the lime juice to the strained pawpaw. Be very careful to avoid adding any seeds. Stir in the margarine, vanilla extract, and spices (cinnamon and nutmeg). These additions will awaken the flavors of the pawpaw!
-
Sweeten to Taste: Add 1 1/2 cups of the sugar to the pawpaw mixture, and stir well to dissolve. Taste the filling and gradually add the remaining sugar, adjusting to your personal preference. This recipe calls for 2 cups total, but you may find you prefer less. Remember, you can always add more, but you can’t take it away! Mix well and set the filling aside.
-
Preheat the Oven: Preheat your oven to 350 degrees Fahrenheit (175 degrees Celsius). Make sure your oven rack is in the center position for even baking.
-
Prepare the Pie Crust: In a large mixing bowl, measure out the flour, salt, and baking powder. Combine these dry ingredients thoroughly.
-
Cut in the Fat: Use a fork or pastry blender to cut the cold margarine into the flour mixture. To “cut in” the fat, you’ll want to mash the margarine into small pieces while mixing it with the flour. Continue this process until the margarine is broken down and evenly distributed throughout the flour, resembling coarse crumbs.
-
Add Sweetness & Moisture: Stir the sugar into the milk until it dissolves. Pour the sweetened milk into the flour mixture. Use a spatula to fold the milk into the flour until just combined. Be careful not to overmix the dough, as this can lead to a tough crust.
-
Form the Dough: Use your hands to gently gather the dough into a ball. Place the dough on a lightly floured surface. Divide the dough into four equal pieces.
-
Roll Out the Dough: Use a rolling pin to flatten each piece of dough into a circle. For easier handling, you can divide each piece in half again. Roll the dough out flat on a lightly floured surface to about 1/8 inch thickness.
-
Cut into Circles: Use a large round cookie cutter (or a sharp knife) to cut the dough into circles. These circles will form the base and top of your tartlets.
-
Assemble the Tarts: Spoon a generous amount of the pawpaw filling into the center of each dough circle. Fold the dough over to form a half-moon shape.
-
Seal the Edges: Use a fork to seal the edges of the tartlets tightly. This prevents the filling from leaking out during baking. Press the tines of the fork firmly along the edge to create a decorative crimped pattern.
-
Bake the Tarts: Grease and flour a cookie sheet to prevent the tarts from sticking. Place the assembled tarts on the prepared cookie sheet, leaving some space between each tartlet. Bake at 350 degrees Fahrenheit (175 degrees Celsius) until golden brown, about 20-25 minutes. Keep a close eye on them, as baking times may vary depending on your oven.
-
Cool and Enjoy: Use a spatula to carefully remove the tartlets from the cookie sheet and transfer them to a wire rack to cool slightly. Serve warm or at room temperature. Enjoy!
Expert Tips & Tricks
- For an extra flaky crust, ensure the margarine is very cold before cutting it into the flour. You can even chill the flour beforehand.
- If the dough becomes too sticky, add a little more flour, one tablespoon at a time, until it reaches a workable consistency.
- To prevent the crust from browning too quickly, you can tent the tarts with aluminum foil during the last few minutes of baking.
- Brush the tops of the tarts with milk or an egg wash before baking for a golden, glossy finish.
- For a more intense flavor, consider adding a touch of grated ginger or a splash of rum to the pawpaw filling.
Serving & Storage Suggestions
Pawpaw tarts are delightful served warm or at room temperature. They make a wonderful addition to brunch spreads, afternoon tea, or a simple dessert after dinner. Serve them with a dollop of whipped cream or a scoop of vanilla ice cream for an extra indulgent treat.
Store leftover tarts in an airtight container at room temperature for up to 2 days, or in the refrigerator for up to 5 days. To reheat, warm them in a preheated oven at 300 degrees Fahrenheit (150 degrees Celsius) for about 10 minutes, or until heated through. You can also freeze baked tarts for up to 2 months. Thaw them in the refrigerator overnight before reheating.
Nutritional Information
| Nutrient | Amount per Serving | % Daily Value |
|---|---|---|
| Calories | 1071.5 kcal | N/A |
| Calories from Fat | 402 g | 38% |
| Total Fat | 44.7 g | 68% |
| Saturated Fat | 10.1 g | 50% |
| Cholesterol | 7.6 mg | 2% |
| Sodium | 984.4 mg | 41% |
| Total Carbohydrate | 159.5 g | 53% |
| Dietary Fiber | 3.7 g | 14% |
| Sugars | 89.4 g | 357% |
| Protein | 11.2 g | 22% |
Variations & Substitutions
- Gluten-Free: Use a gluten-free flour blend and a gluten-free baking powder for a gluten-free version of this recipe. Be sure to add a binding agent like xanthan gum if your flour blend doesn’t already include it.
- Vegan: To make this recipe vegan, ensure your margarine is plant-based. You can also substitute the milk with a plant-based alternative, such as almond milk or soy milk.
- Spiced Crust: Add a teaspoon of cinnamon or nutmeg to the crust for a warm, aromatic twist.
- Citrus Zest: Grate the zest of one lime into the pawpaw filling for an extra burst of citrus flavor.
FAQs (Frequently Asked Questions)
Q: Can I use ripe papaya for this recipe?
A: No, this recipe specifically calls for green, unripe papaya. Ripe papaya will be too soft and sweet.
Q: Where can I find green papaya?
A: You may need to visit an African, Oriental, or Spanish grocery store to find green papaya. Check in the produce section.
Q: Can I make the pie crust ahead of time?
A: Yes, you can prepare the pie crust dough in advance and store it in the refrigerator for up to 2 days. Wrap it tightly in plastic wrap to prevent it from drying out.
Q: How do I prevent the tart crust from getting soggy?
A: Make sure to seal the edges of the tarts tightly with a fork to prevent the filling from leaking out. Also, avoid overfilling the tarts.
Q: Can I freeze the pawpaw filling?
A: Yes, you can freeze the pawpaw filling for up to 2 months. Thaw it in the refrigerator overnight before using.
Final Thoughts
These Pawpaw Tartlets are more than just a recipe; they’re a slice of history, a taste of the tropics, and a reminder of the simple joys in life. I encourage you to try this recipe and experience the unique flavor of green papaya in a delightful dessert. Don’t be afraid to experiment with your own variations and share your creations with loved ones. And if you have any feedback or questions, please don’t hesitate to share!