
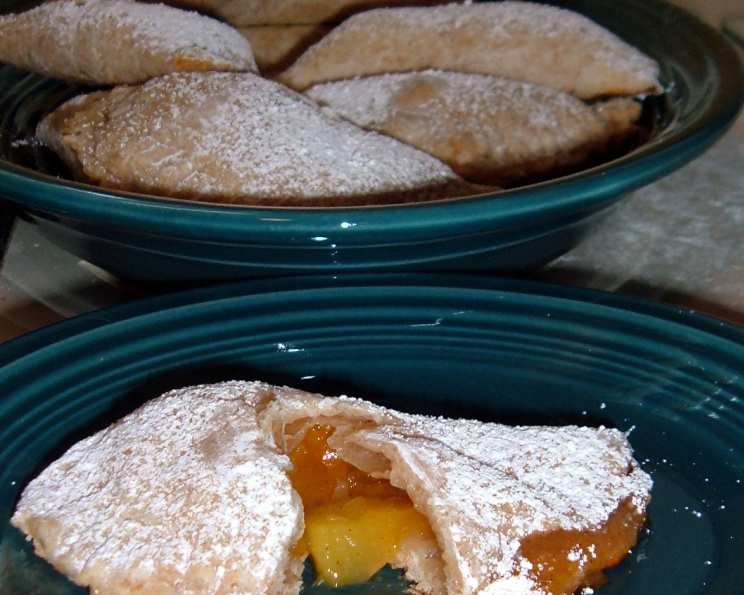
Peach Fried (or Baked) Pies: A Taste of Summer Sunshine
The aroma of fried dough and sweet, cooked peaches always transports me back to my grandmother’s kitchen. I can almost feel the humid summer air, hear the lazy buzz of cicadas, and see her standing over the stove, carefully turning each golden-brown pie. She’d let me sneak one, still warm, the sugary glaze melting on my fingers as I devoured it. These weren’t just pies; they were edible sunshine, embodying the joy and simple pleasures of a summer well spent. This recipe, inspired by those cherished memories, brings that same feeling home.
Recipe Overview
- Prep Time: 30 minutes
- Cook Time: 20-30 minutes (frying) / 15 minutes (baking)
- Total Time: 50-60 minutes
- Servings: 6-8 pies
- Yield: 6-8 pies
- Dietary Type: Vegetarian
Ingredients
For the Filling:
- 2 fresh peaches, sliced and diced into 1/2 inch cubes (no need to peel)
- ¾ cup peach preserves
- ¼ – ½ teaspoon cinnamon
For the Dough:
- 3 cups flour
- 2 teaspoons baking powder
- 1 ½ teaspoons salt
- ½ cup butter, cold, cut in ½ inch cubes
- ¾ cup ice water
For Frying:
- 3-4 inches canola oil
For Baking:
- 2 tablespoons water
- 1 egg
Optional Topping:
- Powdered sugar
Equipment Needed
- Large bowl
- Pastry blender or food processor
- Rolling pin
- Floured surface
- 5-inch cookie cutter or similar (lid from a 1-quart container works well)
- Deep frying pan or Dutch oven (for frying)
- Baking sheet (for baking)
- Parchment paper (for baking, optional)
- Fork
- Paper towels
Instructions
-
Prepare the filling: In a medium bowl, gently combine the diced peaches, peach preserves, and cinnamon. Set aside. The peaches will release some juice, which is perfectly fine and adds to the flavor.
-
Combine dry ingredients: In a large bowl, whisk together the flour, baking powder, and salt. This ensures even distribution of the leavening agent and seasoning.
-
Cut in the butter: Add the cold, cubed butter to the dry ingredients. Use a pastry blender or your fingertips to cut the butter into the flour mixture. Work quickly to prevent the butter from melting. The mixture should resemble coarse cornmeal with small, pea-sized pieces of butter remaining. These butter pieces are crucial for creating flaky layers in the crust. A food processor can also be used; pulse until the mixture reaches the desired consistency.
-
Add ice water: Gradually add the ice water to the flour and butter mixture, mixing lightly with a fork or your hands. Add just enough water until the dough comes together to form a ball. Be careful not to overmix, as this will develop the gluten in the flour and result in a tough crust. The dough should be slightly shaggy but not sticky.
-
Divide and chill the dough: Divide the dough into two equal parts. Wrap each portion tightly in plastic wrap and refrigerate for at least 30 minutes. This allows the gluten to relax and makes the dough easier to roll out. You can chill the dough for longer, even overnight, if needed.
-
Roll out the dough: On a lightly floured surface, roll out one portion of the dough to approximately 1/16 inch thick. This is slightly thicker than a tortilla. Keep the remaining dough refrigerated until ready to use.
-
Cut out circles: Using a 5-inch cookie cutter or a similar-sized object (like the lid from a 1-quart plastic container), cut out circles from the rolled-out dough. Each ball of dough should yield 3 to 4 circles, depending on how efficiently you cut them.
-
Fill the pies: Place about 1 tablespoon of the peach filling in the center of each dough circle. Do not overfill, as this can cause the pies to burst during frying or baking.
-
Fold and seal: Fold the dough in half over the filling to create a half-moon shape. Seal the edges with a bit of water to help them stick together. Then, crimp the edges with a fork to create a decorative seal and prevent the filling from leaking out.
-
Fry the pies (Option 1): Pour 3-4 inches of canola oil into a deep frying pan or Dutch oven. Heat the oil over medium-high heat until it reaches a temperature of 350-375°F (175-190°C). A good way to test the temperature is to drop a small scrap of dough into the oil; it should sizzle and bubble immediately. Fry a couple of pies at a time, for approximately 2-3 minutes per side, until they are golden brown. Be careful not to overcrowd the pan, as this will lower the oil temperature and result in greasy pies.
-
Drain and cool (Option 1): Remove the fried pies from the oil with a slotted spoon and place them on a plate lined with paper towels to drain excess oil.
-
Bake the pies (Option 2): Preheat the oven to 375°F (190°C). Grease a baking sheet or line it with parchment paper.
-
Prepare egg wash (Option 2): In a small bowl, whisk together 2 tablespoons of water and 1 egg to create an egg wash.
-
Brush and bake (Option 2): Place the pies on the prepared baking sheet and brush the tops with the egg wash. This will give them a beautiful golden-brown color. Bake for 15 minutes, or until the pies are golden brown.
-
Garnish and serve: Whether fried or baked, sprinkle the pies with powdered sugar while they are still warm, if desired. Serve immediately and enjoy the taste of summer!
Expert Tips & Tricks
- Keep the butter cold: This is crucial for creating a flaky crust. If the butter starts to soften, pop it back into the freezer for a few minutes.
- Don’t overwork the dough: Overmixing develops the gluten and results in a tough crust. Mix just until the dough comes together.
- Re-roll scraps: If you have leftover dough scraps, you can re-roll them and cut out more circles, but be aware that the dough will become tougher with each re-rolling.
- Adjust cinnamon to taste: If you prefer a stronger cinnamon flavor, use the full ½ teaspoon.
- Prevent soggy fried pies: Ensure the oil is hot enough before frying. Lower oil temperature results in greasy pies.
- Make ahead: The filled pies can be assembled ahead of time and refrigerated for several hours before frying or baking.
Serving & Storage Suggestions
Serve these peach pies warm for the best flavor and texture. The warm, flaky crust and sweet, gooey filling are simply irresistible. They are perfect as a dessert, snack, or even a special breakfast treat. Leftover pies can be stored at room temperature for up to 2 days, or in the refrigerator for up to 4 days. To reheat, warm them in a 350°F (175°C) oven for 5-10 minutes, or until heated through. Fried pies may lose some of their crispness upon reheating. You can freeze unbaked pies for up to 2 months. Thaw them in the refrigerator overnight before frying or baking.
Nutritional Information
(Estimated per serving, values may vary based on specific ingredients and portion sizes)
| Nutrient | Amount per Serving | % Daily Value |
|---|---|---|
| Calories | 450 kcal | 23% |
| Total Fat | 20g | 31% |
| Saturated Fat | 12g | 60% |
| Cholesterol | 50mg | 17% |
| Sodium | 500mg | 22% |
| Total Carbohydrate | 60g | 20% |
| Dietary Fiber | 3g | 12% |
| Sugars | 25g | N/A |
| Protein | 5g | 10% |
Variations & Substitutions
- Other fruits: Substitute the peaches with other fruits like apples, blueberries, or cherries. Adjust the spices accordingly.
- Different preserves: Experiment with different types of preserves, such as apricot, strawberry, or even fig.
- Gluten-free: Use a gluten-free flour blend for the dough. Be sure to add a binder like xanthan gum to help hold the dough together.
- Vegan: Replace the butter with a vegan butter substitute and use a plant-based milk (like almond or soy milk) instead of ice water. Omit the egg wash or use a plant-based milk alternative brushed on top before baking.
- Spice variations: Add a pinch of nutmeg or ginger to the filling for a warmer, spicier flavor.
FAQs (Frequently Asked Questions)
Q: Can I use canned peaches instead of fresh peaches?
A: Yes, you can use canned peaches, but be sure to drain them well and pat them dry with paper towels before adding them to the filling. Fresh peaches will provide the best flavor and texture.
Q: Can I make these pies ahead of time?
A: Yes, you can assemble the filled pies ahead of time and refrigerate them for several hours before frying or baking.
Q: My dough is too sticky. What should I do?
A: Add a little more flour, one tablespoon at a time, until the dough is no longer sticky. Be careful not to add too much flour, as this can make the dough tough.
Q: My filling is too runny. What can I do?
A: Add a tablespoon of cornstarch to the filling to help thicken it.
Q: Can I freeze these pies?
A: Yes, you can freeze unbaked pies for up to 2 months. Thaw them in the refrigerator overnight before frying or baking.
Final Thoughts
I hope this recipe brings a little bit of sunshine into your kitchen, just as it does for me. Don’t be intimidated by the steps; take your time, enjoy the process, and don’t be afraid to experiment with different variations. Whether you choose to fry or bake them, these peach pies are sure to be a crowd-pleaser. Feel free to share your creations and feedback; I’d love to hear how they turn out! Pair these warm pies with a scoop of vanilla ice cream or a dollop of whipped cream for the ultimate summer treat.