
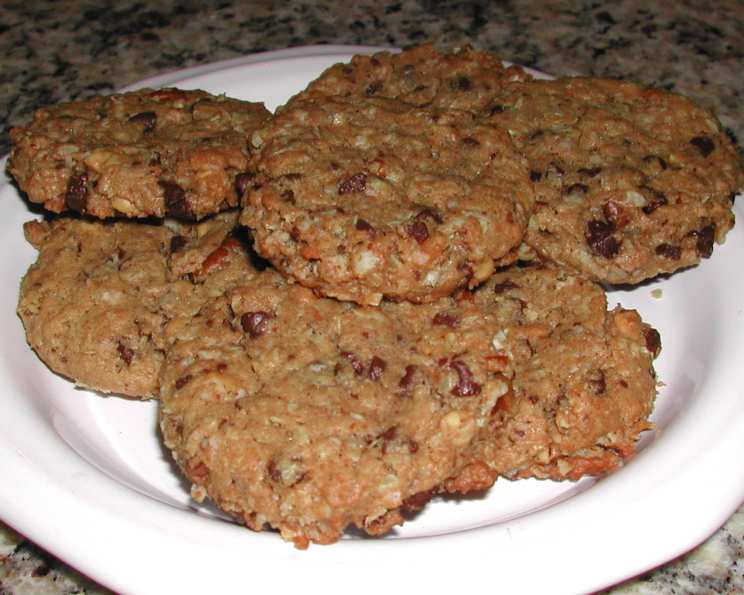
Peanut Butter and Chocolate Chunk Oat Cookies (No Flour)
The aroma of peanut butter cookies baking always takes me back to my childhood. My grandmother, a woman whose love language was definitely baking, would whip up batches of these every time my cousins and I came to visit. Her version always included flour, but these flourless wonders capture that same comforting flavor with an even chewier texture. It’s like a warm hug in cookie form, and the combination of peanut butter and chocolate is simply irresistible. These are perfect for sharing…if you can resist eating them all yourself!
Recipe Overview
- Prep Time: 15 minutes
- Cook Time: 13-14 minutes
- Total Time: 28-29 minutes
- Servings: 28-30 cookies
- Yield: 28-30 cookies
- Dietary Type: Gluten-Free (check chocolate chunk ingredients)
Ingredients
- 1/2 cup butter, softened
- 1 cup white sugar
- 1 cup brown sugar, packed
- 2 cups creamy peanut butter
- 3 large eggs
- 2 teaspoons maple extract (or use 2 teaspoons vanilla extract)
- 4 1/4 cups uncooked oats (regular oats, not quick-cooking)
- 2 teaspoons baking soda
- 1/4 teaspoon salt
- 1 (11 ounce) package semisweet chocolate chunks, divided
- 1 cup chopped pecans (can use walnuts)
- 1/4 cup oats (for sprinkling)
Equipment Needed
- Large mixing bowl
- Electric mixer (handheld or stand mixer)
- Measuring cups and spoons
- Baking sheet
- Parchment paper
- Wire cooling rack
- Small bowl (for combining oats, baking soda, and salt)
Instructions
-
Preheat your oven to 350 degrees Fahrenheit (175 degrees Celsius).
-
Line a baking sheet with parchment paper. This prevents sticking and makes cleanup a breeze.
-
In a large bowl, cream together the softened butter, white sugar, and brown sugar using an electric mixer until the mixture is light and fluffy. This usually takes 2-3 minutes. Make sure the butter is properly softened – not melted – for the best texture.
-
Add the peanut butter, eggs, and maple extract (or vanilla extract) to the creamed butter and sugar mixture. Beat until everything is well combined and smooth. The batter should be uniform in color and texture.
-
In a separate, smaller bowl, combine the 4 1/4 cups of oats with the baking soda and salt. Whisk these dry ingredients together to ensure the baking soda and salt are evenly distributed.
-
Gradually add the oat mixture to the wet ingredients (creamed mixture). Stir until just combined. Be careful not to overmix; the batter will be quite stiff, and that’s perfectly normal. Overmixing can lead to tougher cookies.
-
Stir in only 1 cup of the chocolate chunks and the chopped pecans (or walnuts). Reserve the remaining chocolate chunks for later.
-
Drop approximately 1/4-cup of dough onto the prepared baking sheet for each cookie. Leave some space between each cookie to allow for spreading during baking.
-
Lightly press each cookie with your fingertips into a 3 1/2-inch circle. They won’t spread much during baking, so shaping them beforehand is important.
-
Press 3-4 of the remaining chocolate chunks into the top of each cookie. This ensures those pockets of melty chocolate goodness in every bite.
-
Sprinkle the tops of the cookies with the reserved 1/4 cup of oats. This adds a lovely rustic touch and extra texture.
-
Bake for approximately 13-14 minutes. The centers will still be slightly soft. It’s better to slightly underbake them than overbake them, as they will continue to set as they cool. Watch them closely to prevent burning.
-
Remove the baking sheet from the oven and let the cookies cool on the baking sheet for about 3 minutes before transferring them to a wire rack to cool completely. This prevents them from breaking while they are still warm and soft.
-
Enjoy these delicious, chewy, flourless peanut butter and chocolate chunk oat cookies!
Expert Tips & Tricks
- Soft Butter is Key: Make sure your butter is softened to room temperature but not melted. This is crucial for achieving a fluffy cookie batter. If you forget to take the butter out ahead of time, you can microwave it in short bursts (5-10 seconds) until just softened, but be careful not to melt it.
- Don’t Overmix: Overmixing the batter, especially after adding the oats, can develop the gluten (even though there’s no flour!) and lead to tougher cookies. Mix just until the ingredients are combined.
- Chill the Dough (Optional): For even thicker cookies, chill the dough for 30 minutes before baking. This allows the oats to absorb more moisture and prevents the cookies from spreading too much.
- Even Baking: To ensure even baking, rotate the baking sheet halfway through the baking time.
- Salt Enhancement: A sprinkle of flaky sea salt on top of the baked cookies elevates the flavor and enhances the sweetness of the peanut butter and chocolate.
Serving & Storage Suggestions
These peanut butter and chocolate chunk oat cookies are best enjoyed slightly warm, when the chocolate is still melty and gooey. They are perfect with a cold glass of milk, a cup of coffee, or even a scoop of vanilla ice cream.
To store, place the cooled cookies in an airtight container at room temperature. They will stay fresh for up to 3-4 days. For longer storage, you can freeze the cookies for up to 2 months. Thaw them at room temperature before serving.
To reheat, you can warm them in a preheated oven at 300°F (150°C) for a few minutes or microwave them for a few seconds until heated through.
Nutritional Information
| Nutrient | Amount per Serving | % Daily Value |
|---|---|---|
| Calories | 384.6 kcal | N/A |
| Calories from Fat | 184 g | 48% |
| Total Fat | 20.5 g | 31% |
| Saturated Fat | 6.5 g | 32% |
| Cholesterol | 29 mg | 9% |
| Sodium | 234.8 mg | 9% |
| Total Carbohydrate | 43.1 g | 14% |
| Dietary Fiber | 4.9 g | 19% |
| Sugars | 22.6 g | 90% |
| Protein | 10.4 g | 20% |
Note: Nutritional information is an estimate and may vary based on specific ingredients and serving sizes.
Variations & Substitutions
- Nut-Free: If you have a nut allergy, omit the pecans or walnuts. You can replace them with dried cranberries, sunflower seeds, or extra chocolate chunks.
- Chocolate Options: Experiment with different types of chocolate! Use dark chocolate chunks, white chocolate chips, or even chopped peanut butter cups for a twist.
- Spice It Up: Add a pinch of cinnamon, nutmeg, or even a dash of cayenne pepper for a hint of spice.
- Vegan Option: Substitute the butter with a vegan butter alternative, and use a flax egg (1 tablespoon flaxseed meal mixed with 3 tablespoons water, let sit for 5 minutes) in place of each egg. Ensure your chocolate chunks are dairy-free.
- Different Extracts: Instead of maple or vanilla extract, try almond extract, coconut extract, or even a coffee extract for a unique flavor profile.
FAQs (Frequently Asked Questions)
Q: Why do these cookies not contain any flour?
A: These cookies use oats as the primary binding agent, creating a chewy and delicious texture without the need for flour. This makes them a great option for those avoiding gluten.
Q: Can I use quick-cooking oats instead of regular oats?
A: It’s best to use regular, old-fashioned oats, not quick-cooking oats. Quick-cooking oats are more processed and won’t give the cookies the same chewy texture and structure.
Q: My cookie dough is very stiff. Is this normal?
A: Yes, the dough is intentionally stiff due to the high oat content. This helps the cookies maintain their shape during baking.
Q: How can I tell if the cookies are done baking?
A: The edges of the cookies should be lightly golden brown, and the centers should still appear slightly soft. They will continue to set as they cool.
Q: Can I freeze the cookie dough for later use?
A: Absolutely! Scoop the dough into individual cookie portions and freeze them on a baking sheet. Once frozen, transfer them to a freezer bag. You can bake them directly from frozen; just add a few extra minutes to the baking time.
Final Thoughts
I hope you enjoy making and devouring these irresistible peanut butter and chocolate chunk oat cookies as much as I do. Don’t be afraid to experiment with different variations and make them your own. Whether you’re baking for a crowd or simply treating yourself, these cookies are sure to bring a smile to your face. Feel free to share your feedback and any creative twists you come up with. Happy baking!