
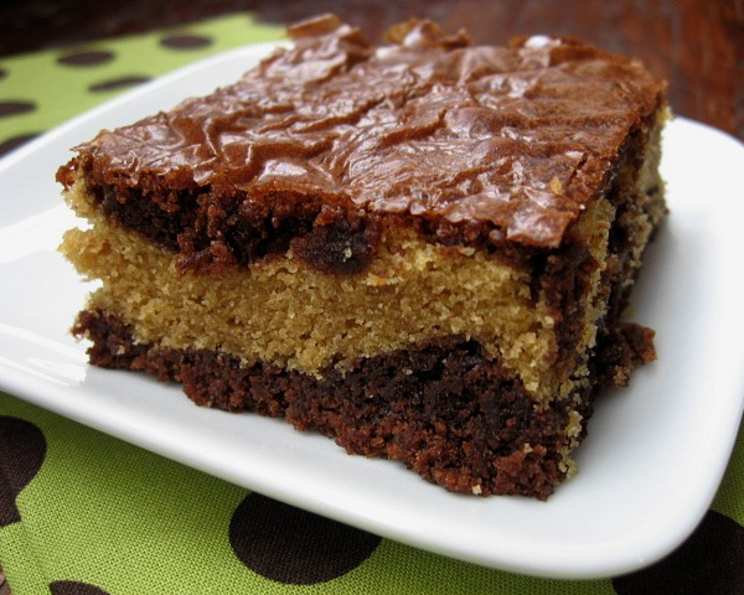
Peanut Butter Brownie Bliss: A Simple Slice of Heaven
The scent of warm brownies always transports me back to childhood. I remember sneaking into the kitchen as a kid, hoping to snag a corner piece still warm from the oven. My grandmother’s brownies were legendary, always fudgy and intensely chocolatey. While this recipe isn’t exactly hers, it evokes the same feelings of comfort and pure joy, but with an added twist – a luscious ribbon of peanut butter that elevates the humble brownie to a whole new level of deliciousness.
Recipe Overview
- Prep Time: 23 minutes
- Cook Time: 30-33 minutes
- Total Time: 53 minutes
- Servings: 20
- Yield: 1 (9×13 inch) pan
- Dietary Type: Not specified
Ingredients
For the Brownies:
- 1/2 cup oil
- 1/4 cup water
- 2 eggs
- 1 (19 1/2 ounce) box brownie mix
For the Peanut Butter Filling:
- 3/4 cup creamy peanut butter
- 1/3 cup margarine or 1/3 cup butter, softened
- 1/3 cup sugar
- 2 tablespoons all-purpose flour
- 2 eggs
Equipment Needed
- Large bowl
- Small bowl
- Spoon
- Mixer (hand or stand mixer)
- 9×13 inch baking pan
- Measuring cups and spoons
- Oven
Instructions
-
First, preheat your oven to 350°F (175°C). Make sure your oven rack is positioned in the center.
-
In a large bowl, combine the brownie mix, oil, water, and eggs. Stir vigorously with a spoon – aim for about 50 strokes – until the ingredients are well incorporated. Set this brownie batter aside. It will be thick, which is exactly what you want!
-
Now, let’s prepare the peanut butter filling. In a small bowl, combine the peanut butter and softened margarine (or butter). Use a mixer (either hand or stand mixer) to beat the mixture until it is smooth and creamy. This step is crucial for ensuring the filling is evenly distributed and has a wonderful texture.
-
Add the sugar and all-purpose flour to the peanut butter mixture. Mix well until everything is thoroughly combined.
-
Next, add the 2 eggs to the peanut butter mixture and blend until well combined. The peanut butter filling should now have a smooth, almost frosting-like consistency.
-
Grease a 9×13 inch baking pan thoroughly. This will prevent the brownies from sticking and make them easier to remove once baked. You can use cooking spray, butter, or oil to grease the pan.
-
Spread half of the brownie mix evenly into the prepared baking pan. Use a spatula or the back of a spoon to ensure it forms a smooth base.
-
Now comes the fun part! Carefully spread the peanut butter mixture evenly over the chocolate brownie mixture. Try to create an even layer without pressing too hard and mixing it with the brownie layer below.
-
Spread the remaining chocolate brownie mixture over the peanut butter mixture. This can be a little tricky since the peanut butter layer is soft. Drop spoonfuls of the brownie batter over the peanut butter and then gently spread it out to cover the entire surface. Don’t worry if it’s not perfectly smooth; the swirling effect adds to the brownie’s charm!
-
Bake for 30-33 minutes. To check for doneness, insert a toothpick into the center of the brownies. If it comes out with moist crumbs attached, they are done. Be careful not to overbake, as this will result in dry brownies.
-
Once baked, cool the brownies for at least 1 hour, or until completely cooled, before cutting and serving. This allows the flavors to meld and the brownies to firm up, making them easier to slice.
-
Store loosely covered at room temperature to maintain optimal texture.
Expert Tips & Tricks
- For extra fudgy brownies, slightly underbake them. Pull them out of the oven when the toothpick comes out with very moist crumbs. They will continue to set as they cool.
- If your peanut butter is too thick, microwave it for a few seconds to soften it slightly before mixing with the other ingredients.
- For a more intense peanut butter flavor, use a natural peanut butter with only peanuts and salt as ingredients.
- To get clean slices, chill the brownies in the refrigerator for 30 minutes before cutting.
- Add chocolate chips or chopped nuts to the brownie batter or peanut butter filling for added texture and flavor.
- For a marbled effect, swirl a knife or skewer through the batter after spreading the brownie and peanut butter layers.
Serving & Storage Suggestions
Serve these decadent brownies slightly chilled or at room temperature. They are delicious on their own or with a scoop of vanilla ice cream. A drizzle of chocolate sauce or a sprinkle of powdered sugar also makes for a beautiful presentation.
These brownies are best stored loosely covered at room temperature for up to 3 days. You can also store them in an airtight container in the refrigerator for up to a week. For longer storage, freeze the brownies for up to 2 months. Thaw them in the refrigerator overnight before serving. Reheating is not usually necessary, but you can warm them slightly in the microwave for a few seconds if desired.
Nutritional Information
| Nutrient | Amount per Serving | % Daily Value |
|---|---|---|
| Calories | 275.9 kcal | N/A |
| Calories from Fat | 154 g | 56% |
| Total Fat | 17.2 g | 26% |
| Saturated Fat | 3.1 g | 15% |
| Cholesterol | 37.2 mg | 12% |
| Sodium | 165.4 mg | 6% |
| Total Carbohydrate | 28.4 g | 9% |
| Dietary Fiber | 0.6 g | 2% |
| Sugars | 4.2 g | 17% |
| Protein | 5 g | 9% |
Note: Nutritional information is an estimate and may vary based on specific ingredients and portion sizes.
Variations & Substitutions
- Gluten-Free: Use a gluten-free brownie mix and gluten-free all-purpose flour in the peanut butter filling.
- Vegan: While this recipe is not easily adaptable to be fully vegan due to the eggs, you could experiment with using flax eggs or other egg replacers in both the brownie batter and the peanut butter filling. Be aware that the texture and flavor may be different.
- Different Nut Butters: Substitute the peanut butter with almond butter, cashew butter, or sunflower seed butter for a unique flavor profile.
- Chocolate Variations: Use a dark chocolate brownie mix for a richer flavor, or add chopped white chocolate to the peanut butter filling for a contrasting sweetness.
- Spiced Peanut Butter: Add a pinch of cinnamon, nutmeg, or chili powder to the peanut butter filling for a warm, spicy twist.
FAQs (Frequently Asked Questions)
Q: Can I use a different size pan?
A: Yes, you can use an 8×8 inch pan, but the baking time may need to be increased slightly. Keep a close eye on the brownies and check for doneness with a toothpick.
Q: My peanut butter filling is too thick. What can I do?
A: If the peanut butter filling is too thick, add a tablespoon or two of milk or cream until it reaches a spreadable consistency.
Q: Can I make these brownies ahead of time?
A: Yes, you can bake the brownies a day or two in advance and store them loosely covered at room temperature.
Q: My brownies are sticking to the pan. What did I do wrong?
A: Make sure you grease the baking pan thoroughly before adding the brownie batter. You can also line the pan with parchment paper for easy removal.
Q: Can I freeze these brownies?
A: Yes, you can freeze the brownies for up to 2 months. Wrap them tightly in plastic wrap and then place them in a freezer-safe bag or container. Thaw them in the refrigerator overnight before serving.
Final Thoughts
These Peanut Butter Brownies are a simple yet irresistible treat that’s perfect for any occasion. Whether you’re baking for a party, a potluck, or just a quiet night in, these brownies are sure to be a crowd-pleaser. Don’t be afraid to experiment with different variations and substitutions to create your own signature brownie masterpiece. So, grab your ingredients, preheat your oven, and get ready to experience the ultimate combination of chocolate and peanut butter bliss! I encourage you to try it and then share your delicious creation with friends and family! Enjoy!