
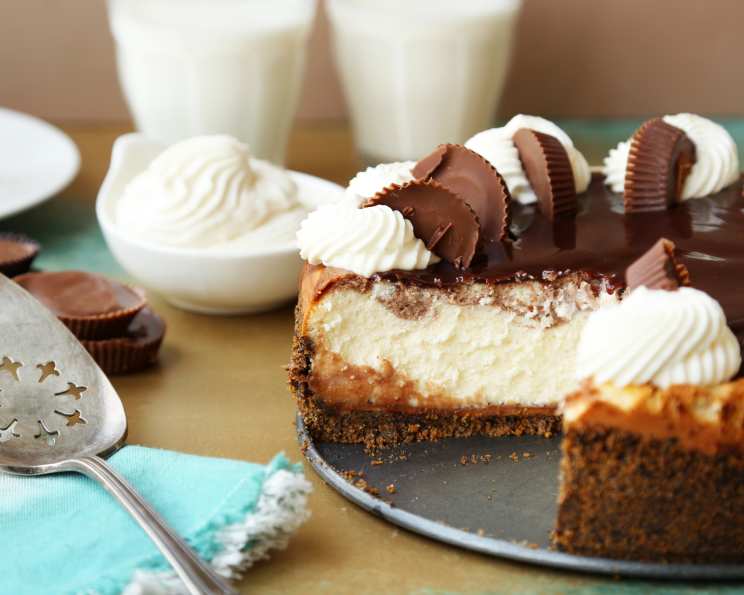
Peanut Butter Cup Cheesecake: A Decadent Dream Come True
I remember the first time I tasted a peanut butter cup cheesecake. It was at a potluck, and I almost didn’t take a slice – I’m usually a simple chocolate cake kind of girl. But the swirls of chocolate and peanut butter beckoned, promising a sweet escape. One bite, and I was hooked. The creamy, tangy cheesecake, the rich peanut butter, and the bursts of chocolate from the chopped peanut butter cups…it was a symphony of flavors that danced on my tongue. Since then, I’ve made it my mission to recreate that perfect balance of sweet and salty, creamy and crunchy, and this recipe is the closest I’ve come!
Recipe Overview
- Prep Time: 30 minutes
- Cook Time: 55-65 minutes
- Total Time: 1 hour 25 minutes (plus overnight refrigeration)
- Servings: 12
- Yield: 1 cheesecake
- Dietary Type: Not Gluten-Free
Ingredients
For the Crust:
- 1 1/4 cups graham cracker crumbs
- 1/4 cup crushed Oreo cookies
- 1/4 cup sugar
- 6 tablespoons (3/4 stick) butter, melted
- 3/4 cup creamy peanut butter
For the Filling:
- 3 (8 ounce) packages cream cheese, softened
- 1 cup sugar
- 1 cup sour cream
- 3 eggs, lightly beaten
- 1 1/2 teaspoons vanilla
- 1 cup chocolate fudge topping, divided
- 6 peanut butter cups, cut into small wedges
Equipment Needed
- 9-inch springform pan
- Mixing bowls (large and small)
- Electric mixer
- Microwave-safe bowls
- Wire rack
- Knife
Instructions
- Prepare the Crust: In a mixing bowl, combine the graham cracker crumbs, crushed Oreo cookies, sugar, and melted butter. Mix well until all ingredients are evenly moistened.
- Press the Crust: Press the crumb mixture firmly onto the bottom and 1 inch up the sides of a greased 9-inch springform pan. Use the bottom of a measuring cup to ensure an even and compact crust.
- Bake the Crust: Bake the crust in a preheated oven at 350°F (175°C) for 7-9 minutes, or until lightly golden brown.
- Cool the Crust: Remove the crust from the oven and let it cool completely on a wire rack. This step is crucial for preventing a soggy crust.
- Prepare the Peanut Butter Layer: In a microwave-safe bowl, heat the peanut butter on HIGH for 30 seconds, or until softened and easily spreadable.
- Spread the Peanut Butter: Carefully spread the softened peanut butter evenly over the cooled crust, leaving a 1-inch border around the edges. This border helps prevent the peanut butter from burning during baking.
- Prepare the Cheesecake Filling: In a large mixing bowl, beat the cream cheese, sugar, and sour cream with an electric mixer until smooth and creamy. Ensure there are no lumps for a perfectly smooth cheesecake.
- Add the Eggs and Vanilla: Add the eggs, one at a time, to the cream cheese mixture, beating on low speed just until combined. Over-mixing can incorporate too much air, leading to cracks in the cheesecake. Stir in the vanilla.
- Divide the Filling: Pour one cup of the cream cheese batter into a separate bowl and set aside. This will be used for the chocolate swirl.
- Pour the Remaining Filling: Pour the remaining cream cheese filling over the peanut butter layer in the crust. Be careful not to disturb the peanut butter layer.
- Prepare the Chocolate Swirl: In a microwave-safe bowl, heat 1/4 cup of the hot fudge topping on HIGH for 30 seconds, or until thin and pourable.
- Create the Swirl: Fold the melted hot fudge topping into the reserved one cup of cream cheese batter.
- Spoon and Swirl: Carefully spoon the chocolate cream cheese batter over the plain filling in dollops. Use a knife to cut through the filling, creating a marbled swirl pattern. Be gentle to avoid disturbing the peanut butter layer or the crust.
- Bake the Cheesecake: Bake the cheesecake in the preheated oven at 350°F (175°C) for 55-65 minutes, or until the center is almost set but still has a slight jiggle. The edges should be set.
- Cool Gradually: Turn off the oven and leave the cheesecake inside with the door slightly ajar for 1 hour. This gradual cooling helps prevent cracks. Remove the cheesecake from the oven and cool on a wire rack for 10 minutes.
- Loosen the Edges: Carefully run a knife around the edge of the pan to loosen the cheesecake from the sides. Do not remove the sides of the pan yet.
- Continue Cooling: Cool the cheesecake for 1 hour longer on the wire rack.
- Add the Final Touch: Microwave the remaining hot fudge topping for 30 seconds, or until warmed and easily spreadable.
- Glaze and Garnish: Spread the warmed hot fudge topping evenly over the cooled cheesecake. Garnish with the peanut butter cup wedges.
- Refrigerate: Refrigerate the cheesecake overnight (or for at least 6 hours) to allow it to set completely.
- Serve: Remove the sides of the springform pan and serve chilled.
Expert Tips & Tricks
- Prevent Cracks: To minimize cracks, consider using a water bath. Wrap the bottom of the springform pan in aluminum foil and place it in a larger baking pan. Add hot water to the larger pan until it reaches about halfway up the sides of the springform pan. This creates a humid environment that helps the cheesecake bake evenly.
- Softened Cream Cheese is Key: Make sure your cream cheese is fully softened. This ensures a smooth and lump-free batter. Leave it at room temperature for at least an hour, or microwave it in 15-second intervals until softened.
- Don’t Overbake: Overbaking is the enemy of a creamy cheesecake. The center should still have a slight jiggle when you take it out of the oven. It will continue to set as it cools.
- Peanut Butter Swirl: For a more pronounced peanut butter swirl, reserve some of the melted peanut butter and drizzle it over the cheesecake before baking, swirling it in with a knife.
- Cookie Crust Variation: For a richer, chocolate-flavored crust, use all crushed Oreo cookies instead of graham crackers. Remove the cream filling from the Oreos before crushing them.
Serving & Storage Suggestions
Serve the Peanut Butter Cup Cheesecake chilled for the best flavor and texture. It pairs perfectly with a scoop of vanilla ice cream or a dollop of whipped cream. A drizzle of extra hot fudge or caramel sauce also adds a touch of elegance.
Store leftover cheesecake in an airtight container in the refrigerator for up to 5 days. For longer storage, you can freeze the cheesecake for up to 2 months. Thaw it overnight in the refrigerator before serving.
Nutritional Information
| Nutrient | Amount per Serving | % Daily Value |
|---|---|---|
| Calories | 734.3 kcal | N/A |
| Calories from Fat | 440 g | 60% |
| Total Fat | 49 g | 75% |
| Saturated Fat | 22.7 g | 113% |
| Cholesterol | 135.8 mg | 45% |
| Sodium | 567 mg | 23% |
| Total Carbohydrate | 64.5 g | 21% |
| Dietary Fiber | 2.8 g | 11% |
| Sugars | 48.4 g | N/A |
| Protein | 13.7 g | 27% |
Note: Nutritional information is an estimate and may vary based on specific ingredients and preparation methods.
Variations & Substitutions
- Gluten-Free Crust: Use gluten-free graham crackers or a gluten-free cookie crumble to make the crust gluten-free.
- Different Nut Butter: Experiment with other nut butters, such as almond butter or cashew butter, for a different flavor profile.
- Dark Chocolate: Use dark chocolate fudge topping instead of regular hot fudge for a richer, more intense chocolate flavor.
- Homemade Fudge Sauce: Elevate the cheesecake by using a homemade fudge sauce instead of store-bought.
- Seasonal Variations: Add a layer of caramel and chopped apples in the fall for a caramel apple cheesecake, or use peppermint extract and crushed peppermint candies during the holidays.
FAQs (Frequently Asked Questions)
Q: Can I make this cheesecake ahead of time?
A: Absolutely! In fact, it’s best to make it the day before serving to allow it to fully set and the flavors to meld together.
Q: Can I freeze this cheesecake?
A: Yes, you can freeze it. Wrap it tightly in plastic wrap and then in aluminum foil. Thaw it overnight in the refrigerator before serving.
Q: My cheesecake cracked. What did I do wrong?
A: Cracking can be caused by several factors, including overbaking, baking at too high a temperature, or sudden temperature changes. Using a water bath and cooling the cheesecake gradually can help prevent cracks.
Q: Can I use a different size springform pan?
A: While a 9-inch springform pan is recommended, you can use an 8-inch pan, but the baking time may need to be adjusted, and the cheesecake will be thicker.
Q: Can I use low-fat cream cheese?
A: While you can use low-fat cream cheese, the texture of the cheesecake may be slightly different. Full-fat cream cheese provides the richest and creamiest texture.
Final Thoughts
This Peanut Butter Cup Cheesecake is a guaranteed crowd-pleaser, a decadent delight that combines the comforting flavors of peanut butter and chocolate with the creamy tang of cheesecake. Don’t be intimidated by the number of steps – each one is simple and straightforward, and the results are well worth the effort. So go ahead, gather your ingredients, and get ready to create a masterpiece that will have everyone asking for seconds. And if you decide to give it a try, please leave a comment and let me know how it turned out. Enjoy!