
Peanut Butter Cup Perfection: A Recipe Honed Over Decades
The memory is as vivid as the taste: my childhood kitchen, bathed in the warm glow of the afternoon sun. My grandmother, a woman of few words but unparalleled baking skills, would be meticulously measuring ingredients for her legendary peanut butter cups. I’d perch on a stool, captivated by the transformation of simple ingredients into that irresistible combination of sweet chocolate and salty peanut butter. One bite, and I was transported to a world of pure bliss. This recipe is my tribute to her, a slightly tweaked version of hers.
Recipe Overview
- Prep Time: 15 minutes
- Cook Time: 5 minutes
- Total Time: 20 minutes (plus cooling time)
- Servings: 36
- Yield: 36 squares
- Dietary Type: Vegetarian
Ingredients
- 2 cups creamy peanut butter (such as Jif or Skippy)
- ½ cup margarine or ½ cup unsalted butter, softened
- 2 ¾ cups powdered sugar
- 12 ounces chocolate chips
- 1 tablespoon margarine or 1 tablespoon butter, melted
Equipment Needed
- 13x9x2 inch baking pan
- Aluminum foil
- Pastry blender
- Double boiler (or heat-safe bowl and saucepan)
- Pizza cutter (optional)
Instructions
-
Begin by preparing your baking pan. Line a 13x9x2 inch pan with aluminum foil, ensuring there is enough overhang on the sides to easily lift the finished peanut butter cups out later. This is important for clean removal and easy cutting.
-
In a large bowl, combine the creamy peanut butter, ½ cup softened margarine (or butter), and powdered sugar. This is where the magic begins. Using a pastry blender, cut the ingredients together by hand. It’s crucial not to use a mixer for this step. A mixer will over-cream the mixture, resulting in a softer, less stable peanut butter base. If necessary, use your hands to knead the mixture until it is evenly combined. The dough should be firm and slightly crumbly.
-
With slightly buttered hands, press the peanut butter mixture evenly into the prepared pan. The butter prevents the peanut butter mixture from sticking to your hands. Ensure the layer is uniform for even chocolate distribution later.
-
Now, prepare the chocolate topping. Fill a saucepan with about an inch of water and bring to a simmer. Place a heat-safe bowl on top of the saucepan, ensuring the bottom of the bowl doesn’t touch the water (this creates a double boiler). Add the melted tablespoon of margarine (or butter) and the chocolate chips to the bowl.
-
Stir the chocolate mixture constantly until the chocolate chips are completely melted and the mixture is smooth and glossy. It’s vital to avoid getting any water into the chocolate, as this will cause it to “seize” and become grainy. If this happens, try adding a small amount of vegetable oil, about a teaspoon at a time, and stirring vigorously until smooth again.
-
Immediately pour the melted chocolate evenly over the peanut butter layer. Spread it smoothly to cover the entire surface. Work quickly, as the chocolate will start to set as it cools.
-
Allow the peanut butter cups to cool and harden slightly at room temperature. This typically takes about 30 minutes to an hour.
-
Once the chocolate has set but is still slightly pliable, cut the peanut butter cups into squares. For neat and easy cutting, my dear husband suggested using a pizza cutter, and it works wonders! You can cut them into any size you prefer.
-
After the squares are cut and the chocolate has fully set, store them covered in an airtight container at room temperature or in the refrigerator.
Expert Tips & Tricks
- Creamy Peanut Butter is Key: Stick with brands like Jif or Skippy. Natural peanut butters tend to separate and don’t have the same consistency, resulting in a less stable final product.
- Don’t Overmix: The peanut butter mixture should be slightly crumbly. Overmixing will result in a softer base that doesn’t hold its shape as well.
- The Double Boiler is Your Friend: Melting the chocolate over a double boiler prevents it from burning and ensures a smooth, glossy finish. Be patient and stir frequently.
- Warm Knife for Clean Cuts: If the chocolate is too hard to cut cleanly, try running a large knife under hot water, drying it thoroughly, and then using it to cut the squares. Repeat as needed.
- Freezing for Firmness: For extra firm peanut butter cups, freeze them for about 30 minutes before cutting. This will make them easier to handle and create cleaner edges.
Serving & Storage Suggestions
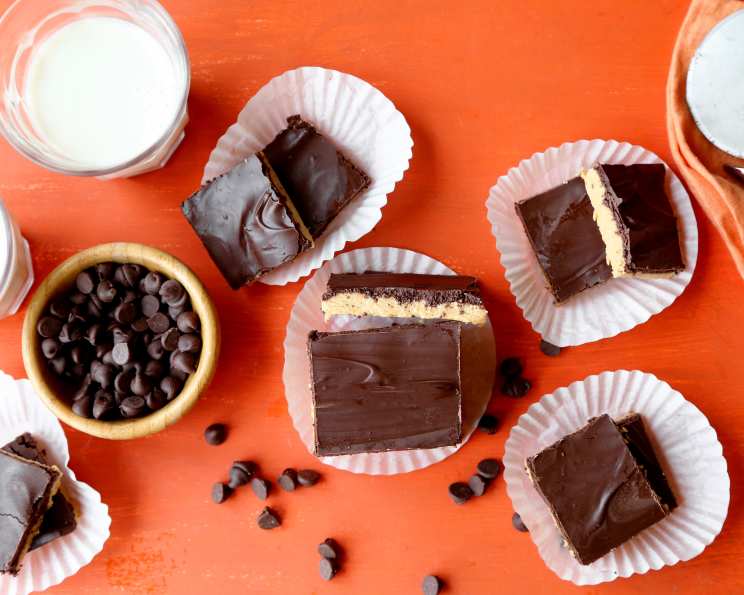
These peanut butter cups are delicious served chilled or at room temperature. They make a wonderful addition to a dessert platter, a perfect treat for parties, or a sweet indulgence any time of day.
- Storage: Store the peanut butter cups in an airtight container at room temperature for up to 3 days or in the refrigerator for up to a week.
- Freezing: For longer storage, freeze them in a single layer on a baking sheet until solid, then transfer to a freezer-safe bag or container. They can be frozen for up to 2 months. Thaw in the refrigerator before serving.
- Serving Suggestions: Garnish with a sprinkle of sea salt for an extra flavor dimension. Pair with a glass of cold milk or a cup of hot coffee for a truly decadent experience.
Nutritional Information
| Nutrient | Amount per Serving | % Daily Value |
|---|---|---|
| Calories | 190.7 kcal | N/A |
| Calories from Fat | 116 kcal | N/A |
| Total Fat | 12.9 g | 19% |
| Saturated Fat | 3.8 g | 18% |
| Cholesterol | 0 mg | 0% |
| Sodium | 100.2 mg | 4% |
| Total Carbohydrate | 18 g | 6% |
| Dietary Fiber | 1.4 g | 5% |
| Sugars | 15.4 g | N/A |
| Protein | 4 g | 8% |
Variations & Substitutions
- Dark Chocolate Delight: Use dark chocolate chips for a richer, more intense flavor.
- White Chocolate Wonder: Substitute white chocolate chips for a sweet and creamy twist.
- Peanut Butter Swirl: Swirl a small amount of melted peanut butter into the chocolate layer for a marbled effect.
- Salted Caramel Surprise: Add a layer of salted caramel between the peanut butter and chocolate layers for an extra indulgent treat.
- Nutty Addition: Stir chopped nuts (such as peanuts, almonds, or pecans) into the peanut butter mixture for added texture and flavor.
FAQs (Frequently Asked Questions)
Q: Can I use natural peanut butter for this recipe?
A: While you can try, creamy peanut butter like Jif or Skippy is recommended. Natural peanut butters tend to be oily and can result in a less stable peanut butter layer.
Q: Why is it important not to use a mixer for the peanut butter mixture?
A: Using a mixer will over-cream the mixture, resulting in a softer, less stable base that won’t hold its shape as well.
Q: What happens if water gets into the melted chocolate?
A: Water will cause the chocolate to “seize” and become grainy. Avoid any contact with water while melting the chocolate.
Q: Can I freeze these peanut butter cups?
A: Yes, these peanut butter cups freeze well. Freeze them in a single layer until solid, then transfer to a freezer-safe bag or container.
Q: How long do these peanut butter cups last?
A: They can be stored at room temperature for up to 3 days or in the refrigerator for up to a week.
Final Thoughts
I truly believe this recipe, honed over decades, captures the essence of perfect peanut butter cups. The combination of the slightly crumbly, intensely peanut-buttery base and the smooth, glossy chocolate topping is simply irresistible. Don’t be afraid to experiment with the variations and substitutions to create your own signature version. Gather your ingredients, follow the simple steps, and prepare to be transported to a world of pure, unadulterated delight. I encourage you to try this recipe and share your feedback. Happy baking!