
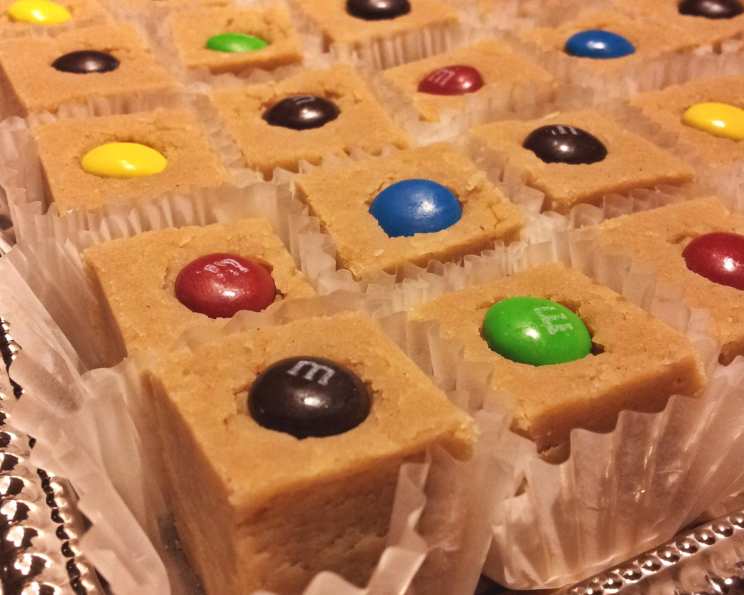
Peanut Butter M&M Fudge: A Sweet Slice of Nostalgia
I can still remember the first time I tasted this fudge. It was at my Aunt Carol’s house during a chaotic family Christmas gathering. Amidst the mountains of cookies and cakes, a simple square of fudge studded with colorful M&Ms stood out. The rich peanut butter flavor, the creamy texture that melted in my mouth, and the satisfying crunch of the candies – it was pure magic. Aunt Carol always had the most requested desserts, and I soon learned why everyone raved about her peanut butter fudge. Now, decades later, I’ve tweaked her recipe slightly, but the heart of it remains the same: a simple, unforgettable treat that brings a smile to everyone’s face.
Recipe Overview
- Prep Time: 10 minutes
- Cook Time: 10 minutes
- Total Time: 4 hours 20 minutes
- Servings: 49
- Yield: 1 8″ square pan
- Dietary Type: Vegetarian (may contain gluten depending on M&M type)
Ingredients
- 1 1/2 cups granulated sugar
- 3/4 cup butter
- 2/3 cup evaporated milk
- 1/4 teaspoon salt
- 1 1/2 cups peanut butter (creamy or chunky – your preference!)
- 1 teaspoon pure vanilla extract
- 2 cups miniature marshmallows
- 1 2/3 ounces M&M’s plain chocolate candy (This is the individual snack size. Use 2 bags if using peanut M&Ms)
Equipment Needed
- 8″ square baking pan
- Parchment paper
- Heavy 2-quart saucepan
- Measuring cups and spoons
- Heat-resistant spatula or spoon
- Knife
Instructions
-
Begin by carefully lining an 8″ square baking pan with parchment paper. Fold the corners neatly to ensure a snug fit. Use tape on the sides if necessary to secure the parchment and keep it in place while you work. Remember, this pan won’t be going into the oven, so the tape is just to help you.
-
In a heavy 2-quart saucepan, combine the granulated sugar, butter, and evaporated milk.
-
Place the saucepan over high heat. Stir the mixture constantly until it reaches a full rolling boil. A full rolling boil means that the mixture continues to boil even while you are stirring.
-
Once boiling, immediately reduce the heat to medium-low, and continue boiling and stirring for exactly 5 minutes. It is crucial to stir continuously, making sure to scrape down the sides of the pan to prevent scorching and ensure even cooking. This step is key to the fudge’s texture.
-
Remove the saucepan from the heat and let it cool for 2 minutes. This brief cooling period prevents the peanut butter from seizing up when you add it.
-
Add the peanut butter to the slightly cooled mixture. Stir until the peanut butter is completely melted and fully incorporated. Ensure there are no streaks of peanut butter remaining.
-
Next, add the vanilla extract and miniature marshmallows. Stir until the marshmallows are completely melted and incorporated into the mixture. Continue stirring until the mixture is smooth and there are no visible streaks of peanut butter or marshmallow.
-
Pour the mixture into the parchment-lined baking pan. Tilt or shake the pan gently to ensure the mixture is evenly distributed and has a uniform thickness.
-
While the fudge mixture is still warm, press the M&M’s into the top. I prefer to create an even grid pattern, typically 7 across and 7 down for a neat presentation. Remember that it’s much easier to cut around the M&M’s than through them. Press the candies deeply enough into the fudge to prevent them from popping out later.
-
If the M&M’s start to crack when you press them into the fudge, it indicates the mixture is still too hot. In this case, wait a few minutes to allow it to cool slightly, then try again.
-
Refrigerate the fudge for at least 4 hours to allow it to set completely.
-
Once the fudge is firm, carefully lift it out of the pan by grabbing opposite sides of the parchment paper.
-
Cut the fudge into even rows, using the M&M’s as a guide. For clean cuts, dip your knife into hot water and wipe it clean between each cut. This prevents buildup on the knife, which can result in messy edges.
-
Assemble a second set of ingredients, and get ready to make another batch because these will be gone before you know it!
Expert Tips & Tricks
- Quality Ingredients Matter: Use a good quality butter and peanut butter for the best flavor and texture. Store-brand butter can sometimes have higher water content, affecting the fudge’s consistency.
- Patience is Key: Don’t rush the boiling process. The 5 minutes of boiling at medium-low is essential for the fudge to set properly.
- Marshmallow Melting: If you find the marshmallows are taking too long to melt, try microwaving them for a few seconds before adding them to the peanut butter mixture. Be careful not to overheat them!
- M&M Placement: Get creative with your M&M placement! You can arrange them in patterns, spell out words, or even create a simple design.
- Preventing a Grainy Texture: Overcooking the sugar mixture can lead to a grainy fudge. Ensure you are continuously stirring during the boiling process to prevent sugar crystals from forming.
Serving & Storage Suggestions
Serve the Peanut Butter M&M Fudge chilled or at room temperature. For an elegant presentation, arrange the fudge squares on a platter and garnish with a few extra M&M’s.
To store, keep the fudge in an airtight container. It will last for up to a week at room temperature, two weeks in the refrigerator, or up to three months in the freezer. If freezing, wrap the fudge tightly in plastic wrap and then place it in a freezer-safe bag.
To thaw frozen fudge, place it in the refrigerator overnight or at room temperature for a few hours.
Nutritional Information
| Nutrient | Amount per Serving | % Daily Value |
|---|---|---|
| Calories | 111.2 kcal | N/A |
| Calories from Fat | N/A | 59% |
| Total Fat | 7.3 g | 11% |
| Saturated Fat | 2.9 g | 14% |
| Cholesterol | 8.6 mg | 2% |
| Sodium | 78.9 mg | 3% |
| Total Carbohydrate | 10.4 g | 3% |
| Dietary Fiber | 0.5 g | 2% |
| Sugars | 8.7 g | 34% |
| Protein | 2.3 g | 4% |
Variations & Substitutions
- Peanut-Free Option: Substitute the peanut butter with sunflower seed butter or almond butter for a nut-free alternative.
- Chocolate Lover’s Fudge: Add 1/2 cup of semi-sweet chocolate chips along with the peanut butter for an even richer chocolate flavor.
- Salted Caramel Fudge: Drizzle salted caramel sauce over the top of the fudge after pressing in the M&M’s for a sweet and salty twist.
- Different M&M Flavors: Experiment with different flavors of M&M’s, such as peanut butter, pretzel, or dark chocolate, to customize your fudge.
- Vegan Fudge: Finding a substitute for the evaporated milk and butter can make this fudge vegan! You could explore coconut cream and a vegan butter alternative. Ensure your M&Ms are also vegan friendly.
FAQs (Frequently Asked Questions)
Q: Why is my fudge grainy?
A: Grainy fudge is often caused by sugar crystals forming during the boiling process. Ensure you are stirring constantly and scraping down the sides of the pan.
Q: Can I use natural peanut butter?
A: Yes, but be aware that natural peanut butter can sometimes separate. Stir it very well before using it in the recipe.
Q: How do I prevent the M&M’s from cracking?
A: If the M&M’s are cracking when you press them into the fudge, the mixture is too hot. Allow it to cool for a few more minutes before adding the candies.
Q: Can I double the recipe?
A: Yes, you can double the recipe, but you will need to use a larger baking pan. A 9×13 inch pan should work well.
Q: How long does the fudge need to refrigerate?
A: The fudge needs to refrigerate for at least 4 hours, or preferably overnight, to set completely.
Final Thoughts
This Peanut Butter M&M Fudge is more than just a recipe; it’s a slice of nostalgia, a taste of childhood, and a guaranteed crowd-pleaser. I encourage you to try this recipe and experience the joy of creating something truly special. Don’t be afraid to experiment with variations and make it your own. And most importantly, share your delicious creation with friends and family – because good food is always best enjoyed together. Happy baking!