
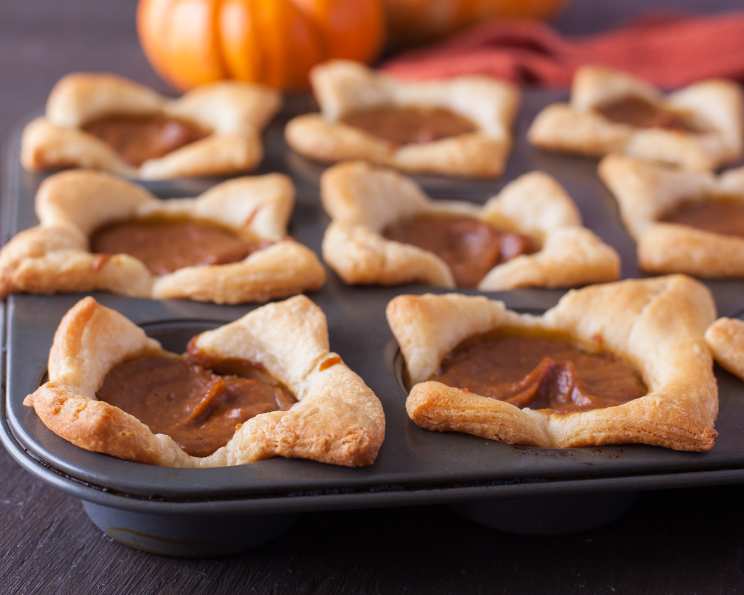
Peanut Butter Pumpkin Pies: A Twist on Tradition
The aroma of pumpkin spice always takes me back to autumn evenings spent at my grandmother’s farm. While her classic pumpkin pie was legendary, it was also undeniably rich. As much as I adored it, a smaller, lighter version always seemed appealing. One year, experimenting in my own kitchen, I stumbled upon a delightful twist: adding peanut butter to the pumpkin filling. The result? A warm, nutty depth that perfectly complements the spice and creates a surprisingly addictive dessert. These individual pies are a delightful nod to tradition, with a peanut buttery secret.
Recipe Overview
- Prep Time: 20 minutes
- Cook Time: 15 minutes
- Total Time: 35 minutes
- Servings: 16
- Yield: 16 mini pies
- Dietary Type: Vegetarian
Ingredients
- 2 eggs, beaten
- 1 (16 ounce) can pumpkin (not pie filling!)
- ½ cup honey
- ⅔ cup smooth peanut butter
- 1 teaspoon cinnamon
- ½ teaspoon nutmeg
- 2 (8 ounce) packages crescent rolls, regular size
- Whipped cream (optional)
Equipment Needed
- Medium mixing bowl
- Spoon or whisk
- Muffin tin (16 cups)
- Oven
Instructions
-
Preheat your oven to 375°F (190°C). Ensure your oven rack is in the center position for even baking.
-
In a medium bowl, combine the beaten eggs, canned pumpkin (making sure it’s pure pumpkin, not pumpkin pie filling), honey, smooth peanut butter, cinnamon, and nutmeg.
-
Stir the mixture thoroughly until all ingredients are well combined and you have a smooth, consistent batter. The peanut butter might take a little extra effort to incorporate, so be patient and keep stirring.
-
Unroll the crescent roll dough from both packages. Separate each package into 4 rectangles along the perforations.
-
Pinch together the perforations on each rectangle to seal them. You want to create a solid sheet of dough. Gently press along the seams to ensure they are well sealed.
-
Cut each sealed rectangle in half, creating two equal squares. Since you started with 8 rectangles total from both packages, you will end up with 16 squares of dough.
-
Lightly press each square of dough into an ungreased muffin tin cup. Gently shape the dough to conform to the cup, allowing the corners of the square to slightly stick out over the top edge of the muffin tin.
-
If any tears or holes occur in the dough while you are pressing it into the muffin tin, carefully pinch the dough back together to repair them. This will prevent the filling from leaking out during baking.
-
Spoon the pumpkin mixture evenly into each pastry cup. Distribute the filling so that each cup is filled to roughly the same level, leaving a little space at the top to allow for expansion during baking.
-
Bake in the preheated oven for 15 minutes, or until the crescent roll dough is nicely browned and the filling is set. Keep an eye on the pies; oven temperatures can vary, so they may need slightly more or less time. A toothpick inserted into the filling should come out relatively clean when they are done.
-
Once baked, remove the muffin tin from the oven and let the pies cool in the tin for 10 minutes. This allows the dough to set slightly, making them easier to remove.
-
After the 10-minute cooling period, gently remove each pie from the muffin tin by lifting it out by two opposing corners. Be careful, as they will still be warm.
-
You can serve the pies immediately while they are still warm, or you can refrigerate them until they are completely cool before serving.
-
If desired, top each pie with fresh whipped cream and a light sprinkling of cinnamon just before serving. This adds a delightful finishing touch to the presentation and flavor.
Expert Tips & Tricks
- For a smoother filling, use a hand mixer or immersion blender to combine the ingredients. This will ensure the peanut butter is fully incorporated and there are no lumps.
- If you find the crescent roll dough difficult to work with, chill it in the refrigerator for about 15 minutes before unrolling. This will make it firmer and easier to handle.
- To prevent the crust from browning too quickly, tent the muffin tin with foil during the last few minutes of baking.
- If you don’t have a muffin tin, you can bake these as one large pie in a standard pie dish. Adjust the baking time accordingly, checking for doneness after about 30 minutes.
Serving & Storage Suggestions
These Peanut Butter Pumpkin Pies are best served slightly warm or at room temperature. A dollop of whipped cream and a sprinkle of cinnamon add a touch of elegance. Leftovers can be stored in an airtight container in the refrigerator for up to 3 days. For longer storage, you can freeze the pies. Wrap each pie individually in plastic wrap, then place them in a freezer-safe container. They can be frozen for up to 2 months. To reheat, thaw the pies in the refrigerator overnight and then warm them in a low oven (around 300°F/150°C) for a few minutes.
Nutritional Information
| Nutrient | Amount per Serving | % Daily Value |
|---|---|---|
| Calories | 199.7 kcal | N/A |
| Calories from Fat | N/A | 36% |
| Total Fat | 7.9 g | 12% |
| Saturated Fat | 1.8 g | 9% |
| Cholesterol | 37.5 mg | 12% |
| Sodium | 189.3 mg | 7% |
| Total Carbohydrate | 27.7 g | 9% |
| Dietary Fiber | 2 g | 7% |
| Sugars | 11.3 g | 45% |
| Protein | 6.5 g | 13% |
Note: Nutritional information is an estimate and may vary based on specific ingredients and portion sizes.
Variations & Substitutions
- Gluten-Free: Use gluten-free crescent roll dough or make your own gluten-free pie crust.
- Dairy-Free: Use dairy-free whipped cream or a coconut cream topping.
- Nut-Free: Substitute the peanut butter with sunflower seed butter (sunbutter) for a nut-free alternative.
- Spice it Up: Add a pinch of ground cloves or ginger to the pumpkin mixture for a more intense spice flavor.
- Chocolate Peanut Butter: Swirl a bit of melted chocolate into the peanut butter before adding it to the pumpkin mixture.
FAQs (Frequently Asked Questions)
Q: Can I use pumpkin pie filling instead of pure pumpkin?
A: It’s best to use pure pumpkin puree, as pumpkin pie filling already contains added sugar and spices, which could make the pies overly sweet and alter the intended flavor balance.
Q: Can I make these ahead of time?
A: Absolutely! These pies are perfect for making ahead. Simply bake them, let them cool completely, and then store them in an airtight container in the refrigerator for up to 3 days.
Q: My crust is browning too quickly. What can I do?
A: If the crust is browning too fast, tent the muffin tin with aluminum foil during the last few minutes of baking. This will help to protect the crust from burning while allowing the filling to finish cooking.
Q: Can I freeze these pies?
A: Yes, you can freeze these pies for up to 2 months. Wrap each pie individually in plastic wrap, then place them in a freezer-safe container. Thaw them in the refrigerator overnight before serving.
Q: My filling is too runny. What did I do wrong?
A: Ensure you are using pure pumpkin puree and not pumpkin pie filling. Also, make sure you measure the ingredients accurately. If the filling still seems too runny, you can add a tablespoon of cornstarch to help thicken it.
Final Thoughts
I hope this Peanut Butter Pumpkin Pie recipe brings as much joy to your kitchen as it has to mine. It’s a delightful twist on a classic, perfect for sharing with friends and family during the autumn season or any time you crave a little comfort. Don’t hesitate to experiment with variations to make it your own! Feel free to share your feedback and experiences, and consider pairing these mini pies with a warm cup of spiced cider or a scoop of vanilla ice cream for an extra special treat. Happy baking!