
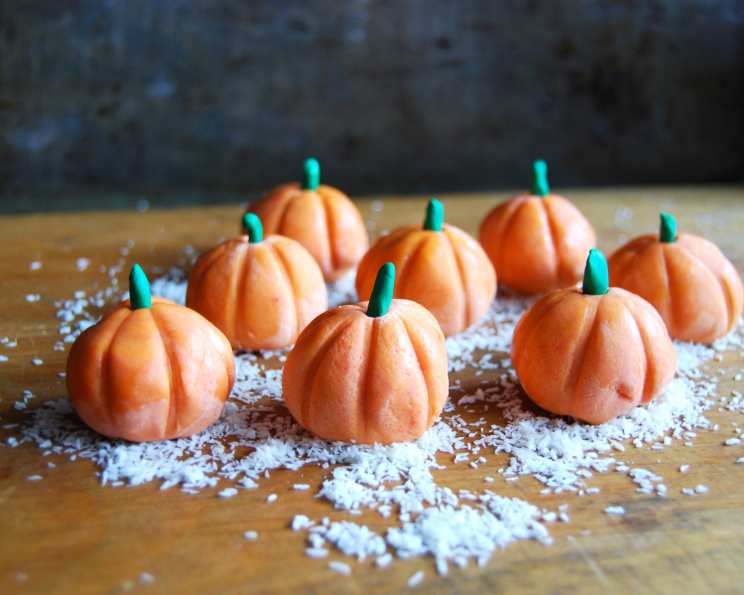
Peanut Butter Pumpkins: A Sweetly Spooky Treat
Every year, as the leaves turned fiery shades of red and gold, my grandmother would transform her kitchen into a confectionery wonderland. There were the usual frosted sugar cookies, of course, but her pièce de résistance was always the peanut butter pumpkins. I remember the first time I saw them – tiny, vibrant orange globes, each bearing its own perfectly imperfect stem. They tasted like pure autumn magic, and the memory of those sweet, peanutty bites still fills me with the warmth of childhood Halloweens. Now, I carry on that tradition, much to the delight of my own little goblins.
Recipe Overview
- Prep Time: 20 minutes
- Cook Time: 0 minutes (No baking required)
- Total Time: 20 minutes (plus refrigeration time)
- Servings: Varies (depending on pumpkin size)
- Yield: Approximately 15 pumpkins
- Dietary Type: Vegetarian (easily adaptable to vegan)
Ingredients
- ½ cup butter, softened (or vegan butter alternative)
- 1 ½ cups peanut butter (creamy or crunchy, your preference!)
- 1 (16 ounce) package confectioners’ sugar, sifted
- Red food coloring (gel or liquid)
- Yellow food coloring (gel or liquid)
- Green decorators icing (tube or bag)
- Optional: Toasted coconut for serving
- Optional: Halloween decorated cookies for serving
Equipment Needed
- Large Mixing Bowl
- Electric Mixer (optional, but helpful)
- Rubber Spatula
- Toothpicks
- Measuring Cups and Spoons
- Wax Paper or Parchment Paper
- Plate or Tray for Serving
Instructions
-
In a large bowl, cream together the softened butter and peanut butter until smooth and well combined. If using an electric mixer, start on low speed to prevent peanut butter from splattering.
-
Add a few drops of yellow food coloring and red food coloring to the butter-peanut butter mixture. Mix thoroughly until you achieve a vibrant, even orange color. Adjust the amount of food coloring as needed to reach your desired shade of pumpkin orange. Remember, a little goes a long way!
-
Gradually add the sifted confectioners’ sugar to the mixture, one cup at a time, mixing well after each addition. It’s crucial to sift the sugar to avoid lumps in your final dough.
-
Continue mixing until the dough comes together and reaches a doughlike consistency. This means the dough should be stiff enough to hold its shape. You might not need to use the entire 16-ounce package of confectioners’ sugar; the precise amount depends on the peanut butter’s moisture content. Add sugar until the dough is very stiff but still pliable. The mixture should be easy to handle without being sticky.
-
Shape the dough into small balls, approximately 1-2 inches in diameter, depending on your desired pumpkin size. Gently flatten the balls slightly to resemble small pumpkins.
-
Using a toothpick, create ridges on each pumpkin to mimic the pumpkin’s natural segments. Start at the top of the pumpkin and drag the toothpick down to the bottom, repeating around the entire pumpkin. Be gentle to avoid tearing the dough.
-
Using the green decorators icing, add a small amount to the top of each pumpkin to represent the stem. A simple dot or a tiny swirl will do.
-
Place the peanut butter pumpkins on a sheet of wax paper or parchment paper.
-
Refrigerate the pumpkins for at least 30 minutes, or longer, to allow them to firm up. This will make them easier to handle and prevent them from becoming too soft.
-
Before serving, you can optionally line a plate with toasted coconut to resemble autumn leaves or hay. Arrange the peanut butter pumpkins on the coconut bed.
-
If desired, decorate the serving plate with Halloween-themed cookies for an extra festive touch. These pumpkins also look fantastic on top of cupcakes!
Expert Tips & Tricks
-
For a richer flavor, use natural peanut butter. Be mindful, however, that natural peanut butter tends to be oilier, so you might need slightly more confectioners’ sugar to achieve the correct dough consistency.
-
If the dough becomes too dry and crumbly, add a teaspoon of milk or water at a time until it comes together. Conversely, if the dough is too sticky, add more sifted confectioners’ sugar.
-
To prevent the peanut butter pumpkins from sticking to your hands, lightly dust your hands with confectioners’ sugar before shaping them.
-
Get creative with your decorations! Instead of green icing, use melted chocolate or candy melts for the stems. You can also add edible glitter for extra sparkle.
-
If you’re short on time, skip the individual pumpkin shaping and simply press the dough into a square pan, then cut into squares after chilling.
Serving & Storage Suggestions
Serve these adorable peanut butter pumpkins chilled for the best texture. They make a delightful addition to any Halloween party, dessert platter, or lunchbox treat.
Store leftover peanut butter pumpkins in an airtight container in the refrigerator for up to a week. While they can be stored at room temperature, they will soften more quickly. Freezing is not recommended, as it can alter the texture of the peanut butter dough.
Nutritional Information
(Estimates are based on one pumpkin and may vary based on ingredient brands and portion sizes.)
| Nutrient | Amount per Serving | % Daily Value |
|---|---|---|
| Calories | 215 kcal | 11% |
| Total Fat | 12g | 18% |
| Saturated Fat | 5g | 25% |
| Cholesterol | 10mg | 3% |
| Sodium | 85mg | 4% |
| Total Carbohydrate | 24g | 8% |
| Dietary Fiber | 1g | 4% |
| Sugars | 22g | – |
| Protein | 4g | 8% |
Variations & Substitutions
-
Vegan Peanut Butter Pumpkins: Substitute the butter with a vegan butter alternative and ensure your confectioners’ sugar is vegan-friendly (some brands use bone char in processing).
-
Chocolate Peanut Butter Pumpkins: Add 2-3 tablespoons of cocoa powder to the dough for a rich chocolate flavor.
-
Maple Peanut Butter Pumpkins: Replace some of the confectioners’ sugar with maple sugar for a more complex sweetness. Start with ¼ cup and adjust to taste.
-
Spice It Up: Add ½ teaspoon of pumpkin pie spice or cinnamon to the dough for a warm, autumnal flavor.
-
Nut-Free Option: If you have peanut allergies, try using sunflower seed butter (sunflower butter) or tahini as a substitute, but be aware that the flavor will be different.
FAQs (Frequently Asked Questions)
Q: Can I use crunchy peanut butter?
A: Absolutely! Crunchy peanut butter will add a pleasant texture to the pumpkins. Just be aware that it may make the dough slightly more crumbly, so you might need a touch more butter or liquid to bind it together.
Q: Do I have to refrigerate the pumpkins?
A: While not strictly necessary, refrigerating the pumpkins helps them firm up and maintain their shape. This is especially helpful if you’re serving them at a warm party or event.
Q: My dough is too sticky. What should I do?
A: Gradually add more sifted confectioners’ sugar, a tablespoon at a time, until the dough reaches the desired consistency.
Q: Can I make these ahead of time?
A: Yes! The peanut butter pumpkins can be made up to 3 days in advance and stored in the refrigerator in an airtight container.
Q: Can I use different food coloring?
A: Of course! Get creative and experiment with different colors. You could make green pumpkins for a spooky twist or even add a touch of brown for a more rustic look.
Final Thoughts
These Peanut Butter Pumpkins are more than just a sweet treat; they’re a chance to create lasting memories with loved ones. Gather your family, put on some Halloween tunes, and enjoy the process of shaping these adorable little pumpkins together. Don’t be afraid to get creative with your decorations and personalize them to your liking. I encourage you to try this recipe and share your creations – and any fun variations you come up with – with friends and family. Happy haunting, and happy baking!