
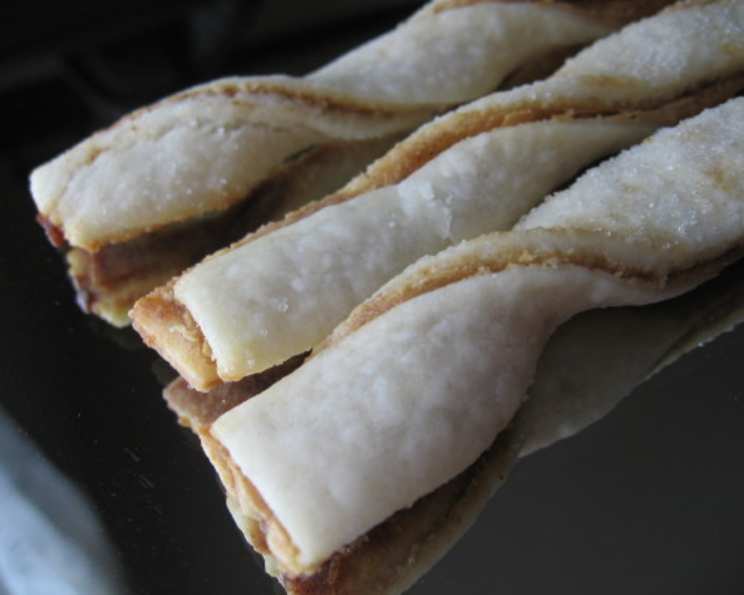
Peanut Butter Twists: A Sweet and Savory Indulgence
The aroma of warm peanut butter and subtly spiced apple butter mingling in the oven is a scent that instantly transports me back to my grandmother’s kitchen. She wasn’t much for elaborate desserts, but she had a knack for turning simple ingredients into comforting treats. These Peanut Butter Twists echo that spirit – a bit rustic, undeniably delicious, and perfect with a cup of tea on a chilly afternoon. I remember how she used to let us kids help twist the dough, our little fingers coated in sticky peanut butter. It was more about the experience than perfection, and the results were always delightful.
Recipe Overview
- Prep Time: 20 minutes
- Cook Time: 7-10 minutes
- Total Time: 30 minutes
- Yields: 30 twists
- Dietary Type: Vegetarian
Ingredients
- 1 cup all-purpose flour
- 2 tablespoons sugar
- ½ teaspoon salt
- ⅓ cup vegetable shortening
- 3 ounces cream cheese
- 2 teaspoons milk
- ¼ cup peanut butter
- 3 tablespoons apple butter
- Additional milk, for brushing
- Granulated sugar, for sprinkling
Equipment Needed
- Small mixing bowl
- Electric mixer
- Rolling pin
- Measuring cups and spoons
- Cookie sheets
- Parchment paper (optional)
Instructions
- Begin by preparing the dough. In a small mixing bowl, sift together the all-purpose flour, sugar, and salt. Sifting ensures a light and airy texture for the twists.
- Add the vegetable shortening, cream cheese, and milk to the bowl.
- Using an electric mixer, mix on the lowest speed until the dough begins to form a well-combined mass. It should come together easily and not be overly sticky.
- Shape the dough into a ball.
- Lightly flour a clean, flat surface. This prevents the dough from sticking as you roll it out.
- Using a rolling pin, roll out the dough into a 20 x 8 inch rectangle. Aim for an even thickness throughout.
- Using a knife or pastry cutter, cut the rectangle in half lengthwise to create two 10 x 8-inch rectangles.
- Spread one of the rectangles with peanut butter, ensuring an even layer that covers the entire surface. If you prefer a bit of texture, try using crunchy peanut butter.
- Top the peanut butter layer with the apple butter, spreading it evenly as well. The combination of peanut butter and apple butter creates a fantastic sweet and savory flavor profile.
- Carefully place the second rectangle of dough on top of the first, creating a “sandwich.”
- Brush the top layer of dough lightly with milk. This will help the granulated sugar adhere and create a beautiful golden-brown color during baking.
- Sprinkle the milk-brushed dough generously with granulated sugar.
- Using a knife or pastry cutter, cut the layered dough into strips that are approximately 5 x ½ inches.
- Gently twist each strip twice to create the signature twist shape.
- Place the twists on well-greased cookie sheets. Alternatively, you can line the cookie sheets with parchment paper for easy cleanup.
- Bake in a preheated 400-degree oven for 7-10 minutes, or until the twists are light golden brown. Keep a close eye on them, as they can burn easily if overbaked.
- Remove the twists from the oven and let them cool slightly on the cookie sheets before transferring them to a wire rack to cool completely.
- Serve warm or at room temperature.
Expert Tips & Tricks
- For a richer flavor, use natural peanut butter with no added sugar or salt. You can also use different nut butters like almond or cashew butter.
- If your dough is too sticky, add a tablespoon of flour at a time until it reaches a manageable consistency.
- Don’t overwork the dough, as this can result in tough twists.
- For a more intense apple flavor, consider using homemade apple butter.
- If you want to make these ahead of time, you can assemble the twists and store them in the refrigerator for up to 24 hours before baking.
Serving & Storage Suggestions
These Peanut Butter Twists are best served warm, but they are also delicious at room temperature. They make a great addition to a brunch spread or a sweet treat with your afternoon coffee or tea.
Store leftover twists in an airtight container at room temperature for up to 3 days. You can also freeze them for longer storage – simply wrap them individually in plastic wrap and then place them in a freezer bag. They can be stored in the freezer for up to 2 months.
To reheat frozen twists, thaw them at room temperature and then warm them in a low oven (around 300 degrees Fahrenheit) for a few minutes.
Nutritional Information
| Nutrient | Amount per Serving | % Daily Value |
|---|---|---|
| Calories | 64.2 kcal | N/A |
| Calories from Fat | 39 kcal | 62% |
| Total Fat | 4.4 g | 6% |
| Saturated Fat | 1.5 g | 7% |
| Cholesterol | 3.2 mg | 1% |
| Sodium | 57.5 mg | 2% |
| Total Carbohydrate | 5.3 g | 1% |
| Dietary Fiber | 0.3 g | 1% |
| Sugars | 1.6 g | 6% |
| Protein | 1.2 g | 2% |
Variations & Substitutions
- Gluten-Free: Substitute the all-purpose flour with a gluten-free all-purpose blend. You may need to adjust the amount of liquid to achieve the correct dough consistency.
- Dairy-Free: Use a dairy-free cream cheese alternative and dairy-free milk.
- Different Nut Butter: Experiment with other nut butters such as almond, cashew, or sunflower seed butter.
- Spiced Apple Butter: Add a pinch of cinnamon, nutmeg, or cloves to the apple butter for a warmer, more festive flavor.
- Chocolate Drizzle: After baking and cooling, drizzle the twists with melted chocolate for an extra touch of indulgence.
FAQs (Frequently Asked Questions)
Q: Can I use a different type of shortening?
A: Yes, you can substitute the vegetable shortening with butter or coconut oil. Keep in mind that using butter will add a richer flavor, while coconut oil will impart a subtle coconut taste.
Q: My dough is too crumbly. What should I do?
A: Add a teaspoon of milk at a time until the dough comes together. Be careful not to add too much liquid, as this can make the dough sticky.
Q: Can I make these ahead of time and freeze them?
A: Yes, you can assemble the twists and freeze them before baking. When ready to bake, simply thaw them at room temperature and bake as directed.
Q: My twists are burning on the bottom. What can I do?
A: Lower the oven temperature by 25 degrees Fahrenheit and bake for a longer period of time. You can also place a baking sheet underneath the cookie sheet to help insulate the twists.
Q: Can I use a different type of jam instead of apple butter?
A: Yes, you can experiment with other jams or preserves such as apricot, raspberry, or strawberry.
Final Thoughts
These Peanut Butter Twists are a testament to the fact that simple ingredients, when combined with a little bit of creativity, can create something truly special. Whether you’re looking for a quick and easy snack or a delightful treat to share with friends and family, these twists are sure to please. So, gather your ingredients, preheat your oven, and get ready to embark on a baking adventure that will fill your kitchen with the irresistible aroma of peanut butter and apple butter. Don’t be afraid to experiment with variations and make them your own. And most importantly, have fun! I’d love to hear your feedback and see your own creative twists on this classic recipe. Perhaps serve them alongside a scoop of vanilla ice cream for an extra indulgent treat!