
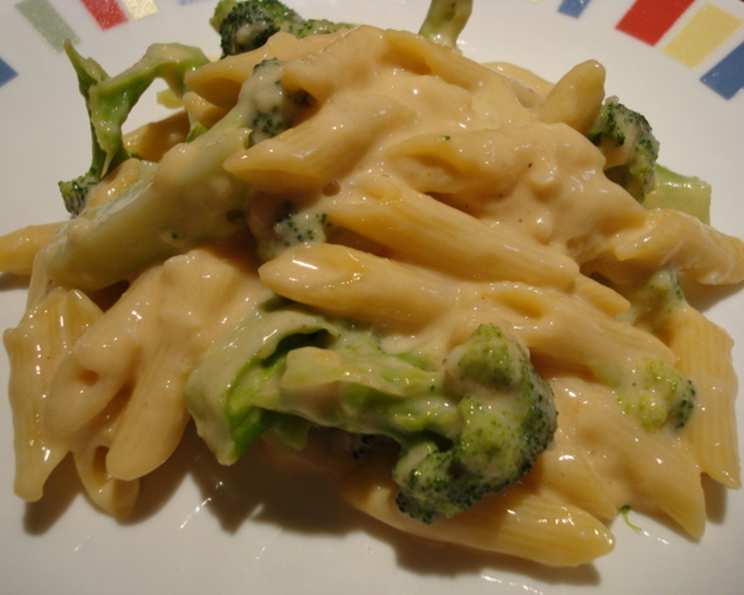
Penne in Creamy Garlic Cheese Sauce: A Comfort Food Classic
There’s a certain magic that happens when garlic meets cheese, especially when swirled into a creamy sauce enveloping perfectly cooked penne. I remember one particularly hectic week when I was juggling multiple catering gigs and teaching a pasta-making class. Exhausted and craving something comforting, I threw together a quick garlic cheese sauce. The aroma alone was enough to soothe my frazzled nerves, and that first bite… pure bliss. It was simple, satisfying, and exactly what I needed. This recipe reminds me of that moment – a little bit of culinary therapy in a bowl.
Recipe Overview
- Prep Time: 15 minutes
- Cook Time: 15 minutes
- Total Time: 30 minutes
- Servings: 4
- Dietary Type: Vegetarian
Ingredients
- 8 garlic cloves, peeled
- 3 cups small broccoli florets
- 6 ounces penne pasta
- 2 cups evaporated skim milk
- 1 tablespoon all-purpose flour
- 1 teaspoon all-purpose flour
- 1 1/2 ounces reduced-fat cheddar cheese, grated
- 1 1/2 ounces Parmesan cheese, freshly grated
- 1/2 teaspoon black pepper, freshly ground
- 1/4 teaspoon salt
Equipment Needed
- Large pot
- Slotted spoon
- Large nonstick skillet
- Wire whisk
Instructions
-
In a large pot of boiling water, cook the garlic cloves for 3 minutes, or until softened. Don’t overcrowd the pot; work in batches if needed to maintain a rolling boil.
-
Using a slotted spoon, carefully remove the softened garlic from the water and set it aside. The slotted spoon allows you to drain the garlic well, preventing excess water from diluting the sauce later.
-
Mince the cooked garlic finely. You can use a garlic press if you prefer, but mincing by hand allows for more control over the texture. Set the minced garlic aside.
-
Return the water to a boil. Add the broccoli florets to the boiling water and cook for 3 minutes, until they are bright green and just softened. Overcooking will result in mushy broccoli, so watch carefully.
-
Remove the broccoli from the water with a slotted spoon and set aside. Immediately plunging the broccoli into ice water after removing it from the boiling water will stop the cooking process and help retain its vibrant green color. This step is optional.
-
Return the water to a boil once more. Add the penne pasta and cook for 8-10 minutes, or until tender. Stir occasionally to prevent the pasta from sticking together. Check for doneness by tasting a piece of pasta. It should be firm to the bite, or “al dente”.
-
Drain the penne pasta thoroughly, discarding the cooking liquid. Ensure all excess water is removed to prevent a watery sauce. Set the cooked pasta aside.
-
While the pasta is cooking, prepare the sauce. In a large nonstick skillet, combine the evaporated skim milk, 1 tablespoon of all-purpose flour, and 1 teaspoon of all-purpose flour using a wire whisk. Whisk vigorously until the flour is completely dissolved and no lumps remain. This is crucial for a smooth sauce.
-
Cook the milk mixture over medium heat, stirring constantly with the wire whisk, for 4 minutes, until the mixture begins to bubble and thicken. Constant stirring prevents the milk from scorching on the bottom of the pan. The mixture should develop a light coating consistency.
-
Stir in the minced garlic into the thickened milk sauce.
-
Reduce the heat to low. Add the grated reduced-fat cheddar cheese, freshly grated Parmesan cheese, black pepper, and salt to the milk mixture.
-
Cook, stirring constantly, until the cheeses are completely melted and the sauce is smooth and creamy. Ensure the cheeses are fully incorporated before proceeding.
-
Stir in the cooked broccoli and penne pasta into the cheese sauce.
-
Cook, stirring frequently, just until everything is heated through. Be careful not to overcook, as this can cause the pasta to become mushy and the sauce to separate. Serve immediately.
Expert Tips & Tricks
- Garlic Infusion: For a more intense garlic flavor, sauté the minced garlic in a tablespoon of olive oil before adding it to the milk mixture. Be careful not to burn the garlic, as it can become bitter.
- Cheese Blending: For a richer flavor, use a blend of different cheeses, such as Gruyere or Fontina, in addition to cheddar and Parmesan. Experiment to find your favorite combination.
- Sauce Consistency: If the sauce becomes too thick, add a splash of milk to thin it out. If it’s too thin, simmer it for a few more minutes until it reaches the desired consistency.
- Make-Ahead Prep: You can cook the garlic, broccoli, and pasta ahead of time and store them separately in the refrigerator. When ready to serve, simply prepare the sauce and add the pre-cooked ingredients.
- Spice It Up: Add a pinch of red pepper flakes to the sauce for a touch of heat.
Serving & Storage Suggestions
Serve the Penne in Creamy Garlic Cheese Sauce immediately while it’s hot and creamy. Garnish with a sprinkle of fresh parsley or extra grated Parmesan cheese for added flavor and visual appeal. This dish pairs well with a simple side salad or garlic bread.
Leftovers can be stored in an airtight container in the refrigerator for up to 3 days. Reheat gently in a saucepan over low heat, stirring occasionally, until heated through. You may need to add a splash of milk to restore the sauce’s creamy consistency. Freezing is not recommended as the sauce may separate upon thawing.
Nutritional Information
| Nutrient | Amount per Serving | % Daily Value |
|---|---|---|
| Calories | 384 kcal | N/A |
| Total Fat | 6 g | N/A |
| Saturated Fat | 4 g | N/A |
| Cholesterol | 21 mg | N/A |
| Sodium | 590 mg | N/A |
| Total Carbohydrate | 56 g | N/A |
| Dietary Fiber | 5 g | N/A |
| Protein | 27 g | N/A |
| Calcium | 673 mg | N/A |
Variations & Substitutions
- Gluten-Free: Use gluten-free penne pasta for a gluten-free version of this dish.
- Vegetable Variations: Substitute broccoli with other vegetables such as asparagus, peas, or spinach.
- Spicy Kick: Add a pinch of red pepper flakes or a dash of hot sauce to the sauce for a spicy kick.
- Creamier Sauce: For a richer, creamier sauce, substitute half of the evaporated skim milk with heavy cream or half-and-half. Be mindful that this will increase the calorie and fat content of the dish.
- Vegan Option: Use plant-based milk, vegan cheese, and nutritional yeast for a dairy-free and vegan option.
FAQs (Frequently Asked Questions)
Q: Can I use pre-shredded cheese instead of freshly grated cheese?
A: While pre-shredded cheese is convenient, it often contains cellulose, which can prevent it from melting smoothly. Freshly grated cheese melts more evenly and creates a creamier sauce.
Q: How can I prevent the sauce from becoming grainy?
A: Ensure the flour is fully dissolved in the milk before cooking, and avoid overheating the sauce. Cook over low heat and stir constantly to prevent the cheese from separating.
Q: Can I add chicken or other protein to this dish?
A: Absolutely! Grilled chicken, shrimp, or sausage would be delicious additions to this pasta dish. Simply cook the protein separately and add it to the sauce along with the broccoli and penne.
Q: Can I use whole wheat pasta instead of white pasta?
A: Yes, whole wheat pasta is a nutritious and delicious alternative. Keep in mind that whole wheat pasta may require a slightly longer cooking time.
Q: How do I adjust the recipe if I only have a small skillet?
A: If you have a small skillet, you may need to cook the sauce in batches. Alternatively, you can prepare the sauce in a separate saucepan and then combine it with the cooked pasta and broccoli in the skillet.
Final Thoughts
I hope you’ll give this Penne in Creamy Garlic Cheese Sauce a try. It’s a versatile and comforting dish that can be easily adapted to your own tastes and preferences. Whether you’re looking for a quick weeknight meal or a satisfying dish to share with friends and family, this recipe is sure to please. Don’t be afraid to experiment with different cheeses, vegetables, and seasonings to create your own unique version. I’d love to hear your feedback and any variations you come up with! Enjoy!