
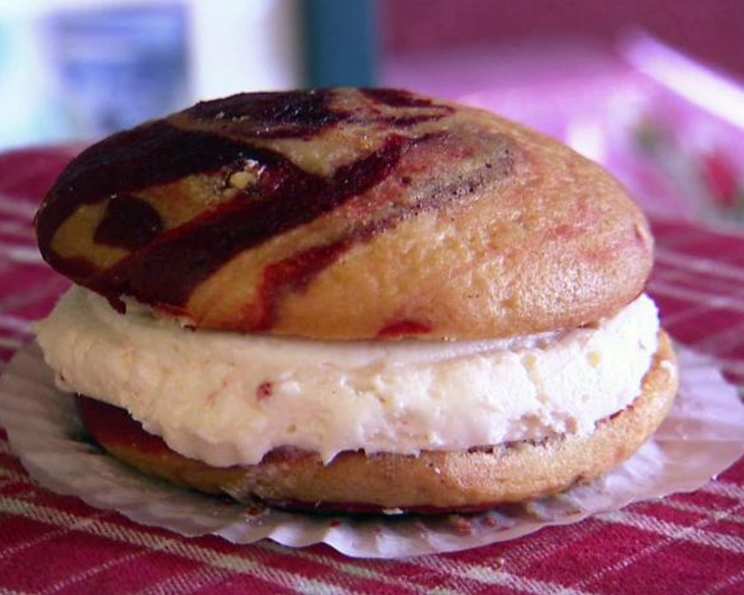
Peppermint Red Velvet Whoopie Pies: A Festive Fusion
The holidays always bring a wave of nostalgia, and for me, nothing sparks those warm, fuzzy feelings quite like the scent of peppermint and the sight of red velvet. I remember baking with my grandmother every Christmas, her mixing bowl stained a cheerful pink from countless batches of her famous red velvet cake. While her recipe was a closely guarded secret, I’ve taken that spirit of festive baking and combined it with another childhood favorite: whoopie pies. These Peppermint Red Velvet Whoopie Pies are a playful twist on classic flavors, guaranteed to bring a smile to anyone’s face.
Recipe Overview
- Prep Time: 45 minutes
- Cook Time: 12 minutes
- Total Time: 57 minutes
- Yields: 21 whoopie pies
- Dietary Type: Vegetarian
Ingredients
For the Strawberry Cake:
- 3 cups cake flour
- 1 tablespoon baking powder
- 1/2 teaspoon kosher salt
- 1 cup milk
- 1/2 cup seedless strawberry jam
- 2-3 tablespoons red food coloring
- 2 cups sugar
- 1 cup canola oil
- 1 teaspoon vanilla extract
- 1 teaspoon white distilled vinegar
- 3 eggs
For the Dark Chocolate Cake:
- 2 1/2 cups cake flour
- 1/2 cup plus 1/3 cup cocoa
- 2 teaspoons baking soda
- 1/2 teaspoon kosher salt
- 2 cups sugar
- 3/4 cup unsalted butter, softened
- 2 eggs
- 1 teaspoon vanilla extract
- 1 cup buttermilk
- 1/3 cup chocolate pudding mix (instant)
For the Peppermint Vanilla Cake:
- 2 1/2 cups cake flour
- 3/4 cup all-purpose flour
- 1 tablespoon baking powder
- 1 teaspoon baking soda
- 3/4 teaspoon kosher salt
- 1/2 cup unsalted butter, softened
- 1/2 cup vegetable shortening
- 1 3/4 cups sugar
- 1 tablespoon peppermint extract
- 1 tablespoon vanilla extract
- 1 large egg
- 1 egg yolk
- 1 1/2 cups ice cold water
For the Peppermint Cream Cheese Icing:
- 2 cups unsalted butter, softened
- 1 1/2 lbs cream cheese, softened
- 2 teaspoons vanilla extract
- 1/2 teaspoon peppermint extract
- 2 lbs confectioners’ sugar
- 1/4 cup crushed peppermint candy (soft meringue-like texture is ideal)
Equipment Needed
- Mixing bowls (various sizes)
- Electric mixer (stand or hand-held)
- Measuring cups and spoons
- Whisk
- Spatula
- Baking sheets
- Parchment paper
- Ice cream scoop (small)
- Knife
- Piping bag (optional)
Instructions
-
Prepare the Strawberry Cake Batter: In a medium bowl, whisk together the cake flour, baking powder, and kosher salt. Set aside. In a separate small bowl, whisk together the milk, strawberry jam, and red food coloring. Set aside. In the bowl of an electric mixer, beat together the sugar, canola oil, vanilla, vinegar, and eggs on medium-high speed until pale and smooth, about 2 to 3 minutes. In three additions, alternately add the dry and wet ingredients to the sugar mixture, beginning and ending with the dry ingredients. Mix until just combined. Be careful not to overmix.
-
Prepare the Dark Chocolate Cake Batter: In a medium bowl, whisk together the cake flour, 1/2 cup cocoa, baking soda, and salt. Set aside. In the bowl of an electric mixer, cream together the sugar and butter until light and fluffy. Add the eggs one at a time, creaming well after each addition. Mix in the vanilla extract. Add the flour mixture and buttermilk alternately, beginning and ending with the flour. Mix until just combined.
-
Combine the Strawberry and Chocolate Cake Batters and create Red Velvet: Mix the strawberry and the chocolate cake batters together in a large bowl. Then, add the remaining 1/3 cup cocoa and the chocolate pudding mix to the combined batter. This is the basis for your “red velvet” portion of the whoopie pie.
-
Prepare the Peppermint Vanilla Cake Batter: Whisk together the cake flour, all-purpose flour, baking powder, baking soda, and salt in a large bowl. Set aside. In the bowl of an electric mixer fitted with the paddle attachment, beat the butter and shortening on medium speed until creamy, about 3 to 4 minutes. Add the sugar, peppermint extract, and vanilla extract and beat on medium speed until fluffy, about 3 minutes. Scrape down the bowl, add the egg and egg yolk, and beat until just combined. Turn the mixer to low. Add the flour mixture, alternating with the ice cold water, in three separate additions, beginning and ending with the flour mixture. Scrape down the bowl, then mix on low speed for a few more seconds until just combined.
-
Assemble and Bake the Whoopie Pies: Preheat the oven to 350 degrees F (175 degrees C). Line baking sheets with parchment paper.
-
Scoop and Swirl: Take 1 small ice cream scoop of the red velvet batter and place it on the parchment paper. Then, get a new 1 small ice cream scoop of the peppermint vanilla cake batter and layer it on top of the red velvet batter. Using a knife, swirl the batters together by free hand, creating a marbled effect. This creates one half of your whoopie pie. Repeat, leaving space between each whoopie pie.
-
Bake: Bake until the whoopie pies are cooked through, about 12 minutes. To test for doneness, insert a toothpick into the center of one of the whoopie pies. If it comes out clean or with a few moist crumbs, they are ready.
-
Cool: Let the whoopie pies cool completely on the baking sheets before frosting.
-
Prepare the Peppermint Cream Cheese Icing: With an electric mixer and paddle attachment, cream the butter until smooth. Next, add the cream cheese and beat until fluffy. Add the vanilla extract and peppermint extract (with the mixer on low speed). Then, add the confectioners’ sugar in small batches until fully incorporated. Mix until there are no lumps of sugar. Add the crushed peppermints to the icing and gently fold them in.
-
Frost and Assemble: Place the icing in a piping bag (or use a knife or spatula) and pipe or spread a generous amount of icing onto the flat side of one whoopie pie half. Top with the flat side of another whoopie pie half, creating a sandwich.
Expert Tips & Tricks
- Room Temperature is Key: Ensure your butter, cream cheese, and eggs are at room temperature for smoother batters and icing.
- Don’t Overmix: Overmixing cake batters develops gluten, leading to tough whoopie pies. Mix until just combined.
- Chill the Dough (Optional): If your kitchen is warm, chilling the red velvet and peppermint vanilla cake batters for 30 minutes before scooping can help prevent them from spreading too much during baking.
- Even Baking: For even baking, ensure your oven rack is in the center position. Rotate the baking sheets halfway through the baking time.
- Crushed Peppermint Perfection: For the most appealing texture, use soft, meringue-like peppermint candies that crush easily. Hard candies can be too crunchy in the icing.
Serving & Storage Suggestions
These Peppermint Red Velvet Whoopie Pies are best served slightly chilled. They can be stored in an airtight container at room temperature for up to 2 days, or in the refrigerator for up to 5 days. For longer storage, you can freeze them for up to 2 months. Wrap them individually in plastic wrap before placing them in a freezer-safe container. Thaw them in the refrigerator before serving.
Nutritional Information
(Estimated values per whoopie pie. Please note that these are estimates and will vary based on ingredient brands and exact measurements.)
| Nutrient | Amount per Serving | % Daily Value |
|---|---|---|
| Calories | 575 kcal | 29% |
| Total Fat | 27.4 g | 42% |
| Saturated Fat | 13 g | 65% |
| Cholesterol | 83 mg | 28% |
| Sodium | 300 mg | 13% |
| Total Carbohydrate | 72 g | 24% |
| Dietary Fiber | 1 g | 4% |
| Sugars | 49 g | N/A |
| Protein | 5 g | 10% |
Variations & Substitutions
- Gluten-Free: Substitute a gluten-free cake flour blend for the regular cake flour in both the red velvet and peppermint vanilla cake recipes.
- Dairy-Free: Use dairy-free butter and cream cheese alternatives. Substitute almond milk or other plant-based milk for the buttermilk.
- Extract Experimentation: Adjust the amount of peppermint extract to your liking. A touch of almond extract in the vanilla cake can also add a pleasant depth of flavor.
- Seasonal Swirls: In the summertime, consider using a lemon or orange zest vanilla cake to pair with the red velvet.
FAQs (Frequently Asked Questions)
Q: Can I make the whoopie pies ahead of time?
A: Yes, you can bake the whoopie pies 1-2 days ahead of time. Store them in an airtight container at room temperature until ready to frost.
Q: My icing is too soft. What can I do?
A: Gradually add more confectioners’ sugar, one tablespoon at a time, until the icing reaches your desired consistency. You can also chill the icing for 15-20 minutes to firm it up.
Q: Can I use regular food coloring instead of gel food coloring?
A: Gel food coloring is recommended for a more vibrant red color without adding too much liquid to the batter. However, liquid food coloring can be used, but you may need to use more to achieve the desired color, which could affect the batter’s consistency slightly.
Q: My whoopie pies spread too thin while baking. What did I do wrong?
A: Overmixing the batter or using butter that is too soft can cause the whoopie pies to spread. Be sure to cream the butter and sugar until just combined and avoid overmixing the batter. Chilling the batter before scooping can also help.
Q: Can I freeze the frosted whoopie pies?
A: Yes, you can freeze frosted whoopie pies. Wrap them individually in plastic wrap and place them in a freezer-safe container. Thaw them in the refrigerator before serving. Be aware that the texture of the icing may change slightly after freezing.
Final Thoughts
So, there you have it: Peppermint Red Velvet Whoopie Pies, a dessert that combines the festive spirit of the holidays with the comforting nostalgia of childhood. I encourage you to try this recipe and create your own sweet memories. Feel free to adapt the flavors to your preferences, and don’t hesitate to share your creations and feedback. These whoopie pies pair perfectly with a warm mug of hot chocolate or a festive holiday cocktail. Happy baking!