
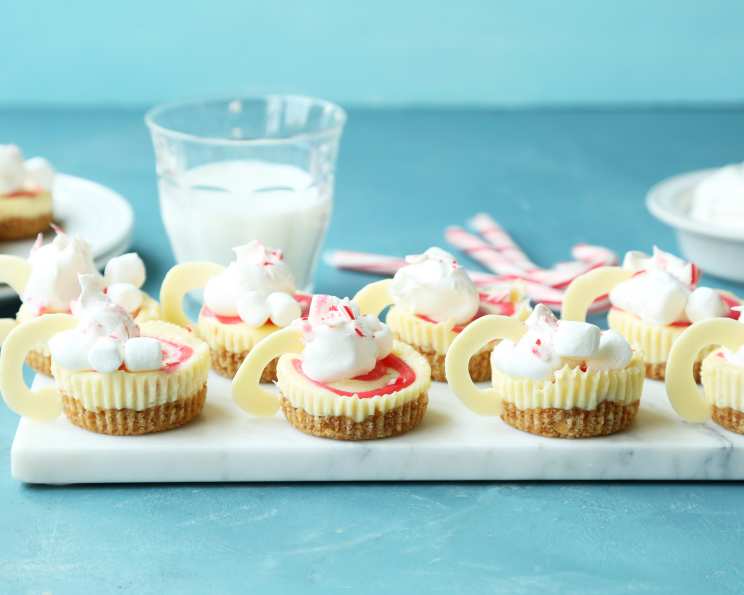
Peppermint White Mocha Cheesecakes
The first time I tasted peppermint white mocha, it was a blustery December evening, the city dusted with fresh snow. I was instantly transported – not just to a cozy coffee shop, but back to childhood memories of candy canes and Christmas mornings. These mini cheesecakes capture that same comforting magic, each bite a little swirl of holiday cheer. They’re like tiny edible mugs of pure joy!
Recipe Overview
- Prep Time: 30 minutes
- Cook Time: 15 minutes
- Total Time: 4 hours
- Servings: 12
- Yield: 12 cheesecakes
- Dietary Type: Not specified
Ingredients
- 3 cups vanilla wafer cookies
- 4 tablespoons unsalted butter, melted
- 2 (8 ounce) packages cream cheese, softened
- ½ cup granulated sugar
- 2 tablespoons flour
- 1 teaspoon vanilla extract
- 2 large eggs
- 1 teaspoon peppermint extract
- 2-4 drops red food coloring, gel
- 2 ounces white chocolate chips
- 1 cup frozen whipped topping, thawed, plus more for topping
- ½ cup mini marshmallows
- 2 candy canes, crushed
Equipment Needed
- Food processor
- Large bowl
- Muffin tin
- Baking sheet
- Parchment paper
- Mixer
- Small bowl
- Small ice cream scoop or spoon
- Microwave-safe bowl or double boiler
- Squeeze bottle or piping bag
- Refrigerator
Instructions
-
Preheat your oven to 350 degrees F. Line a baking sheet with parchment paper. This prevents sticking and makes cleanup a breeze.
-
Place the vanilla wafer cookies in a food processor and pulse until finely chopped. You want a fine crumb, almost like sand. If you don’t have a food processor, you can place the cookies in a ziplock bag and crush them with a rolling pin.
-
Transfer the cookie crumbs to a large bowl and stir in the melted butter until well combined. The mixture should resemble wet sand and hold together when pressed.
-
Divide the mixture between the wells of a muffin tin and press down into an even layer. Use the back of a spoon or a measuring cup to get a nice, compact crust.
-
Bake the crusts for 5 minutes and then let them cool completely. This pre-baking helps the crust to set and prevents it from becoming soggy. Once cooled, lower the oven temperature to 325 degrees F.
-
In a large mixing bowl, beat together the cream cheese, sugar, and flour until smooth and creamy. Make sure your cream cheese is properly softened, otherwise you’ll end up with lumps in your filling.
-
Stir in the vanilla extract and then add the eggs one at a time, mixing well after each addition. Be careful not to overmix the batter at this stage, as this can incorporate too much air and cause the cheesecakes to crack during baking.
-
Remove about ½ cup of the filling and transfer it to a small bowl. This is where we’ll create our peppermint swirl.
-
Add the peppermint extract and red food coloring to the small bowl and mix until well combined. Start with 2 drops of food coloring and add more until you achieve your desired shade of pink/red.
-
Gently fold the red batter into the regular batter once or twice until streaked throughout. Don’t overmix, you want to see distinct swirls of color.
-
Use a small ice cream scoop or spoon to divide the cheesecake batter evenly between each well. This ensures that each cheesecake bakes evenly.
-
Bake in the 325 degree F oven for 13-15 minutes until the centers are just set. The cheesecakes should be slightly wobbly in the center but not liquid.
-
Remove from the oven and let cool completely. Cooling them slowly prevents cracking.
-
Refrigerate for 2-3 hours and up to overnight. This allows the cheesecakes to set completely.
-
Melt the white chocolate chips in the microwave for 30 second intervals, stirring after each, until melted and smooth. Alternatively, melt in a double boiler. Be careful not to overheat the white chocolate, as it can seize and become grainy.
-
Transfer the melted white chocolate to a squeeze bottle or piping bag fitted with a small tip and pipe out handles in a “C” shape onto a baking sheet lined with parchment paper.
-
Freeze the chocolate handles for about 5 minutes to harden. This makes them easier to handle and prevents them from melting when you insert them into the cheesecakes.
-
Remove the cheesecakes from the pan and peel away the liners.
-
Insert a white chocolate handle into each cheesecake and then garnish with a dollop of whipped topping, mini marshmallows, and crushed candy canes before serving.
Expert Tips & Tricks
- For an extra creamy cheesecake, try using full-fat cream cheese.
- If your cheesecakes crack during baking, don’t worry! They’ll still taste delicious. You can also try placing a pan of hot water on the bottom rack of the oven to create a more humid environment, which can help to prevent cracking.
- To make the white chocolate handles easier to insert, gently warm the end of a butter knife and use it to create a small slit in the side of the cheesecake.
- Don’t skip the refrigeration time! It’s crucial for the cheesecake to set properly.
Serving & Storage Suggestions
Serve these mini cheesecakes chilled, straight from the refrigerator. They look beautiful arranged on a platter, garnished with extra whipped cream, marshmallows, and candy canes. Leftovers can be stored in an airtight container in the refrigerator for up to 3 days. Freezing is not recommended, as the texture of the cheesecake and whipped topping may change.
Nutritional Information
| Nutrient | Amount per Serving | % Daily Value |
|---|---|---|
| Calories | 535 kcal | N/A |
| Calories from Fat | 285 g | 53% |
| Total Fat | 31.7 g | 48% |
| Saturated Fat | 15.1 g | 75% |
| Cholesterol | 83.8 mg | 27% |
| Sodium | 315.4 mg | 13% |
| Total Carbohydrate | 57.3 g | 19% |
| Dietary Fiber | 1.2 g | 4% |
| Sugars | 15.1 g | 60% |
| Protein | 6.3 g | 12% |
Variations & Substitutions
- Gluten-Free: Substitute the vanilla wafer cookies with gluten-free vanilla cookies. Ensure all other ingredients are also certified gluten-free.
- Dairy-Free: Use dairy-free cream cheese and whipped topping alternatives. Melted coconut oil can be used to substitute the butter in the crust. For the white chocolate, use a dairy-free variety or substitute with melted coconut butter.
- Chocolate Crust: Replace some of the vanilla wafer cookies with chocolate cookies for a richer, more decadent crust.
- Extract Variations: Experiment with different extracts, such as almond or orange, for a unique flavor profile.
FAQs (Frequently Asked Questions)
Q: Can I make these ahead of time?
A: Yes! The cheesecakes can be made up to 2 days in advance and stored in the refrigerator. Assemble with the white chocolate handles and toppings just before serving.
Q: Can I use a different type of cookie for the crust?
A: Absolutely! Graham crackers, shortbread cookies, or even chocolate chip cookies would all work well. Adjust the amount of melted butter as needed.
Q: My white chocolate keeps seizing when I melt it. What am I doing wrong?
A: White chocolate is delicate and can easily seize if overheated. Use low heat and stir frequently. Adding a tiny bit of vegetable oil can sometimes help to smooth it out.
Q: Can I use a regular-sized muffin tin instead of a mini muffin tin?
A: Yes, but you’ll need to adjust the baking time. Start checking for doneness around 20-25 minutes.
Q: Can I omit the red food coloring?
A: Yes, you can leave out the red food coloring for a plain peppermint cheesecake, or substitute with another color.
Final Thoughts
These Peppermint White Mocha Cheesecakes are a delightful treat that’s perfect for holiday gatherings, potlucks, or even just a cozy night in. The combination of creamy cheesecake, refreshing peppermint, and sweet white chocolate is simply irresistible. Don’t be afraid to get creative with your toppings and have fun with the presentation! Share your creations with friends and family, and let me know what you think. Happy baking!