
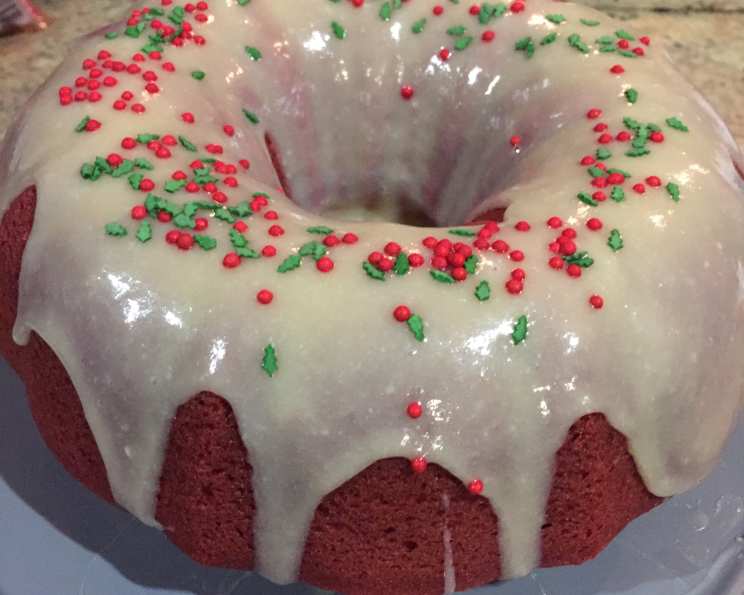
Perfect Red Velvet Bundt Cake
There’s something about Red Velvet cake that just screams celebration. I remember the first time I ever tasted it – at my grandmother’s 70th birthday party. The cake was magnificent, with its striking crimson hue and the tangy cream cheese frosting. The subtle cocoa notes danced on my tongue, and the cake was so unbelievably moist. Ever since then, Red Velvet has held a special place in my heart, a symbol of joy and togetherness. I’ve spent years trying to recreate that perfect cake, and I think I’ve finally cracked the code.
Recipe Overview
- Prep Time: 25 minutes
- Cook Time: 50 minutes
- Total Time: 1 hour 15 minutes
- Servings: 20
- Yield: 1 Bundt Cake
- Dietary Type: Not specified
Ingredients
For the Cake:
- 1 1/4 cups vegetable oil (not butter)
- 1 cup buttermilk
- 2 eggs
- 1 tablespoon red food coloring
- 1 teaspoon apple cider vinegar
- 1 teaspoon vanilla extract
- 2 1/2 cups all-purpose flour (not cake flour)
- 1 3/4 cups sugar
- 1 teaspoon baking soda
- 3/4 teaspoon salt
- 1 1/2 tablespoons cocoa powder
For the Frosting (may want to double):
- 8 ounces cream cheese, softened
- 5 tablespoons unsalted butter, softened
- 2 teaspoons vanilla extract
- 2 1/2 cups confectioners’ sugar
Equipment Needed
- Bundt Pan
- Stand Mixer (or electric hand mixer)
- Large Mixing Bowl
- Sifter (optional, but recommended)
- Measuring Cups and Spoons
- Cooling Rack
- Rubber Spatula
Instructions
-
Begin by preheating your oven to 350 degrees F (175 degrees C). While the oven heats, thoroughly grease and flour your bundt pan. This step is crucial to prevent the cake from sticking. Ensure every nook and cranny is coated.
-
In the bowl of a stand mixer, combine the vegetable oil, buttermilk, eggs, red food coloring, apple cider vinegar, and vanilla extract. Mix on medium speed until well combined, about 2-3 minutes. The batter should be a vibrant red color.
-
In a separate large bowl, sift together the all-purpose flour, sugar, baking soda, salt, and cocoa powder. Sifting ensures that there are no lumps and that the dry ingredients are evenly distributed, leading to a more tender cake. If you don’t have a sifter, whisk the dry ingredients vigorously.
-
Gradually add the dry ingredients to the wet ingredients in the stand mixer, starting on low speed to avoid a flour explosion. Increase the speed to medium once the flour is mostly incorporated.
-
Beat until the batter is smooth and homogenous, scraping down the sides of the bowl as needed to ensure everything is well combined. Be careful not to overmix, as this can lead to a tough cake.
-
Pour the batter into the prepared bundt pan, spreading it evenly.
-
Bake for 50 minutes, or until a toothpick inserted into the center of the cake comes out clean. Start checking for doneness around 45 minutes, as baking times can vary depending on your oven.
-
Once baked, cool the cake in the bundt pan on a wire rack for 30 minutes. This allows the cake to settle and makes it easier to remove from the pan without breaking.
-
After 30 minutes, carefully invert the cake onto a cake plate to finish cooling completely. If the cake is sticking, gently tap the pan or use a thin knife to loosen the edges.
-
While the cake is cooling, prepare the frosting. In the bowl of a stand mixer, combine the softened cream cheese and butter. Beat on medium speed until light and fluffy. It’s essential that both ingredients are at room temperature to prevent lumps in the frosting.
-
Add the vanilla extract and mix until fully combined.
-
Gradually add the confectioners’ sugar on low speed to combine, then increase the speed to high and whisk for three minutes, or until the frosting is smooth, creamy, and holds its shape.
-
Once the cake is completely cool, apply the frosting using your preferred method. You can spread it evenly over the entire cake, or for a more rustic look, drizzle it from a plastic bag with the corner snipped off. I personally prefer the drizzle method for a bundt cake.
Expert Tips & Tricks
- Don’t use butter or cake flour in the cake. Trust me on this one. It will turn out dry. Vegetable oil is crucial for the moist crumb, and all-purpose flour provides the right structure.
- Room temperature ingredients are key for the frosting. Softened cream cheese and butter ensure a smooth, lump-free frosting.
- For a more intense red color, you can increase the amount of red food coloring slightly, but be careful not to add too much, as it can affect the taste and texture of the cake.
- If your frosting is too thick, add a tablespoon of milk or cream at a time until it reaches your desired consistency.
- If you’re short on time, you can use a store-bought cream cheese frosting, but homemade is always best.
- To prevent the cake from sticking, thoroughly grease and flour the bundt pan, or use a baking spray specifically designed for bundt pans.
Serving & Storage Suggestions
This Red Velvet Bundt Cake is best served at room temperature. A simple dusting of confectioners’ sugar or a scattering of fresh berries can add a touch of elegance to the presentation. Leftovers can be stored in an airtight container at room temperature for up to 3 days, or in the refrigerator for up to a week. For longer storage, the cake can be frozen for up to 2 months. Wrap it tightly in plastic wrap and then foil to prevent freezer burn. Thaw the cake in the refrigerator overnight before serving.
Nutritional Information
| Nutrient | Amount per Serving | % Daily Value |
|---|---|---|
| Calories | 382.5 kcal | N/A |
| Total Fat | 21.2 g | 32% |
| Saturated Fat | 6.1 g | 30% |
| Cholesterol | 39.2 mg | 13% |
| Sodium | 232.8 mg | 9% |
| Total Carbohydrate | 45.8 g | 15% |
| Dietary Fiber | 0.6 g | 2% |
| Sugars | 33.2 g | N/A |
| Protein | 3.4 g | 6% |
Note: Nutritional information is an estimate and may vary depending on specific ingredients and serving sizes.
Variations & Substitutions
- Red Velvet Cupcakes: Use this same batter to make cupcakes! Reduce baking time to about 18-20 minutes.
- Gluten-Free Red Velvet Cake: Substitute the all-purpose flour with a gluten-free all-purpose flour blend. You may need to add a binding agent like xanthan gum for best results.
- Vegan Red Velvet Cake: Replace the eggs with applesauce or a commercial egg replacer. Use a plant-based buttermilk alternative (almond milk with vinegar). Be sure to use a vegan cream cheese for the frosting.
- Spice it up: Add 1/2 teaspoon of ground cinnamon or nutmeg to the dry ingredients for a warm, spiced Red Velvet flavor.
FAQs (Frequently Asked Questions)
Q: Why use vegetable oil instead of butter in Red Velvet Cake?
A: Vegetable oil creates a more tender and moist cake crumb because it remains liquid at room temperature. Butter, on the other hand, can solidify and make the cake drier.
Q: Can I use a different type of vinegar?
A: While apple cider vinegar is preferred for its subtle flavor, you can substitute it with white vinegar in a pinch.
Q: Is the red food coloring necessary?
A: The red food coloring is what gives Red Velvet Cake its signature color. While you can omit it, the cake will not have the same vibrant hue. You can also use natural food coloring alternatives, but they may not achieve the same intensity.
Q: How do I prevent the cake from sticking to the bundt pan?
A: Thoroughly grease and flour the bundt pan before pouring in the batter. Alternatively, use a baking spray specifically designed for bundt pans.
Q: Can I freeze the frosted cake?
A: Yes, you can freeze the frosted cake. However, the frosting may change texture slightly after thawing. It’s best to freeze the cake unfrosted and frost it after thawing for optimal results.
Final Thoughts
Now that you have all the secrets to creating the perfect Red Velvet Bundt Cake, it’s time to get baking! Don’t be intimidated by the ingredients or steps – this recipe is surprisingly straightforward, and the results are well worth the effort. Imagine the look on your loved ones’ faces when you present them with this stunning, crimson-hued cake. So go ahead, preheat that oven, gather your ingredients, and create a memory that will last a lifetime. I’d love to hear about your baking adventures and see your beautiful creations – so please share your feedback and photos! Perhaps pair it with a scoop of vanilla ice cream or a steaming mug of coffee for the ultimate indulgence.