
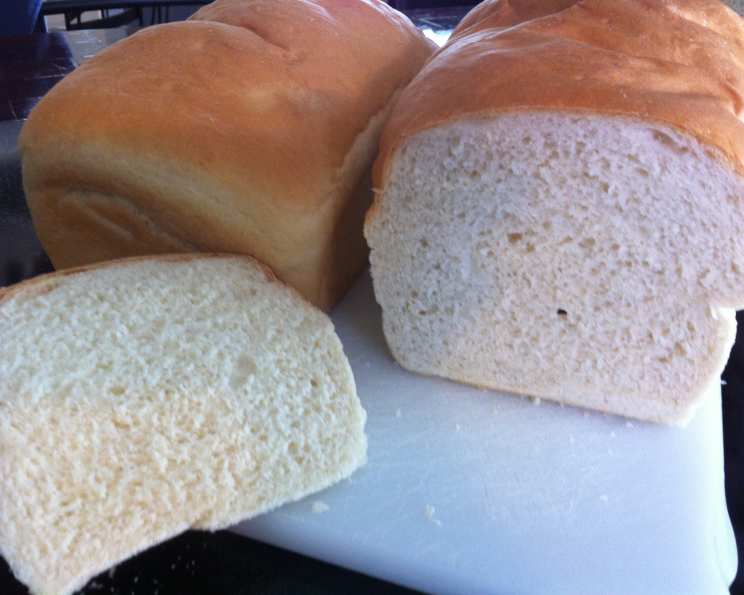
The Quintessential Homemade Sandwich Bread
The scent of baking bread… it’s a time machine, really. One whiff, and I’m instantly transported back to my grandmother’s kitchen, the heart of our family home. I can still picture her, flour dusting her apron, patiently kneading dough as sunlight streamed through the window. Her bread was never fancy, but it was always perfect – the kind of bread that transformed a simple ham and cheese into something truly special, a warm hug on a plate. It was this memory that fueled my quest to create the perfect sandwich bread at home, something that would not only taste incredible, but evoke that same feeling of comfort and love with every bite.
Recipe Overview
- Prep Time: 25 minutes
- Cook Time: 35 minutes
- Total Time: 3 hours (includes rising time)
- Servings: 24
- Yield: 2 loaves
- Dietary Type: Vegetarian
Ingredients
- 5-7 cups bread flour
- 1 2/3 cups milk
- 1/2 cup warm water (110 degrees Fahrenheit)
- 2 tablespoons active dry yeast (or 3 packets)
- 3 tablespoons honey (plus 1 extra tablespoon, optional)
- 2 teaspoons salt
- 2 tablespoons oil (vegetable or olive oil)
- 1 pinch sugar
- 1 egg, beaten (optional, for egg wash)
Equipment Needed
- Large Mixing Bowl
- Measuring Cups and Spoons
- Sturdy Spoon
- Floured Surface
- Plastic Wrap
- Kitchen Towel
- 2 Greased Loaf Pans (standard size)
- Cooling Rack
Instructions
- Begin by proofing the yeast. In a small bowl, combine the warm water (it’s crucial that it’s around 110 degrees Fahrenheit – too hot, and you’ll kill the yeast; too cold, and it won’t activate), a pinch of sugar (this provides the yeast with food to get started), and the active dry yeast. Let this mixture sit undisturbed for 5-10 minutes, or until it becomes very foamy and bubbly. This indicates that the yeast is alive and active.
- In a large mixing bowl, combine the proofed yeast mixture with the milk, honey (add the extra tablespoon here if you’d like), oil, and salt. Mix these wet ingredients together until they are well combined.
- Now, gradually add the bread flour. Start by adding 3 cups of bread flour to the wet ingredients. Use a sturdy spoon to mix the flour in until the mixture is smooth.
- Continue adding the bread flour, one cup at a time, mixing well after each addition. As the dough becomes thicker, it will become more difficult to stir with a spoon.
- Once the dough becomes too difficult to stir, turn it out onto a lightly floured surface. Begin to knead the dough for approximately 10 minutes, adding more flour as needed to prevent it from sticking to your hands or the work surface. The goal is to achieve a dough that is smooth, elastic, and not too dry, but also not sticky. Don’t be afraid to add a little flour at a time if it is too sticky.
- Prepare a large bowl by lightly greasing it with oil. Place the kneaded dough into the greased bowl and turn it over to lightly coat all sides with the oil. This will prevent the dough from drying out as it rises.
- Cover the bowl tightly with plastic wrap, followed by a clean kitchen towel. Alternatively, you can use a damp paper towel underneath the kitchen towel if you don’t have plastic wrap.
- Place the covered bowl in a warm place (such as on top of the refrigerator or in a slightly warmed oven that is turned off) and let the dough rise for 1 to 1 1/2 hours, or until it has doubled in size.
- Once the dough has doubled, gently punch it down to release the air. Divide the dough in half as equally as possible.
- On a lightly floured surface, shape each half of the dough into a loaf. Flatten each portion into a rectangle, then roll it up tightly, tucking in the ends to create a neat, loaf-like shape.
- Grease two loaf pans with shortening, butter, or cooking spray. Place each shaped loaf into a prepared pan.
- Cover the loaf pans with plastic wrap and a clean kitchen towel. Let the loaves rise again for approximately 45 minutes, or until they have almost doubled in size.
- Preheat your oven to 350 degrees Fahrenheit (175 degrees Celsius). If desired, gently brush the tops of the loaves with a beaten egg for a glossy finish. This is optional, but adds a beautiful sheen to the baked bread.
- Bake the loaves in the preheated oven for 35 minutes, placing them on the middle rack to ensure even baking. Be sure to leave room above the loaves as they will rise more during baking.
- The bread is done when it is golden brown on top and sounds hollow when you tap it. You can also check the internal temperature with a thermometer; it should reach around 200-210°F (93-99°C).
- Immediately remove the baked loaves from the pans and place them on a cooling rack to cool completely. This prevents the bottoms from becoming soggy. To further ensure doneness, tap on the bottom of the loaf as well; it should also sound hollow.
- Allow the bread to cool for at least 10 minutes before slicing and serving.
Expert Tips & Tricks
- Temperature is key: Ensure your liquids are the correct temperature for the yeast. Too hot, and it will die; too cold, and it won’t activate properly.
- Don’t over-knead: Over-kneading can result in tough bread. Aim for a smooth and elastic dough, but stop kneading once it reaches that point.
- Warm environment for rising: A warm environment is crucial for the dough to rise properly. If your kitchen is cold, try placing the dough in a slightly warmed oven (turned off) or on top of the refrigerator.
- Don’t skip the cooling rack: Allowing the bread to cool completely on a cooling rack is essential for preventing a soggy bottom.
- For a softer crust: Brush the top of the loaf with melted butter immediately after baking.
- Make ahead: You can prepare the dough through step 7, then refrigerate it overnight. Let it come to room temperature before proceeding with step 8.
Serving & Storage Suggestions
This homemade sandwich bread is perfect for, well, sandwiches! It also makes excellent toast, grilled cheese, or can be enjoyed simply with butter and a sprinkle of sea salt. Store cooled bread in an airtight container at room temperature for up to 3 days. For longer storage, wrap well and freeze for up to 2 months. To reheat frozen bread, thaw at room temperature and warm in the oven or toaster. You can also slice the loaf before freezing for easy access to individual slices.
Nutritional Information
(Estimates based on 1 slice, assuming 24 slices per recipe)
| Nutrient | Amount per Serving | % Daily Value |
|---|---|---|
| Calories | 127 kcal | 6% |
| Total Fat | 2.1g | 3% |
| Saturated Fat | 0.6g | 3% |
| Cholesterol | 2.4mg | 1% |
| Sodium | 203.4mg | 9% |
| Total Carbohydrate | 23.2g | 8% |
| Dietary Fiber | 1g | 4% |
| Sugars | 2.2g | – |
| Protein | 3.7g | 7% |
Note: Nutritional information is an estimate and may vary based on specific ingredients and serving sizes.
Variations & Substitutions
- Whole Wheat Sandwich Bread: Substitute up to half of the bread flour with whole wheat flour for a nuttier flavor and added fiber.
- Herb-Infused Bread: Add 1-2 tablespoons of your favorite dried herbs (such as rosemary, thyme, or oregano) to the dough during the mixing process.
- Sweet Sandwich Bread: Increase the amount of honey to 1/4 cup for a slightly sweeter bread, perfect for French toast or peanut butter and jelly sandwiches.
- Dairy-Free Bread: Replace the milk with a non-dairy alternative like almond milk, soy milk, or oat milk.
- Seed Bread: Add 1/4 cup of mixed seeds (such as sesame, poppy, sunflower, and flax seeds) to the dough.
FAQs (Frequently Asked Questions)
Q: My bread didn’t rise properly. What could have gone wrong?
A: There are several possible reasons. Ensure your yeast is fresh and properly activated, the liquid temperatures are correct, and the rising environment is warm enough. Also, avoid using expired flour.
Q: How do I prevent the crust from getting too dark?
A: If the crust is browning too quickly, tent the loaves with foil during the last 10-15 minutes of baking.
Q: Can I use instant yeast instead of active dry yeast?
A: Yes, you can. You can mix instant yeast directly with the flour, skipping the proofing step.
Q: Is it necessary to knead the dough for 10 minutes?
A: Kneading is essential for developing the gluten, which gives the bread its structure. However, you can use a stand mixer with a dough hook to reduce the kneading time to about 5-7 minutes.
Q: Can I freeze the dough instead of baking it right away?
A: Yes, you can freeze the dough after the first rise. Punch it down, shape it into loaves, and wrap them tightly in plastic wrap. Thaw in the refrigerator overnight before allowing it to rise again and baking as directed.
Final Thoughts
Making your own sandwich bread is a truly rewarding experience. It may seem intimidating at first, but with a little patience and attention to detail, you’ll be enjoying warm, homemade bread in no time. This recipe is a fantastic starting point, and I encourage you to experiment with different variations and flavors to create your own signature loaf. Don’t be afraid to share your baking triumphs (and occasional learning experiences!) with fellow bread enthusiasts. And why not try it with a homemade soup for the ultimate comfort food experience? Happy baking!