
Perfect Turkey in an Electric Roaster Oven
The aroma of a roasting turkey is, for me, the quintessential scent of the holidays. It instantly transports me back to my grandmother’s bustling kitchen, where she orchestrated a symphony of culinary delights. I remember the nervous excitement of being tasked with basting the bird, and the immense satisfaction of witnessing the golden-brown masterpiece emerge from the oven, ready to grace our family table. While her oven was a classic, a roaster oven is also a great option, and I’m excited to share my tried-and-true tips for achieving a perfectly moist and beautifully roasted turkey using an electric roaster oven.
Recipe Overview
- Prep Time: 15 minutes
- Cook Time: 4 hours 5 minutes (approximate, varies with size)
- Total Time: 4 hours 20 minutes (approximate, including resting time)
- Servings: 18
- Yields: 1 Turkey
- Dietary Type: Varies (depending on stuffing)
Ingredients
- 1 whole turkey, thawed (up to 20 lbs)
- ¼ cup olive oil or ¼ cup butter
- 1 teaspoon seasoning salt
- 1 teaspoon poultry seasoning
- ½ teaspoon pepper
Equipment Needed
- Electric Roaster Oven
- Roaster Oven Insert Pan with Rack
- Wired Meat Thermometer (highly recommended)
- Foil
Instructions
-
Begin by removing the insert pan from the roaster oven and preheating the roaster to its highest setting. If your model goes up to 500°F, use that temperature. Otherwise, use 450°F.
-
Important: Do not wash the turkey! According to the USDA, washing it can potentially spread salmonella. Instead, sprinkle salt inside the cavities.
-
If you plan to stuff the turkey, prepare your stuffing immediately before roasting. Don’t pre-stuff the turkey in advance. A general guideline is to use about ¾ cup of stuffing per pound of turkey. Tossing in a few pieces of cut fruit or herbs is not considered ‘stuffing’ in this context.
-
Rub the entire turkey with olive oil or butter. This will help the skin crisp up nicely.
-
Now, “doctor up” your bird with whatever seasonings you prefer. I personally always use poultry seasoning for that classic Thanksgiving flavor.
-
Finish by generously sprinkling the turkey with seasoning salt and black pepper.
-
I strongly recommend using a wired thermometer so you can monitor the turkey’s internal temperature without needing to lift the lid and let heat escape. Your turkey will likely be done sooner than the estimated cooking time, so keep a close eye on the thermometer. If you’re using a pop-up thermometer, be aware that they can sometimes stick, so it’s best to use two of them for added assurance.
-
Place the rack into the insert pan, making sure the handles are facing upwards. Then, carefully place the turkey on top of the rack inside the insert pan.
-
Important: Do not add water to the pan.
-
Put the insert pan with the turkey back into the roasting pan. If your roaster oven doesn’t have an insert pan, that’s okay; just be extra cautious when placing the turkey into the hot oven to avoid burning your hands on the sides.
-
Cover the roaster oven securely with its lid.
-
Roast the turkey at the highest temperature setting (450°F or 500°F, depending on your roaster) for 30 minutes. This initial high-heat sear, along with the butter or oil and seasonings, will ensure that the skin becomes beautifully browned and crispy.
-
After the initial 30 minutes, reduce the oven temperature to 325°F.
-
The turkey will essentially self-baste during cooking, as long as you avoid lifting the lid. There’s no need to baste it every 20 minutes like you would in a conventional oven. Do not lift the lid during the cooking time unless absolutely necessary! Opening the lid causes the roaster oven to lose heat, which will significantly increase the overall cooking time. The roaster oven is designed to retain moisture, ensuring the turkey doesn’t come out steamed, like some might think.
-
Refer to a cooking time guide for estimated roasting times based on the turkey’s weight. Remember, it’s always better to check the internal temperature rather than relying solely on estimated times.
-
Important: The final safe internal temperature for a cooked turkey is 180°F in the thigh and 165°F in the breast and stuffing (if you’ve stuffed the turkey). The juices should run clear, not pink, when the thigh is pierced.
-
Start checking the turkey’s temperature early. I recommend beginning about an hour before the estimated cooking time is up. Your turkey will likely be done sooner than expected. If you’re using a pop-up thermometer, check by briefly lifting the lid to minimize heat loss. If needed, check again after another 30 minutes, but it’s unlikely you’ll need to do so. It’s perfectly fine to let the turkey roast for a bit longer; this method won’t dry it out, even if it cooks for an extra half hour.
-
Once the turkey reaches the correct internal temperature, carefully remove it from the roaster oven.
-
Tent the turkey loosely with foil and let it rest for 20 minutes. This resting period allows the juices to redistribute throughout the meat, resulting in a more tender and flavorful turkey.
-
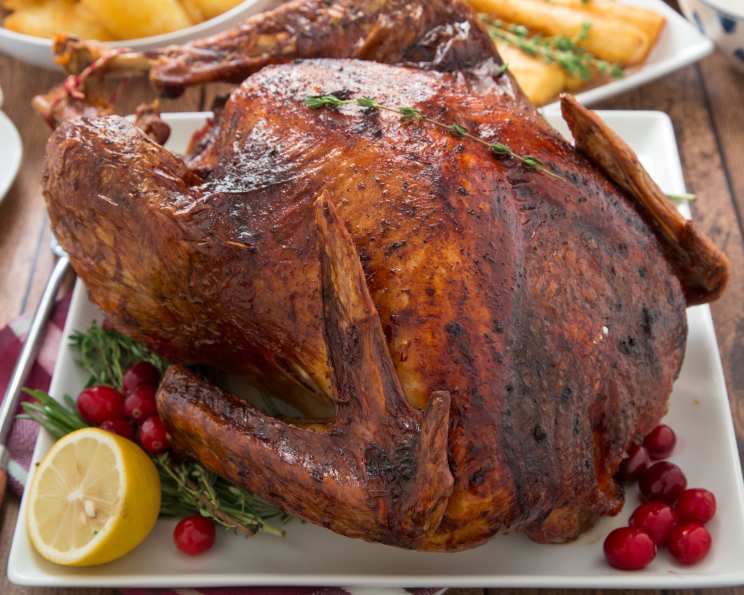
Carve and serve.
Expert Tips & Tricks
- Dry Brining: Consider dry brining the turkey 12-24 hours before roasting. This involves rubbing the turkey with salt and spices, then letting it sit uncovered in the refrigerator. Dry brining enhances the turkey’s flavor and helps it retain moisture during cooking.
- Aromatic Infusion: Place aromatic vegetables like onions, carrots, and celery in the bottom of the roaster pan. These vegetables will add flavor to the drippings and create a delicious aroma while the turkey roasts.
- Crispy Skin Boost: For extra crispy skin, increase the oven temperature to 400°F for the last 15-20 minutes of cooking. Monitor the turkey closely to prevent burning.
- Gravy Gold: Save the drippings from the roaster pan to make a flavorful gravy. Skim off the excess fat and use the remaining drippings to create a rich and savory gravy.
- Even Cooking: To ensure even cooking, rotate the turkey halfway through the roasting time. This will help the turkey cook evenly and prevent one side from becoming overcooked.
Serving & Storage Suggestions
Serve the turkey hot, carved, and arranged on a platter. Garnish with fresh herbs like parsley or sage for an elegant presentation. Leftover turkey should be cooled completely and stored in an airtight container in the refrigerator for up to 3-4 days. You can also freeze leftover turkey for up to 2-3 months. To reheat, slice the turkey and warm it gently in a skillet with a little broth or gravy, or reheat in a microwave-safe dish.
Nutritional Information
| Nutrient | Amount per Serving | % Daily Value |
|---|---|---|
| Calories | 483 kcal | N/A |
| Fat | 25.9g | 39% |
| Saturated Fat | 6.9g | 34% |
| Cholesterol | 193.8mg | 64% |
| Sodium | 185.3mg | 7% |
| Carbohydrate | 0.1g | 0% |
| Fiber | 0g | 0% |
| Sugars | 0g | 0% |
| Protein | 58.2g | 116% |
Note: Nutritional information is an estimate and may vary based on specific ingredients and preparation methods.
Variations & Substitutions
- Herb Butter: Create an herb butter by combining softened butter with chopped fresh herbs like rosemary, thyme, and sage. Rub the herb butter under the turkey’s skin for added flavor.
- Citrus Infusion: Stuff the turkey cavity with citrus fruits like oranges, lemons, and limes for a bright and aromatic flavor.
- Spicy Turkey: Add a pinch of cayenne pepper or a dash of hot sauce to the seasoning rub for a spicy kick.
- Gluten-Free: Ensure your stuffing and gravy are gluten-free if needed.
- Low Sodium: Use a low-sodium seasoning salt or omit the seasoning salt altogether to reduce the sodium content.
FAQs (Frequently Asked Questions)
Q: Can I use a frozen turkey in an electric roaster oven?
A: It is essential to fully thaw the turkey before cooking it in the roaster oven. Cooking a frozen turkey can lead to uneven cooking and potential food safety issues.
Q: How do I prevent the turkey from drying out in the roaster oven?
A: Avoid lifting the lid during cooking, and ensure the turkey is properly basted with oil or butter. The self-basting effect of the roaster oven helps to keep the turkey moist.
Q: What if my turkey is browning too quickly?
A: If the turkey is browning too quickly, tent it with foil to prevent it from burning.
Q: Can I cook other items in the roaster oven along with the turkey?
A: It’s best to focus solely on the turkey to ensure it cooks evenly and reaches the proper internal temperature. Side dishes can be prepared in a separate oven or on the stovetop.
Q: How long should I let the turkey rest before carving?
A: Allow the turkey to rest for at least 20 minutes before carving. This allows the juices to redistribute throughout the meat, resulting in a more tender and flavorful turkey.
Final Thoughts
There you have it – a perfectly roasted turkey, made easily in your electric roaster oven! This is a method that will give you great results every time. Don’t be intimidated; follow these steps, and you’ll be rewarded with a flavorful and moist turkey that will be the star of your holiday meal. I hope this recipe becomes a cherished part of your holiday traditions. If you try this method, please let me know your results! Happy cooking, and happy Thanksgiving!