
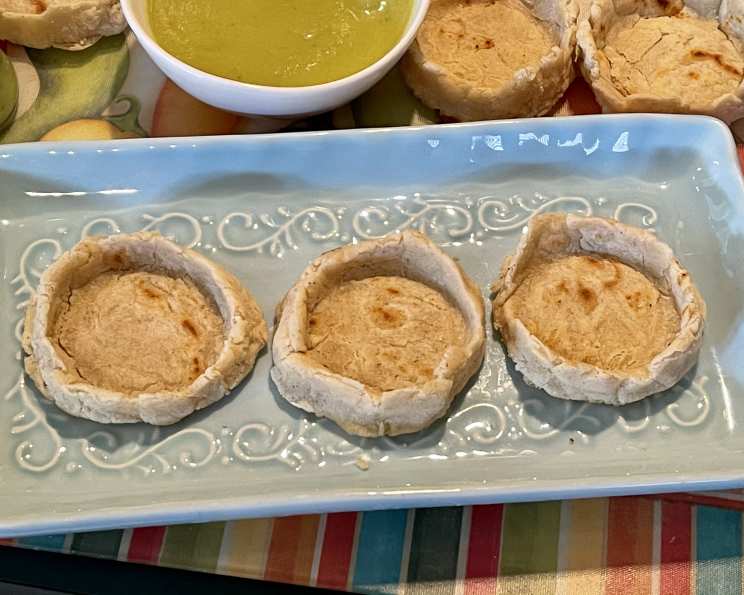
Picadas: A Taste of Mexican Street Food at Home
The sizzle of masa hitting a hot comal, the earthy aroma of corn mingling with melting cheese and spicy salsa… it transports me back to my time spent in Oaxaca. Every afternoon, the town square would transform into a bustling marketplace, overflowing with the vibrant colors and flavors of authentic Mexican cuisine. And amidst the array of tantalizing treats, the humble picada always stood out – a simple yet deeply satisfying pinched masa tartlet, bursting with savory toppings. Each bite was a little celebration. Now, I’m excited to share this taste of Mexico with you, from my kitchen to yours.
Recipe Overview
- Prep Time: 30 minutes
- Cook Time: 15 minutes
- Total Time: 45 minutes
- Servings: 6-8
- Yields: 20-22 Picadas
- Dietary Type: Vegetarian (can be made gluten-free)
Ingredients
- 1 teaspoon salt, to taste
- 1 lb masa harina flour, fresh or reconstituted by mixing 2 cups masa harina with about 1 cup plus 2 tablespoons warm water (Masa Harina is made by Quaker Oats and other companies)
- ½ cup lard or ½ cup vegetable shortening
For the toppings:
- 1 cup any salsa or 1 cup green chili salsa
- 1 cup guacamole
- 2 cups shredded cooked chicken (optional, for non-vegetarian)
- 8 ounces queso fresco, crumbled
- 1 small white onion, finely chopped
Equipment Needed
- Mixing bowl
- Griddle or large cast-iron skillet
- Baking sheets
- Damp cloth
- Basket lined with tea towels
- Small skillet or saucepan
- Kitchen tongs
- Paper towels
Instructions
-
Prepare the Masa: In a large mixing bowl, thoroughly work the salt into the masa harina.
-
Form the Dough Balls: Shape the salted masa into approximately 20 to 22 walnut-sized balls.
-
Press into Rounds: Using a tortilla press or your hands, gently press each ball into rounds that are about 3 inches in diameter and 1/8-inch thick. Aim for uniform thickness to ensure even cooking.
-
Rest the Rounds: As you shape the rounds, arrange them side by side (do not stack) on baking sheets. Cover them with a damp cloth to prevent them from drying out. This is crucial for maintaining their pliability.
-
Heat the Griddle: Lightly grease a griddle or a large cast-iron skillet. Heat it over medium-high heat. The griddle is ready when a drop of water sizzles immediately upon contact.
-
Prepare the Holding Basket: Have a basket lined with clean tea towels ready near the griddle. These towels will keep the picadas warm and pliable after they’re cooked, making them easier to pinch.
-
Cook the Masa Rounds: Work quickly, as the masa will only be supple enough to shape for a short time after cooking. Place 2 of the prepared masa rounds on the hot griddle.
-
First Side: Cook for approximately 1 ½ minutes, or until the edges start to shrink away slightly from the pan and the masa loses its raw appearance.
-
Second Side: Turn the rounds and cook the other side for another 1 to 1 ½ minutes.
-
Pinch the Edges: Immediately transfer the cooked rounds to a plate or work surface. While they are still hot and pliable, quickly pinch up the edges of each round to create a slightly raised rim, forming a small tartlet shape. This is the defining characteristic of a picada.
-
Keep Warm: Place the pinched picadas in the prepared basket and cover them snugly with the tea towels to keep them warm and flexible.
-
Repeat: Continue cooking the remaining masa rounds in batches of two, repeating steps 7-11 until all the rounds are cooked and pinched.
-
Prepare for Frying: Line a baking sheet with paper towels to drain the excess fat from the fried picadas.
-
Heat the Fat: In a small skillet or saucepan, heat the lard or vegetable shortening over medium heat. The fat should be hot but not quite rippling.
-
Briefly Fry: Using kitchen tongs, carefully slide each picada into the hot fat. Let it cook for only 10 to 20 seconds per side. The goal is to lightly crisp the exterior, not to deeply fry it.
-
Drain: Before the picada starts to brown, lift it out of the hot fat, allowing it to drain well. Place the drained picada on the prepared baking sheet lined with paper towels.
-
Assemble the Picadas: Once all the picadas are fried, it’s time to assemble. Layer them generously with guacamole, cooked chicken (if using), and your choice of salsa.
-
Garnish: Scatter some of the crumbled queso fresco over the salsa. If desired, top with some finely chopped white onion for added flavor and texture.
-
Serve Immediately: Serve the picadas immediately while they are still warm and the toppings are fresh.
Expert Tips & Tricks
- Masa Hydration: The consistency of your masa is key. If it’s too dry, the rounds will crack. If it’s too wet, they’ll be sticky and difficult to work with. Adjust the water carefully, adding it a tablespoon at a time until you achieve a play-dough-like texture.
- Griddle Temperature: A too-hot griddle will cause the picadas to burn before they’re cooked through. A too-cool griddle will result in pale, doughy picadas. Experiment to find the sweet spot on your stove.
- Pinching Technique: Don’t be afraid to be firm when pinching the edges. You want to create a defined rim that will hold the toppings. If the masa cools too much, it will become difficult to pinch, so work quickly.
- Fat Temperature for Frying: The hot fat step is all about crisping the outside, not fully frying. Keeping the temp hot and frying for a short time will get the right crisp without making them oily.
Serving & Storage Suggestions
Picadas are best served immediately while the masa is still warm and crispy, and the toppings are fresh. Arrange them on a platter for a colorful and inviting presentation.
Leftover picadas can be stored in an airtight container in the refrigerator for up to 2 days. However, the masa will soften over time. To reheat, you can bake them in a preheated oven at 350°F (175°C) for a few minutes to crisp them up slightly. Reheating in a skillet over medium heat also works. Note that the toppings may become slightly soggy upon reheating. Freezing is not recommended as it can significantly alter the texture of the masa.
Nutritional Information
| Nutrient | Amount per Serving | % Daily Value |
|---|---|---|
| Calories | 157.4 kcal | N/A |
| Calories from Fat | 62 g | 40% |
| Total Fat | 6.9 g | 10% |
| Saturated Fat | 2.4 g | 11% |
| Cholesterol | 15.4 mg | 5% |
| Sodium | 205.7 mg | 8% |
| Total Carbohydrate | 18.5 g | 6% |
| Dietary Fiber | 2.4 g | 9% |
| Sugars | 0.7 g | 2% |
| Protein | 5.8 g | 11% |
Note: Nutritional information is an estimate and may vary based on specific ingredients and portion sizes.
Variations & Substitutions
- Vegetarian/Vegan: Omit the chicken and use a variety of vegetable toppings such as grilled corn, black beans, roasted peppers, or sauteed mushrooms. Ensure your guacamole is vegan (some recipes include honey).
- Spicy: Add finely chopped jalapeños or a dash of hot sauce to your salsa or guacamole for an extra kick.
- Gluten-Free: Picadas are naturally gluten-free as long as you use pure masa harina and ensure your toppings are also gluten-free.
FAQs (Frequently Asked Questions)
Q: Can I make the masa ahead of time?
A: Yes, you can prepare the masa dough up to a day in advance. Wrap it tightly in plastic wrap and store it in the refrigerator. Let it come to room temperature before shaping.
Q: What if my masa is too dry and cracking?
A: Gradually add more warm water, one tablespoon at a time, kneading until the masa becomes pliable and smooth.
Q: Can I use a tortilla press instead of pressing by hand?
A: Absolutely! A tortilla press will give you consistent, evenly shaped rounds. Line the press with plastic wrap or parchment paper to prevent sticking.
Q: What other toppings can I use?
A: The possibilities are endless! Try using shredded pork, carnitas, chorizo, refried beans, or any combination of your favorite Mexican flavors.
Q: Why are my picadas tough after cooking?
A: Overcooking the masa can make it tough. Be sure to cook them for just the right amount of time on each side, and keep them warm under a towel to maintain their pliability.
Final Thoughts
Picadas are more than just a snack; they’re a delicious and interactive way to experience the vibrant flavors of Mexican cuisine. Don’t be intimidated by the process – with a little practice, you’ll be whipping up these tasty tartlets in no time. Gather your family and friends, set out a variety of toppings, and let everyone customize their own picadas. And, don’t be shy, share your favorite topping combinations! Pair these with a refreshing agua fresca or a cold Mexican beer for a complete and authentic experience. ¡Buen provecho!