
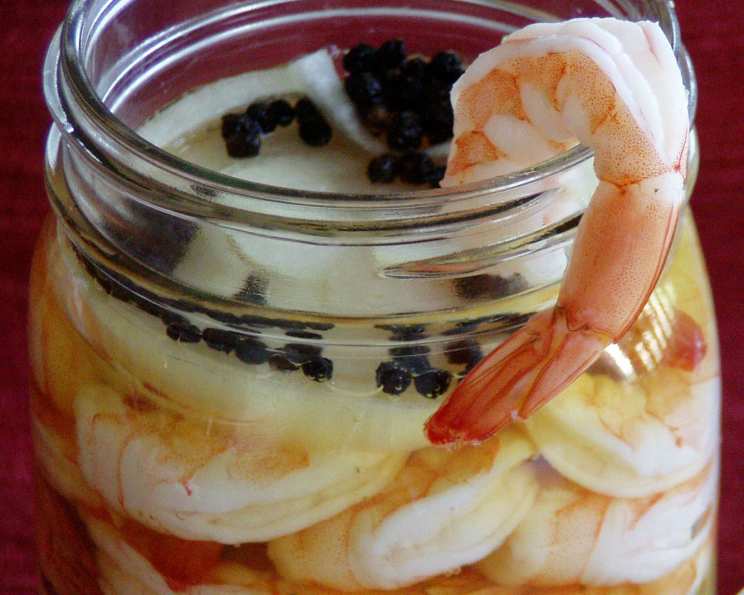
Paula Deen’s Irresistible Pickled Shrimp: A Culinary Dive
I can almost smell the tangy brine just thinking about it! Growing up, summer meant family reunions down in Savannah, Georgia. And no family gathering was complete without a massive jar of Pickled Shrimp, a recipe, I later learned, made famous by the queen of Southern cuisine herself, Paula Deen. The adults would gather on the porch, sipping sweet tea and snacking on these succulent, slightly spicy shrimp, while the kids chased fireflies in the yard. To me, that jar was a symbol of family, warmth, and pure Southern comfort. This recipe captures that very essence, and I’m excited to share it with you.
Recipe Overview
- Prep Time: 30 minutes
- Cook Time: 5 minutes
- Total Time: 36 hours, 35 minutes (includes chilling time)
- Servings: 10
- Yield: Approximately 1 1/2 quart jar
- Dietary Type: Gluten-Free, Dairy-Free
Ingredients
- 7 1/2 cups water
- 2 1/2 lbs unpeeled fresh shrimp
- 3 medium onions, sliced
- Fresh ground pepper to taste
- Whole peppercorns to taste
- 4 bay leaves
- 2 whole garlic cloves, peeled
- 1 cup cider vinegar
- 1 tablespoon lemon juice
Equipment Needed
- Large saucepan
- Colander
- Large glass airtight jar (approximately 1 1/2 quarts)
Instructions
-
Begin by bringing the water to a rolling boil in a large saucepan. This initial step is crucial for quickly and efficiently cooking the shrimp without overcooking them.
-
Once the water is boiling vigorously, carefully add the unpeeled fresh shrimp to the saucepan. Cook the shrimp until they just turn pink. This usually takes no more than 3 to 5 minutes. Overcooking the shrimp will result in a rubbery texture, which we definitely want to avoid.
-
Immediately after the shrimp are cooked, drain them well in a colander. Then, rinse them thoroughly under cold water. This stops the cooking process and helps to keep the shrimp tender and prevents them from becoming tough.
-
Once the shrimp are cool enough to handle, peel and devein them, leaving the tails on. The tails add a nice visual appeal and provide a convenient handle for enjoying the pickled shrimp.
-
Now, prepare your large glass airtight jar (about 1 1/2 quarts). We’ll start layering the ingredients to create a visually appealing and flavorful masterpiece. Begin by adding a layer of the peeled and deveined shrimp to the bottom of the jar.
-
Next, add a layer of the sliced onions on top of the shrimp. The onions will infuse the shrimp with a subtle sweetness and provide a pleasant textural contrast.
-
Sprinkle the shrimp and onion layers with fresh ground black pepper and whole peppercorns to taste. These spices add a wonderful warmth and subtle heat to the pickled shrimp.
-
Add a bay leaf and a garlic clove on top of the spice layer. The bay leaf and garlic clove contribute a deeper, more complex flavor profile to the brine.
-
Repeat steps 5-8, layering the shrimp, onions, black pepper, peppercorns, bay leaf, and garlic cloves until the jar is about 2/3 full. Be sure to distribute the ingredients evenly throughout the jar.
-
Pour the cider vinegar and lemon juice over the layers until the jar is almost full. The cider vinegar provides the essential acidity for pickling, while the lemon juice adds a bright, citrusy note. Leave some space at the top of the jar to allow for expansion and easy shaking.
-
Seal the jar tightly with an airtight lid. This is essential to prevent spoilage and ensure that the shrimp are properly pickled.
-
Chill the jar in the refrigerator for at least a few days, up to two weeks. This allows the flavors to meld together and the shrimp to fully absorb the pickling brine.
-
Every other day or so, gently turn the jar upside down to remix the ingredients. This ensures that all of the shrimp are evenly exposed to the brine and that the flavors are well-distributed.
-
Serve the pickled shrimp chilled as an appetizer.
Expert Tips & Tricks
- Don’t overcook the shrimp! This is the single most important factor in achieving the perfect texture. They should be just pink and still slightly pliable.
- Use high-quality vinegar. The better the vinegar, the better the flavor. Opt for a good quality cider vinegar with a balanced acidity.
- Adjust the spice level. If you prefer a spicier pickled shrimp, add a pinch of red pepper flakes or a dash of hot sauce to the brine.
- Make it ahead. This recipe is perfect for making ahead of time. In fact, the longer it sits, the better the flavors develop.
Serving & Storage Suggestions
Serve your pickled shrimp chilled in a decorative bowl or directly from the jar. Garnish with fresh parsley or a lemon wedge for an extra touch of elegance. They are fantastic on their own, or served with crackers, crusty bread, or cocktail forks for easy grabbing.
Store any leftover pickled shrimp in the refrigerator in the same airtight jar. They will keep for up to two weeks, and the flavor will actually improve over time. While it’s best served chilled, it’s crucial to keep the jar refrigerated after the pickling process is complete. Do not leave at room temperature for more than 2 hours. Freezing is not recommended as it can alter the texture of the shrimp.
Nutritional Information
| Nutrient | Amount per Serving | % Daily Value |
|---|---|---|
| Calories | 100.2 kcal | N/A |
| Calories from Fat | 10 g | 11% |
| Total Fat | 1.2 g | 1% |
| Saturated Fat | 0.1 g | 0% |
| Cholesterol | 143.2 mg | 47% |
| Sodium | 651.4 mg | 27% |
| Total Carbohydrate | 4.7 g | 1% |
| Dietary Fiber | 0.6 g | 2% |
| Sugars | 1.5 g | N/A |
| Protein | 15.9 g | 31% |
Variations & Substitutions
- Spicy Pickled Shrimp: Add sliced jalapeños or a pinch of cayenne pepper to the brine for an extra kick.
- Herb Infused Pickled Shrimp: Incorporate fresh herbs like dill, thyme, or rosemary into the layers for a more complex flavor profile.
- Garlic Lovers Pickled Shrimp: Increase the amount of garlic cloves for a more intense garlic flavor. You can even roast the garlic cloves before adding them to the jar for a sweeter, mellower garlic flavor.
- Use different types of vinegar: While cider vinegar is classic, try white wine vinegar or even rice vinegar for a slightly different tang.
FAQs (Frequently Asked Questions)
Q: Can I use frozen shrimp for this recipe?
A: While fresh shrimp is always preferable, you can use frozen shrimp. Just be sure to thaw them completely before cooking and pat them dry to remove any excess moisture.
Q: How long does it take for the pickled shrimp to be ready?
A: It’s best to let the shrimp pickle for at least 48 hours, but they’re even better after a few days. The longer they sit, the more flavorful they become.
Q: Can I reuse the brine?
A: It’s not recommended to reuse the brine, as it will have absorbed flavors and bacteria from the shrimp.
Q: What kind of jar should I use?
A: A glass jar with an airtight lid is essential for pickling. Mason jars or repurposed glass jars work well.
Q: Can I add other vegetables besides onions?
A: Yes, you can add other vegetables like sliced bell peppers or celery for added flavor and texture.
Final Thoughts
So, there you have it – Paula Deen’s Pickled Shrimp recipe, a true taste of Southern hospitality. It’s more than just a recipe; it’s a connection to cherished memories and a celebration of simple, delicious flavors. I encourage you to give this recipe a try and experience the joy of sharing it with your loved ones. Don’t hesitate to experiment with different variations and find your own perfect twist. Serve it alongside some cheesy grits or a refreshing watermelon salad for a truly unforgettable Southern feast. And most importantly, enjoy the process and savor every bite!