
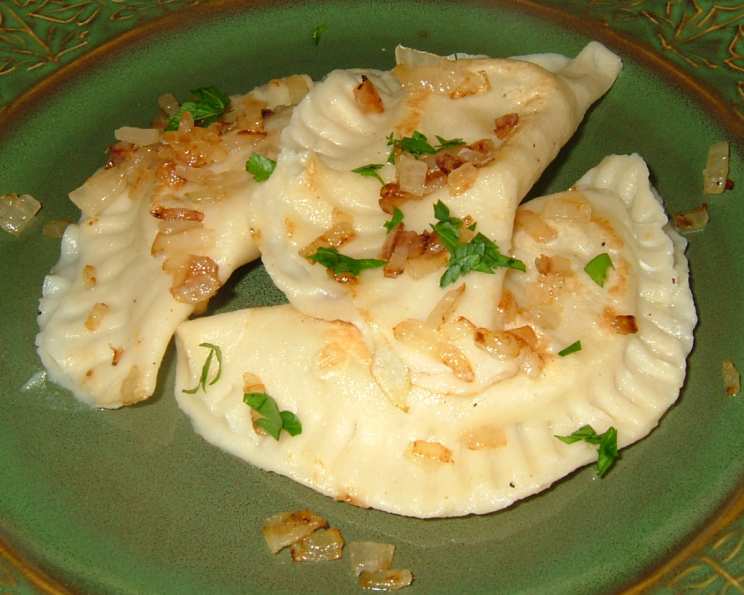
The Perfect Pierogi and Vareniki Dough: A Culinary Journey
The first time I tasted a truly exceptional pierogi, it was at my grandmother’s kitchen table. The aroma of browned butter and caramelized onions hung heavy in the air, a comforting blanket against the blustery autumn day. But it wasn’t just the savory filling that captivated me; it was the dough itself – tender, almost melt-in-your-mouth, yet sturdy enough to hold its precious cargo without bursting. That day, I vowed to unlock the secrets to her legendary pierogi dough, a quest that has led me to countless experiments and joyful discoveries in my own kitchen. This recipe is the culmination of that journey, a dough that’s both easy to work with and delivers the perfect texture for your pierogi and vareniki dreams.
Recipe Overview
- Prep Time: 20 minutes
- Cook Time: 30 minutes (includes resting time)
- Total Time: 50 minutes
- Yield: Approximately 48 pierogies or 32 vareniki
- Dietary Type: Vegetarian (can be made vegan by substituting the egg)
Ingredients
- 1 cup all-purpose flour, plus additional for kneading and rolling
- ¾ cup cake flour (not self-rising)
- 2 large eggs
- ¾ teaspoon salt
- ¼ cup water
Equipment Needed
- Large mixing bowl
- Fork
- Clean work surface
- Rolling pin
- Plastic wrap
- Pot for boiling
Instructions
-
In a large mixing bowl, stir together the all-purpose flour and cake flour. The cake flour is the secret ingredient that gives this dough its tender texture, so don’t skip it! Make sure both flours are well combined before moving to the next step.
-
Create a well in the center of the flour mixture. This well will hold the wet ingredients, allowing for a gradual and even incorporation.
-
Add the eggs, salt, and water to the well. Using a fork, gently stir together these wet ingredients within the well, being careful not to disturb the flour mixture just yet.
-
Begin to gradually incorporate the flour into the wet ingredients, still using the fork. Continue stirring in a circular motion, slowly pulling flour from the sides of the well and mixing it into the egg mixture.
-
Keep stirring until a soft, shaggy dough begins to form. It will look a bit messy at this stage, but don’t worry – that’s perfectly normal.
-
Transfer the dough to a lightly floured work surface. Lightly flour your hands as well.
-
Begin to knead the dough. Add only as much additional all-purpose flour as needed to prevent the dough from sticking to the surface or your hands. Remember, a slightly sticky dough is better than a dry one!
-
Continue kneading for about 8 minutes, until the dough becomes smooth and elastic. It should feel soft and pliable to the touch. The kneading process develops the gluten in the flour, which gives the pierogi their characteristic chewy texture.
-
Form the dough into a ball.
-
Cover the dough tightly with plastic wrap. This prevents the dough from drying out and allows the gluten to relax, resulting in a more tender final product.
-
Let the dough rest at room temperature for at least 30 minutes. This resting period is crucial! It allows the gluten to relax, making the dough easier to roll out and preventing it from shrinking back during shaping. You can let it rest for up to 2 hours.
-
After the resting period, your dough is ready to be rolled, filled, and shaped into delicious pierogi or vareniki!
Expert Tips & Tricks
- The cake flour is key: Don’t be tempted to substitute it entirely with all-purpose flour. Cake flour has a lower protein content, which results in a more tender dough.
- Don’t over-knead: Over-kneading will result in a tough pierogi. Knead just until the dough is smooth and elastic.
- Resting is essential: Give the dough ample time to rest. This allows the gluten to relax, making it easier to work with and preventing shrinkage.
- Rolling out the dough: Roll the dough out thinly, but not so thin that it tears easily. Aim for about 1/8 inch thickness.
- Sealing the edges: Make sure to tightly seal the edges of your pierogi to prevent the filling from leaking out during boiling. A little water brushed along the edges can help with sealing.
- Freezing pierogi: Pierogi freeze beautifully! After shaping, place them on a parchment-lined baking sheet and freeze until solid. Then, transfer them to a freezer bag or container. They can be cooked directly from frozen.
- Vegan option: You can substitute the eggs with a flax egg (1 tablespoon ground flaxseed mixed with 3 tablespoons water, let sit for 5 minutes to thicken) for a vegan version. The texture may be slightly different, but still delicious!
Serving & Storage Suggestions
Pierogi and vareniki are best served warm, right after boiling. They are traditionally served with a variety of toppings, such as:
- Browned butter and caramelized onions: A classic and irresistible combination.
- Sour cream: Adds a tangy and creamy element.
- Fried bacon or pancetta: For a smoky and savory flavor.
- Chopped fresh herbs (chives, parsley, dill): Adds a pop of freshness and color.
Storage:
- Cooked pierogi: Can be stored in the refrigerator for up to 3 days in an airtight container. Reheat by pan-frying, boiling, or microwaving.
- Uncooked pierogi (filled): Best cooked immediately, but can be stored in the refrigerator for up to 24 hours.
- Frozen pierogi: Can be stored in the freezer for up to 3 months. Cook directly from frozen.
Nutritional Information
Please note that nutritional information is an estimate and can vary depending on the specific ingredients used and portion sizes.
| Nutrient | Amount per Serving | % Daily Value |
|---|---|---|
| Calories | 75 kcal | 4% |
| Total Fat | 1.5g | 2% |
| Saturated Fat | 0.5g | 3% |
| Cholesterol | 25mg | 8% |
| Sodium | 80mg | 3% |
| Total Carbohydrate | 13g | 5% |
| Dietary Fiber | 0.5g | 2% |
| Sugars | 0g | 0% |
| Protein | 2g | 4% |
Variations & Substitutions
- Gluten-Free Pierogi: Substitute the all-purpose and cake flour with a high-quality gluten-free all-purpose flour blend. You may need to add a bit more water to achieve the right consistency.
- Whole Wheat Pierogi: Replace up to half of the all-purpose flour with whole wheat flour for a nuttier flavor and added fiber.
- Potato Flour Pierogi: Replace up to a quarter of the all-purpose flour with potato flour for an even more tender and delicate dough.
- Flavored Dough: Add herbs, spices, or vegetable purees to the dough for a unique flavor profile. For example, add finely chopped dill for dill pierogi, or pureed beets for vibrant pink pierogi.
FAQs (Frequently Asked Questions)
Q: Can I make the dough ahead of time?
A: Yes! The dough can be made up to 2 hours in advance. Wrap it tightly in plastic wrap and store it in the refrigerator. Allow it to come to room temperature before rolling.
Q: Why is my dough so sticky?
A: It’s normal for the dough to be slightly sticky. Resist the urge to add too much flour, as this will make the pierogi tough. Just use enough flour to prevent it from sticking to the surface and your hands while kneading.
Q: How do I prevent the pierogi from bursting while boiling?
A: Make sure to tightly seal the edges of the pierogi. Also, avoid overcrowding the pot when boiling. Cook in batches to ensure even cooking.
Q: Can I use different fillings for pierogi and vareniki?
A: Absolutely! The possibilities are endless. Popular fillings include potato and cheese, sauerkraut and mushroom, meat, fruit (like blueberries or cherries), and sweet cheese.
Q: My pierogi are sinking to the bottom of the pot. Are they cooked?
A: Pierogi are done when they float to the surface. Once they float, cook them for another 2-3 minutes to ensure the filling is heated through.
Final Thoughts
Now it’s your turn to embark on this culinary adventure! Don’t be intimidated; this dough is surprisingly forgiving. Experiment with different fillings, toppings, and variations to create your own signature pierogi or vareniki. And most importantly, share them with loved ones – because nothing tastes better than homemade comfort food enjoyed with good company. I encourage you to try this recipe and would love to hear about your experiences and creations! Perhaps pair them with a crisp, dry white wine or a hearty beet soup for a complete and satisfying meal. Happy cooking!